Tag Archives: choose high-quality materials

how-to-make-wooden-coasters-a-simple-diy-guide-2

How to Make Wooden Coasters: A Simple DIY Guide

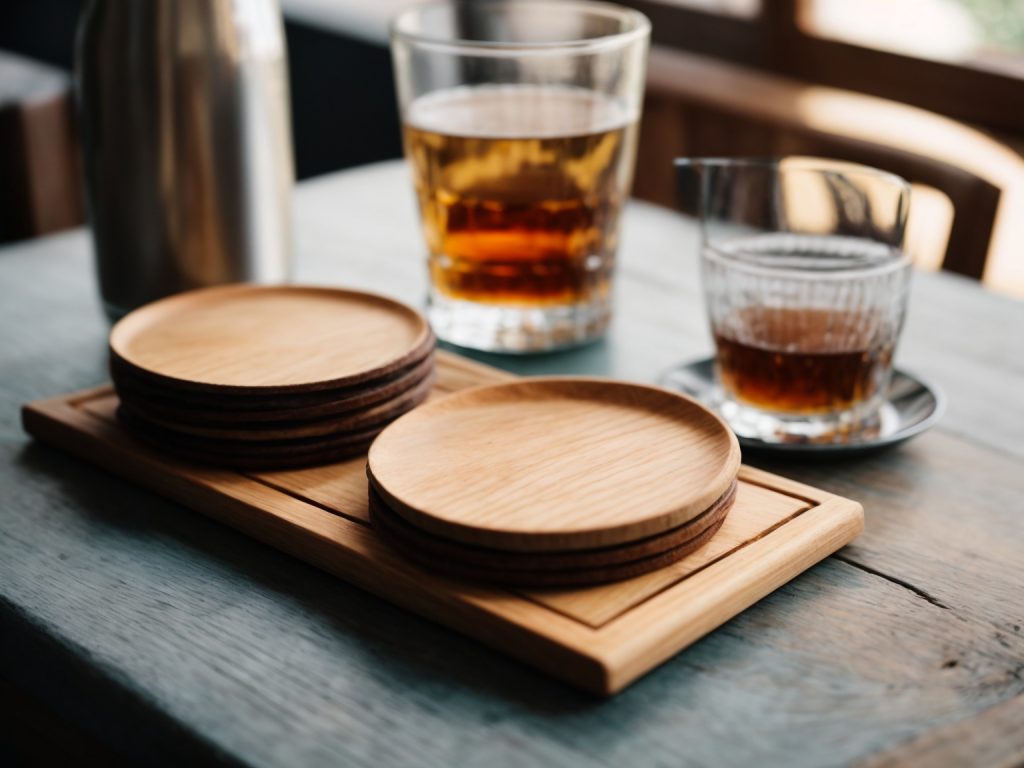
Looking for a fun and easy DIY project that can add a personal touch to your home decor? Look no further than wooden coasters! Not only are they functional, but they can also add a rustic and charming feel to any room. Plus, they make great handmade gifts for friends and family.

If you’re new to woodworking, don’t worry – making your own wooden coasters is a beginner-friendly project that requires minimal tools and materials. With just a few hours of work and some basic woodworking skills, you can create a set of beautiful and practical coasters that you’ll be proud to display in your home. Whether you’re looking to spruce up your own living space or create thoughtful gifts for loved ones, making wooden coasters is a fun and rewarding project that anyone can tackle.

Understanding Wood Types

how-to-make-wooden-coasters-a-simple-diy-guide-2

When it comes to making wooden coasters, choosing the right type of wood is crucial for the durability and longevity of your project. In this section, we will discuss the differences between softwood and hardwood, and provide some guidance on how to choose the right wood for your coaster-making project.

Softwood Vs Hardwood

Softwood and hardwood are the two main categories of wood. Softwood comes from coniferous trees, such as pine, cedar, and spruce, while hardwood comes from deciduous trees, such as oak, maple, and cherry.

Softwood is generally less dense and less expensive than hardwood. It is also easier to work with, making it a popular choice for beginners. However, softwood is more prone to dents, scratches, and other types of damage.

Hardwood, on the other hand, is denser and more durable than softwood. It is also more expensive and harder to work with. However, hardwood is less prone to damage and can last for decades with proper care.

Choosing the Right Wood

When choosing the right wood for your coaster-making project, consider the following factors:

  • Moisture resistance: Coasters are often used to protect furniture from water rings, so it’s important to choose a wood that can withstand moisture. Some woods, such as cedar and redwood, are naturally resistant to moisture, while others, such as pine and spruce, are more prone to warping and cracking when exposed to water.
  • Heat resistance: Coasters are also used to protect furniture from heat damage, so it’s important to choose a wood that can withstand high temperatures. Hardwoods such as oak and maple are more heat-resistant than softwoods such as pine and cedar.
  • Aesthetics: Wood comes in a variety of colors and grain patterns, so choose a wood that matches your personal style and complements your home decor.

Overall, hardwood is the best choice for making coasters that are both durable and attractive. However, if you are a beginner or on a tight budget, softwood can be a good option as well. Just be sure to choose a wood that is appropriate for your needs and take proper care of your coasters to ensure their longevity.

Gathering Tools and Materials

When it comes to making wooden coasters, having the right tools and materials is key to achieving a professional-looking finished product. Here are the essential tools and materials you will need:

Essential Woodworking Tools

To create wooden coasters, you will need the following woodworking tools:

Tool Description
Saw A saw is necessary to cut the wood to size. A jigsaw or circular saw is recommended for beginners.
Sandpaper Sandpaper is used to smooth out rough edges and create a smooth surface. Start with a coarse grit (80-100) and work up to a finer grit (220-240).
Drill A drill is needed to make holes for decorative elements or to attach felt pads to the bottom of the coaster.
Clamps Clamps are useful to hold the wood in place while cutting or sanding.

Safety Equipment

Safety should always be a top priority when working with power tools. Be sure to wear the following safety equipment:

  • Safety glasses or goggles to protect your eyes from flying debris
  • Earplugs or earmuffs to protect your ears from loud noise
  • Dust mask or respirator to protect your lungs from sawdust

Wood and Finishing Materials

Choosing the right type of wood is important for creating durable and long-lasting coasters. Some common types of wood used for coasters include oak, maple, and pine. You will also need a protective finish to prevent damage from condensation and hot drinks. Consider using polyurethane or shellac to finish your coasters.

In summary, to make wooden coasters, you will need a saw, sandpaper, drill, clamps, safety equipment, wood, and finishing materials. Always prioritize safety and choose high-quality materials for the best results.

Designing Your Coasters

designing-your-coasters

When it comes to designing your wooden coasters, the possibilities are endless. Whether you want to create a set of coasters that match your home decor or make a unique gift for a loved one, designing your own coasters is a fun and creative process. Here are some tips to help you get started:

Determining Size and Shape

Before you begin designing your coasters, you’ll need to determine the size and shape you want them to be. The size of your coasters will depend on the size of your glasses or mugs, but a typical coaster is around 4 inches in diameter. You can also make square or rectangular coasters if you prefer.

Once you’ve determined the size and shape of your coasters, you’ll need to choose the type of wood you want to use. Hardwoods like oak, maple, and cherry are durable and make great coasters, but you can also use softer woods like pine or cedar if you prefer.

Adding Personal Touches

One of the best things about making your own wooden coasters is that you can add personal touches to make them unique. Here are some ideas to get you started:

  • Wood burning: Use a wood burning tool to create designs or patterns on your coasters. You can also add names or initials to make them personalized.
  • Stenciling: Use stencils to create designs or patterns on your coasters. You can use paint or wood stain to fill in the stencil.
  • Etching: Use a rotary tool to etch designs or patterns into the wood. This method works best on hardwoods.
  • Inlay: Use a router to create a groove in the coaster and fill it with a contrasting wood or resin.

Once you’ve added your personal touches, you’ll need to seal your coasters to protect them from moisture. You can use a clear polyurethane finish or a food-safe wax to seal your coasters.

Designing your own wooden coasters is a fun and easy DIY project that anyone can do. With a little creativity and some basic woodworking skills, you can create a set of coasters that are both functional and beautiful.

Cutting the Wood

When it comes to making wooden coasters, cutting the wood is a crucial step. This section will cover two important sub-sections: Preparing the Wood and Cutting Techniques.

Preparing the Wood

Before you start cutting the wood, you need to make sure it is properly prepared. Here are a few steps to follow:

  • Choose the right type of wood: For coaster-making, it’s best to use hardwoods like maple, oak, or cherry. Softwoods like pine or cedar are not recommended.
  • Measure and mark: Use a ruler or tape measure to measure the wood and mark where you want to make the cuts.
  • Sand the wood: Sand the surface of the wood to remove any rough spots or imperfections.

Cutting Techniques

There are several cutting techniques you can use to make wooden coasters. Here are a few options:

  • Hand saw: A hand saw is a simple and affordable tool that can be used to make straight cuts. It’s a good option if you don’t have access to power tools.
  • Miter saw: A miter saw is a power tool that can make precise cuts at different angles. This is a good option if you want to make angled cuts for your coasters.
  • Table saw: A table saw is a versatile power tool that can make both straight and angled cuts. It’s a good option if you plan on making a large number of coasters.

No matter which cutting technique you choose, it’s important to follow these safety tips:

  • Wear protective eyewear and gloves.
  • Keep your fingers away from the blade.
  • Follow the manufacturer’s instructions for your specific tool.

By following these tips and techniques, you’ll be able to cut your wood with confidence and create beautiful wooden coasters.

Sanding and Finishing

Sanding Basics

Sanding is an essential step in making wooden coasters. It helps to smooth out any roughness on the surface of the wood and ensures that the coasters are even and flat. Here are some basic steps to follow when sanding your wooden coasters:

  1. Start with a coarse grit sandpaper, such as 120, and sand the surface of each coaster. Be sure to sand in the direction of the wood grain to avoid scratches.
  2. Gradually move to finer grit sandpapers, such as 220 and 320, to achieve a smooth surface. Sand each coaster until you are satisfied with the texture.
  3. Use a tack cloth or a soft-bristled brush to remove any dust or debris from the surface of the coasters.

Choosing a Finish

Once you have sanded your wooden coasters, it’s time to choose a finish. A finish not only protects the wood but also enhances its natural beauty. Here are some popular finishes to consider:

  1. Polyurethane: This finish is durable and water-resistant, making it perfect for coasters. It comes in a variety of sheens, from matte to glossy.
  2. Tung oil: This natural finish provides a warm, amber tone to the wood and is easy to apply. It is also water-resistant but may require reapplication over time.
  3. Wax: This finish provides a soft, matte look to the wood and is easy to apply. It is not as water-resistant as other finishes, but it is ideal for indoor use.

When applying a finish, be sure to follow the manufacturer’s instructions and apply it in a well-ventilated area. Use a brush, cloth, or foam applicator to evenly apply the finish to each coaster. Allow the finish to dry completely before using your wooden coasters.

Remember, sanding and finishing your wooden coasters can take time, but the end result is worth it. Your coasters will not only protect your furniture but also add a touch of natural beauty to your home.

Final Touches

Once you have completed making your wooden coasters, it’s time to add some final touches to make them look professional. In this section, we will discuss two important final touches: adding protective pads and packaging and storing.

Adding Protective Pads

Adding protective pads to your wooden coasters will prevent them from scratching surfaces and keep them in good condition for a longer time. You can use self-adhesive felt pads or cork pads, which are available at most hardware stores. Simply cut the pads to the size of the coaster and stick them on the bottom.

Packaging and Storing

Packaging and storing your wooden coasters properly will ensure that they remain in good condition until you are ready to use them or give them as gifts. Here are some tips on how to package and store your coasters:

  • Wrap each coaster in tissue paper or bubble wrap to prevent scratches and damage during transport.
  • Store the coasters in a dry and cool place, away from direct sunlight and moisture.
  • If you are giving the coasters as a gift, consider putting them in a small box or fabric bag for a more professional look.

By following these simple final touches, you can make your wooden coasters look great and last longer.

how-to-build-wooden-steps-a-beginners-guide-2

How to Build Wooden Steps: A Beginner's Guide

Are you looking to add some charm and functionality to your outdoor space? Building wooden steps can be a great way to enhance the look of your yard and provide easy access to different levels of your property. Whether you’re looking to build steps for a deck, patio, or garden, this article will provide you with the basics of how to build wooden steps.

Before you start building, it’s important to prepare the area where the steps will be located. This means removing any shrubs or plants and ensuring the ground is level. You may need to build up low spots with fill dirt so the area slopes away from your house. Once you’ve prepared the area, you’ll need to determine the height and width of the steps. This will depend on the location and purpose of the steps, as well as the materials you’ll be using.

Understanding the Basics of Wooden Steps

how-to-build-wooden-steps-a-beginners-guide-2

When it comes to building wooden steps, there are a few things you need to keep in mind. In this section, we’ll cover the basics of wooden steps, including the types of wood you can use and the safety measures you need to take.

Types of Wood

When it comes to choosing the right type of wood for your steps, there are a few things you need to consider. First, you want to choose a wood that is strong and durable, as your steps will need to support a lot of weight over time. Some of the most popular types of wood for steps include:

  • Cedar: A popular choice for outdoor steps, cedar is a durable and weather-resistant wood that is also resistant to insects and rot.
  • Redwood: Another popular choice for outdoor steps, redwood is a durable and weather-resistant wood that is also resistant to insects and rot.
  • Pressure-treated pine: A popular choice for indoor and outdoor steps, pressure-treated pine is a durable and affordable wood that is treated to resist insects and rot.

When choosing your wood, make sure to choose a type that is appropriate for your climate and the location of your steps.

Safety Measures

When building wooden steps, safety should always be your top priority. Here are a few safety measures you should take:

  • Use a level: Make sure your steps are level and evenly spaced to prevent tripping hazards.
  • Use non-slip treads: Consider using non-slip treads on your steps to prevent slipping, especially if your steps will be used in wet or icy conditions.
  • Install handrails: Handrails can provide additional support and stability when using your steps, especially for children and elderly individuals.
  • Use appropriate tools and equipment: Make sure you have the right tools and equipment for the job, and use them safely and appropriately.

By following these basic guidelines, you can ensure that your wooden steps are safe and durable for years to come.

Tools and Materials Needed

Building wooden steps can be a fun and rewarding DIY project. Before you get started, it’s important to gather all the necessary tools and materials. Here’s what you’ll need:

Tools

  • Circular saw
  • Jigsaw
  • Power drill
  • Hammer
  • Measuring tape
  • Carpenter’s square
  • Level
  • Safety glasses
  • Work gloves

Materials

  • Pressure-treated lumber (2x12s for stringers, 2x6s for treads, and 4x4s for posts)
  • Gravel or crushed stone
  • Concrete mix
  • Galvanized screws or nails
  • Post spikes or concrete anchors

Make sure to choose high-quality materials that are suitable for outdoor use. Pressure-treated lumber is a popular choice because it is durable and resistant to rot and insect damage. You’ll also need gravel or crushed stone to create a stable base for your steps, as well as concrete mix to anchor the posts.

In terms of tools, a circular saw and jigsaw are essential for cutting the lumber to size. A power drill is necessary for drilling pilot holes and attaching the pieces together with screws or nails. A measuring tape and carpenter’s square will help ensure accurate cuts and angles. Don’t forget to wear safety glasses and work gloves to protect yourself while working with power tools.

By gathering all the necessary tools and materials before you start, you’ll be well-prepared to tackle your wooden step project with confidence.

Designing Your Wooden Steps

When building wooden steps, it’s important to consider both functionality and aesthetics. In this section, we’ll cover the key factors to consider when designing your wooden steps.

Step Measurements

Before you start building your wooden steps, you need to measure the area where they will be installed. Here are the key measurements you’ll need to take:

  • Total Rise: Measure the height from the ground to the top of where the steps will end. This will determine the number of steps you need to build.
  • Total Run: Measure the horizontal distance from the bottom of the steps to the top.
  • Tread Depth: This is the horizontal depth of each step. It should be at least 10 inches for comfort and safety.
  • Riser Height: This is the vertical height of each step. It should be between 6 and 8 inches for safety and ease of use.

Once you have these measurements, you can start designing your steps.

Choosing the Design

choosing-the-design

When it comes to designing your wooden steps, there are a few different options to consider. Here are some popular designs:

  • Straight Steps: These are the most basic design, with steps that go straight up and down. They’re easy to build and work well in most situations.
  • L-Shaped Steps: These steps have a landing or platform halfway up, which makes them easier to climb and can add visual interest to your design.
  • U-Shaped Steps: These steps have two landings or platforms, making them ideal for longer staircases. They can be more difficult to build, but they offer a unique and impressive look.

When choosing your design, consider the overall style of your home and the surrounding landscape. You want your wooden steps to complement your property and enhance its curb appeal.

By taking accurate measurements and choosing a design that fits your needs and style, you can create beautiful and functional wooden steps that will last for years to come.

Building the Steps

When it comes to building wooden steps, there are three main steps you need to follow: cutting the wood, assembling the steps, and securing the steps. Here’s a breakdown of each step:

Cutting the Wood

Before you can start assembling your wooden steps, you’ll need to cut the wood to the right size. To do this, you’ll need a saw, a measuring tape, and a pencil. Here’s what you need to do:

  1. Measure the height and width of the area where you want to install the steps.
  2. Cut two pieces of wood to the width of the area where you want to install the steps.
  3. Cut two more pieces of wood to the height of the area where you want to install the steps.
  4. Cut several smaller pieces of wood to the same width as the two larger pieces. These will be used as the steps themselves.

Assembling the Steps

Once you’ve cut all of the wood to the right size, it’s time to start assembling the steps. Here’s what you need to do:

  1. Lay the two larger pieces of wood on the ground where you want to install the steps. These will be the sides of the steps.
  2. Place the smaller pieces of wood on top of the larger pieces, evenly spaced apart. These will be the steps themselves.
  3. Use a level to make sure each step is level before moving on to the next step.
  4. Once you’ve placed all of the steps, use a drill to attach them to the larger pieces of wood on either side.

Securing the Steps

After you’ve assembled the steps, it’s important to make sure they’re secure. Here’s what you need to do:

  1. Use wood glue to attach each step to the larger pieces of wood on either side.
  2. Once the glue has dried, use screws to attach each step to the larger pieces of wood on either side.
  3. Use a level to make sure the steps are still level after you’ve secured them.

By following these three steps, you’ll be able to build wooden steps that are sturdy, secure, and safe to use.

Finishing Touches

Once you have completed building your wooden steps, it’s time to give them a finishing touch. This will not only make them look more attractive but also protect them from the elements. Here are some steps you can take to finish your wooden steps.

Sanding the Steps

Before applying any finish, it’s important to sand your wooden steps. This will help smooth out any rough spots and ensure that the finish adheres properly. Start by using a coarse grit sandpaper, such as 60-grit, to remove any rough spots or splinters. Then, move on to a finer grit sandpaper, such as 120-grit, to smooth out the surface of the wood.

Make sure to sand in the direction of the grain to avoid damaging the wood. You can use a sanding block or an orbital sander to make the job easier. Once you’re done sanding, wipe down the steps with a damp cloth to remove any dust.

Applying the Finish

There are several types of finishes you can use on your wooden steps, including paint, stain, or varnish. Each has its own advantages and disadvantages, so choose the one that best suits your needs.

If you want to paint your steps, make sure to use a high-quality exterior paint that is designed for wood surfaces. Apply the paint in thin, even coats, and allow each coat to dry completely before applying the next.

If you prefer a natural look, you can use a stain to enhance the natural beauty of the wood. Choose a stain that is designed for exterior use and apply it in thin coats with a brush or rag. Make sure to wipe off any excess stain with a clean cloth.

Finally, if you want to protect your steps from the elements, you can use a varnish or sealer. These products will help prevent water damage and protect the wood from UV rays. Apply the varnish or sealer in thin coats, and allow each coat to dry completely before applying the next.

With these finishing touches, your wooden steps will look great and last for years to come.

Maintenance Tips

Taking care of your wooden steps is essential to ensure their longevity and safety. Here are some maintenance tips to keep them in good condition for years to come.

Regular Cleaning

Regular cleaning of your wooden steps is crucial to maintain their appearance and prevent the buildup of dirt and debris. Here are some steps to follow:

  • Sweep the steps regularly to remove dirt, leaves, and other debris.
  • Use a stiff-bristled brush to scrub the steps with a solution of mild soap and water.
  • Rinse the steps thoroughly with water and allow them to dry completely before use.
  • Avoid using a pressure washer as it can damage the wood.

Wood Treatment

Wooden steps are prone to damage from moisture, sunlight, and insects. To prevent this, it is essential to treat them regularly. Here are some tips to follow:

  • Apply a wood preservative to protect the wood from moisture and insects. Follow the manufacturer’s instructions for application and frequency of treatment.
  • Apply a coat of exterior wood sealer or stain to protect the wood from sunlight and weather damage. Choose a product that is suitable for your climate and follow the manufacturer’s instructions for application and frequency of treatment.
  • Inspect the steps regularly for signs of damage such as cracks, splinters, and rot. Repair any damage promptly to prevent further deterioration.

By following these maintenance tips, you can keep your wooden steps in good condition and ensure their safety for you and your family.

understanding-the-basics-of-boat-building

How to Build a Wooden Boat: A Beginner's Guide

Building a wooden boat can be a fulfilling and rewarding experience. Whether you’re an experienced boat builder or a novice, building a wooden boat can be a great way to spend your time and create something that you can be proud of. With the right tools, materials, and guidance, you can build a wooden boat that will last for years to come.

The first step in building a wooden boat is to gather all the necessary materials and tools. You will need to choose the right type of wood for your boat, as well as other materials such as epoxy, fiberglass, and marine hardware. You’ll also need to have the right tools on hand, including saws, sanders, clamps, and drills. Once you have all the materials and tools you need, you can begin the process of building your wooden boat.

There are many different methods and techniques for building a wooden boat, and the best approach will depend on the type of boat you want to build and your level of experience. Some common techniques include stitch-and-glue, strip-planking, and lapstrake construction. Regardless of the method you choose, building a wooden boat requires patience, attention to detail, and a willingness to learn new skills. With dedication and hard work, you can create a beautiful and functional wooden boat that you can be proud of.

Understanding the Basics of Boat Building

understanding-the-basics-of-boat-building

Building a wooden boat may seem like a daunting task, but with a little bit of knowledge and patience, it can be a rewarding experience. Before you get started, it’s important to understand the basics of boat building.

Materials

The materials you choose for your boat will depend on the type of boat you want to build and your budget. Common materials for wooden boat building include:

  • Plywood
  • Cedar
  • Mahogany
  • Teak
  • Oak

It’s important to choose high-quality materials that are suitable for your project. Poor quality materials can lead to a weaker, less durable boat.

Tools

You’ll need a variety of tools to build a wooden boat, including:

  • Saw
  • Drill
  • Hammer
  • Chisels
  • Planes
  • Clamps

It’s important to use the right tool for the job to ensure accuracy and safety. If you’re unsure about how to use a particular tool, seek advice from a professional or experienced boat builder.

Plans

Having a good set of plans is essential for building a wooden boat. Plans will provide you with the specifications and measurements you need to build a boat that is safe and seaworthy. You can find plans online, in books, or from boat building associations.

Construction

The construction process for a wooden boat involves several stages, including:

  • Lofting: Transferring the plans to full size on the building floor.
  • Framing: Building the framework of the boat.
  • Planking: Attaching the planks to the framework.
  • Finishing: Sanding, painting, and varnishing the boat.

Each stage requires attention to detail and careful planning to ensure a successful outcome.

By understanding the basics of boat building, you’ll be well on your way to building your own wooden boat. Remember to take your time, use high-quality materials, and seek advice when you need it. Happy building!

Choosing the Right Type of Wood

When building a wooden boat, choosing the right type of wood is crucial to ensure the boat is sturdy, durable, and long-lasting. In this section, we will discuss the two main categories of wood for boat building and the best types of wood to use.

Hardwood vs Softwood

Hardwood and softwood are the two main categories of wood used for boat building. Hardwood is denser, stronger, and more durable than softwood, making it ideal for keels, frames, thwarts, decks, and other major structural components of the boat. Softwood, on the other hand, is more flexible and easier to work with, making it suitable for smaller parts like gunwales, knees, and breasthooks.

Best Types of Wood for Boats

Here are some of the best types of wood to use when building a wooden boat:

Type of Wood Characteristics
Teak Durable, water-resistant, and rot-resistant. Expensive.
Oak Strong, durable, and resistant to rot.
Mahogany Lightweight, strong, and resistant to rot.
Cedar Lightweight, easy to work with, and resistant to rot.
Plywood Affordable, easy to work with, and suitable for small boats.

When choosing the type of wood to use, consider the size and type of boat you want to build, your budget, and the availability of the wood in your area. It’s also important to choose high-quality wood that is free of knots, cracks, and other defects.

In summary, choosing the right type of wood is essential when building a wooden boat. Hardwood is best for major structural components, while softwood is suitable for smaller parts. Teak, oak, mahogany, cedar, and plywood are some of the best types of wood to use, depending on your needs and budget.

Gathering Your Tools

Before you start building your wooden boat, it’s important to gather all the necessary tools. Having the right tools on hand will make your boat-building project much easier and more enjoyable. In this section, we’ll go over the essential hand tools and power tools you may need.

Essential Hand Tools

Here are some of the essential hand tools you’ll need for building a wooden boat:

Tool Description
Hacksaw For cutting metal parts
Edge tools Wide chisel (25-50mm or 1-2inch), narrow chisel (max 15mm or 5/8 inch)
Block plane Preferably a rabbet block plane. Lie-Nielsen makes a wonderful model, but it is not cheap. More affordable models are available from Dictum, Juuma, Kunz, and Axminster – or you could find a vintage tool.
Clamps Various sizes and types of clamps will be necessary for holding pieces together while glue dries.
Hand saw A crosscut saw and a rip saw will be necessary for cutting wood to length and width.
Screwdrivers A set of screwdrivers in various sizes will be needed for installing hardware and fasteners.
Measuring tools A tape measure, combination square, and marking gauge will help you make accurate measurements and cuts.

Power Tools You May Need

While many wooden boat builders prefer to work with hand tools, power tools can make the job faster and easier. Here are some power tools you may want to consider for your boat-building project:

Tool Description
Circular saw A circular saw will make quick work of cutting large pieces of wood.
Jigsaw A jigsaw is useful for cutting curves and intricate shapes.
Router A router can be used for shaping edges and cutting grooves.
Power drill A power drill will be necessary for drilling holes for hardware and fasteners.
Belt sander A belt sander will make sanding large surfaces much faster and easier.

Remember, having the right tools is essential for a successful boat-building project. Take the time to gather all the necessary tools before you start, and your project will be much smoother and more enjoyable.

Creating Your Boat Design

creating-your-boat-design

When it comes to building a wooden boat, creating a design that meets your needs and preferences is crucial. Here are some steps to help you create your boat design:

Sketching Your Initial Design

The first step in creating your boat design is to sketch out your ideas. You can use paper and pencil or a digital design program to create your initial sketches. Start by outlining the basic shape and size of your boat. Consider the type of water you will be using it in, the number of passengers you want it to hold, and any additional features you may want to include.

Once you have a basic outline, you can start adding details such as the placement of seats, storage compartments, and other features. Keep in mind that the more detailed your sketch is, the easier it will be to create a final blueprint.

Finalizing Your Boat Blueprint

After you have created your initial design, it’s time to finalize your boat blueprint. This is where you will add all the necessary details and measurements. You can use a design program or hire a professional boat designer to help you create a detailed blueprint.

When finalizing your blueprint, consider the materials you will be using to build your boat. Make sure your design takes into account the strength and durability of the wood you will be using. You should also consider the tools and equipment you will need to build your boat.

Once you have finalized your blueprint, you can use it to create a materials list and start building your boat. Remember to refer back to your blueprint throughout the building process to ensure you are staying on track and creating the boat you envisioned.

Creating a boat design can be a fun and rewarding experience. By taking the time to sketch out your ideas and finalize your blueprint, you can create a boat that meets your needs and preferences.

Cutting and Shaping the Wood

When building a wooden boat, cutting and shaping the wood is a crucial step in the process. In this section, we will cover the key aspects of preparing your wood, cutting techniques, and shaping your boat pieces.

Preparing Your Wood

Before you start cutting and shaping your wood, it’s important to ensure that it’s properly prepared. Here are a few things to keep in mind:

  • Choose the right type of wood: The type of wood you choose will depend on your budget, the size of your boat, and the conditions it will be used in. Popular options include cedar, mahogany, and oak.
  • Dry your wood: Make sure your wood is properly dried before you start working with it. This will prevent warping and cracking.
  • Sand your wood: Sanding your wood will make it smoother and easier to work with. Use a fine-grit sandpaper to achieve the best results.

Cutting Techniques

When it comes to cutting your wood, there are a few techniques that you should be familiar with:

  • Straight cuts: Use a saw to make straight cuts in your wood. Make sure to use a straight edge as a guide to ensure accuracy.
  • Curved cuts: To make curved cuts, use a jigsaw or bandsaw. Make sure to use a template or pattern to guide your cuts.
  • Bevel cuts: Bevel cuts are angled cuts made on the edge of a piece of wood. Use a table saw or circular saw to make these cuts.

Shaping Your Boat Pieces

Once you’ve cut your wood to the right size and shape, it’s time to start shaping your boat pieces. Here are a few tips to keep in mind:

  • Use a plane: A hand plane is a great tool for shaping your wood. It allows you to remove small amounts of wood at a time, making it easier to achieve the desired shape.
  • Sand your pieces: Sanding your pieces will help smooth out any rough edges and give them a finished look.
  • Test fit your pieces: Before you start gluing your pieces together, make sure to test fit them to ensure they fit together properly.

By following these tips for cutting and shaping your wood, you’ll be well on your way to building a beautiful wooden boat.

Assembling Your Boat

When it comes to assembling your wooden boat, there are a few key things to keep in mind to ensure that your boat is sturdy and reliable. In this section, we’ll cover two important sub-sections: Joining the Pieces Together and Ensuring Structural Integrity.

Joining the Pieces Together

To join the pieces of your boat together, you have a few options. One of the most common methods is to use epoxy and fiberglass tape. This method involves applying a layer of epoxy to the joint, then laying down a strip of fiberglass tape and applying another layer of epoxy. This creates a strong, waterproof bond that will hold up over time.

Another option is to use wooden dowels or screws to join the pieces together. This method can be a bit more time-consuming, but it can also be more aesthetically pleasing since there won’t be any visible fiberglass tape.

Regardless of which method you choose, it’s important to ensure that the joints are tight and that there are no gaps between the pieces. This will help to prevent leaks and ensure that your boat is sturdy and reliable.

Ensuring Structural Integrity

Once the pieces of your boat are joined together, it’s important to ensure that the structure is sound. This means checking for any weak spots or areas where the wood may be prone to splitting or cracking.

One way to do this is to apply a layer of epoxy to the entire boat. This will help to strengthen the wood and prevent any potential issues down the line.

Another important step is to reinforce any areas that may be prone to stress, such as the joints between the bow and stern and the sides of the boat. This can be done by adding additional layers of fiberglass tape or by using wooden braces.

By taking these steps to ensure structural integrity, you can be confident that your wooden boat will be strong and reliable for years to come.

Applying Finishes

Choosing the Right Finish

When it comes to finishing a wooden boat, there are a variety of options to choose from. The most common finishes are varnish, paint, and epoxy. Each finish has its own advantages and disadvantages, so it’s important to consider your needs and preferences before making a decision.

  • Varnish: Varnish is a popular choice for wooden boats because it enhances the natural beauty of the wood while also providing protection against the elements. It’s available in a range of gloss levels, from high gloss to matte, and can be applied in multiple coats for added durability. However, varnish requires regular maintenance and can be difficult to apply evenly.
  • Paint: Paint is a good choice if you want a solid color or if your boat has a lot of imperfections that you want to hide. It’s also a good option if you want a finish that’s easy to maintain and repair. However, paint can be prone to chipping and cracking, and it doesn’t provide as much protection against the elements as varnish or epoxy.
  • Epoxy: Epoxy is a two-part resin that can be used to seal and protect the wood. It’s a good choice if you want a finish that’s extremely durable and resistant to moisture and UV rays. However, epoxy can be difficult to apply and can be expensive.

Applying Your Chosen Finish

Once you’ve chosen your finish, it’s time to apply it to your wooden boat. Here are some tips to help you get the best results:

  • Prepare the surface: Before applying any finish, make sure the surface of your boat is clean, dry, and free of dust and debris. Sand the surface to create a smooth, even surface.
  • Apply the finish in thin coats: It’s better to apply several thin coats of finish rather than one thick coat. This will help the finish dry more evenly and reduce the risk of drips and runs.
  • Use a high-quality brush: A good brush is essential for achieving a smooth, even finish. Choose a brush that’s appropriate for the type of finish you’re using and make sure it’s clean and free of debris before you start.
  • Follow the manufacturer’s instructions: Different finishes have different application techniques, so it’s important to follow the manufacturer’s instructions carefully. This will ensure that you get the best results and that your finish lasts as long as possible.

With these tips in mind, you should be able to apply a beautiful and durable finish to your wooden boat. Remember to take your time and be patient, and you’ll be rewarded with a boat that looks great and lasts for years to come.

Maintenance Tips

Maintaining your wooden boat is essential to ensure its longevity and keep it looking beautiful. Here are a few tips to help you keep your boat in top condition.

Routine Cleaning

Regular cleaning is crucial to prevent dirt and grime buildup, which can lead to discoloration and deterioration of the wood. Here are some tips for routine cleaning:

  • Use a soft-bristled brush or sponge to scrub the boat’s surface gently.
  • Avoid using harsh chemicals or abrasive cleaners that can damage the wood’s finish.
  • Rinse the boat thoroughly with freshwater after cleaning to remove any remaining soap or cleaning solution.

Periodic Inspections

Periodic inspections can help you identify any issues early on, preventing them from becoming bigger problems. Here are some tips for periodic inspections:

  • Check for cracks, splits, or warping in the wood.
  • Look for signs of rot or decay, such as soft spots or discoloration.
  • Check the fasteners, such as screws and bolts, for corrosion or damage.
  • Inspect the boat’s seams and joints for any signs of separation or leaks.

Repairing Common Wood Damage

Wooden boats are prone to damage from exposure to the elements, wear and tear, and accidents. Here are some tips for repairing common wood damage:

  • Sand the damaged area to remove any loose or damaged wood.
  • Apply a wood filler to the damaged area, following the manufacturer’s instructions.
  • Sand the area again once the wood filler has dried.
  • Apply a coat of primer and then a finish coat to match the boat’s existing finish.

By following these maintenance tips, you can keep your wooden boat looking great and ensure its longevity.

How to Make a Wooden Boat Model: A Beginner's Guide

Are you interested in building a wooden boat model? Whether you are a beginner or an experienced model builder, constructing a wooden boat model can be a fun and rewarding project. Not only will you have the satisfaction of creating something with your own hands, but you’ll also end up with a beautiful and unique piece of decor.

Before you begin, it’s important to choose the right type of wooden boat model for your skill level. If you’re new to model building, it’s best to start with a simple design and work your way up to more complex models. You’ll also need to gather the necessary materials, such as wood, glue, and paint, and have the appropriate tools on hand. Once you have everything you need, you can begin the process of constructing your wooden boat model.

Understanding the Basics of Boat Building

If you are new to boat building, it can seem like an overwhelming task. However, with some basic knowledge and the right tools and materials, you can build a wooden boat model that you can be proud of. In this section, we will cover the types of wooden boats, tools needed, and materials required for building a wooden boat model.

Types of Wooden Boats

There are various types of wooden boats, each with its unique design and purpose. Some popular types of wooden boats are:

  • Canoes
  • Rowboats
  • Sailboats
  • Motorboats

Each type of boat has its unique features, and it’s essential to choose the type of boat that suits your needs and preferences.

Tools Needed

Before you start building your wooden boat model, you need to have the right tools. Here are some of the essential tools you will need:

Tool Description
Saw Used for cutting wood
Drill Used for making holes
Sandpaper Used for smoothing rough surfaces
Clamps Used for holding pieces of wood together
Ruler Used for measuring

Materials Required

The materials you need for building a wooden boat model depend on the type of boat you want to build. However, some of the basic materials you will need are:

  • Wood (cedar, pine, or basswood)
  • Glue (wood glue or epoxy)
  • Paint (for finishing)
  • Varnish (for protecting the wood)

It’s essential to choose high-quality materials to ensure that your wooden boat model lasts long and looks great.

In summary, building a wooden boat model requires some basic knowledge, the right tools, and high-quality materials. By understanding the types of wooden boats, tools needed, and materials required, you can start building your wooden boat model with confidence.

Designing Your Boat Model

When it comes to building a wooden boat model, designing your boat model is an essential step to ensure that you create a model that is both accurate and visually appealing. Here are some key steps to follow when designing your boat model.

Choosing the Type of Boat

Before you start designing your boat model, you need to decide on the type of boat you want to build. There are many different types of boats to choose from, including sailboats, motorboats, and fishing boats. Consider your personal interests and preferences when choosing the type of boat to build.

Sketching the Design

Once you have decided on the type of boat, the next step is to sketch the design. Sketching allows you to visualize your boat model and make any necessary adjustments before you start building. You can use a pencil and paper or a computer program to create your design. Make sure to include all the necessary details, such as the shape of the hull, the location of the deck, and the placement of the mast.

Scaling the Design

After you have sketched your design, you need to scale it down to the appropriate size for your model. Scaling the design involves reducing the size of the boat while maintaining its proportions. You can use a scaling calculator or a ruler to determine the correct scale for your model.

Once you have scaled your design, you can create a detailed plan that includes all the necessary measurements and materials. This plan will serve as your guide when building your boat model.

Designing your boat model is an important step that will ensure that your model is both accurate and visually appealing. By following these key steps, you can create a design that you are proud of and that will be a great addition to your collection.

Building the Boat Model

Building a wooden boat model can be a fun and rewarding experience. Here are the steps to build your own wooden boat model.

Cutting the Wood

The first step in building a wooden boat model is to cut the wood. Use a saw to cut the wood into the desired shape. Make sure to measure and mark the wood before cutting to ensure accuracy. You can use a table saw, jigsaw, or circular saw to cut the wood.

Assembling the Parts

After you have cut the wood, it’s time to assemble the parts. Use wood glue to attach the pieces together. You can use clamps to hold the pieces in place while the glue dries. Make sure to follow the instructions on the glue bottle for drying time.

Once the glue has dried, you can sand down any rough edges and smooth out the surface. You may need to use a chisel or sandpaper to get the desired shape.

Finishing Touches

After you have assembled the boat model, it’s time to add the finishing touches. You can paint the boat model with acrylic paint or stain it with wood stain. You can also add decals or other decorative elements to the boat model.

If you want to add a glossy finish to the boat model, you can apply a clear coat of varnish or polyurethane. This will protect the wood and give it a shiny finish.

In conclusion, building a wooden boat model can be a fun and rewarding experience. By following these steps, you can create your own unique boat model that you can be proud of.

Painting and Decorating Your Boat Model

When it comes to painting and decorating your boat model, there are a few things you need to keep in mind. Here are some tips to help you achieve a beautiful, realistic finish.

Choosing the Paint

Choosing the right paint is crucial for achieving a realistic finish on your boat model. Acrylic paints are a popular choice for wooden boat models because they are easy to work with and dry quickly. You can find a wide range of colors at your local craft store or online.

Before you start painting, make sure you have all the supplies you need, including brushes, masking tape, and a palette. It’s also a good idea to practice on a scrap piece of wood before you start painting your model.

Applying the Paint

When it comes to applying the paint, there are a few things you need to keep in mind. First, make sure you have a clean, dust-free workspace. You don’t want any debris getting stuck in your paint.

Next, apply the paint in thin, even coats. It’s better to apply several thin coats than one thick coat, as this will help prevent drips and runs. Make sure each coat is completely dry before applying the next one.

If you’re painting a large area, use a roller or a large brush to apply the paint. For smaller areas, use a small brush and take your time. Don’t rush the process, as this can lead to mistakes and a less-than-perfect finish.

Adding Details

Adding details is where you can really make your boat model come to life. Use a fine brush to add details like portholes, railings, and other small features. You can also use decals or stickers to add logos, names, and other details.

If you want to add a weathered look to your boat model, use a dry brush technique. Dip your brush in paint, then wipe most of it off on a paper towel. Lightly brush the surface of your model to create a faded, weathered look.

In conclusion, painting and decorating your boat model is an important step in creating a realistic, beautiful finished product. With the right paint, tools, and techniques, you can achieve a professional-looking finish that will impress your friends and family.

Maintenance and Preservation

Taking care of your wooden boat model is essential to ensure its longevity and keep it looking its best. Here are some tips on how to clean and preserve your boat model.

Cleaning Your Boat Model

Cleaning your boat model regularly will help prevent dirt and dust from accumulating on the surface, which can damage the wood over time. Here are some steps to follow when cleaning your boat model:

  1. Use a soft-bristled brush or a microfiber cloth to gently remove any dust or dirt from the surface of the boat.
  2. If there are any stubborn stains, use a damp cloth with mild soap to gently rub the affected area.
  3. After cleaning, use a dry cloth to wipe the boat’s surface and ensure that it is completely dry.

Avoid using harsh chemicals or abrasive materials when cleaning your boat model, as these can damage the wood and paint.

Preserving Your Boat Model

Preserving your boat model is essential to ensure that it lasts for years to come. Here are some steps to follow to preserve your boat model:

  1. Apply a coat of varnish or lacquer to the boat’s surface to protect it from moisture and UV rays.
  2. Store your boat model in a dry and cool place, away from direct sunlight or heat sources.
  3. Avoid exposing your boat model to extreme temperature changes, as this can cause the wood to expand or contract and damage the structure.

It’s important to note that wooden boat models require regular maintenance to ensure their longevity. By following these simple steps, you can keep your boat model looking its best and enjoy it for years to come.

How to Build a Wooden Platform: A Beginner's Guide

If you’re looking to build a wooden platform, there are a few things you should keep in mind before getting started. First, consider the purpose of your platform. Will it be used to hold bee hives, as a base for a shed, or as a raised garden bed? Knowing the purpose will help you determine the size and materials you’ll need.

Once you’ve determined the purpose and size of your platform, it’s time to gather your materials. You’ll need wood, screws, a saw, and other tools depending on the complexity of your design. It’s important to choose the right type of wood for your platform based on its intended use and the climate in which you live. For example, cedar is a good choice for outdoor platforms as it is naturally resistant to rot and insects.

Understanding the Basics

Before you start building your wooden platform, it’s important to understand the basics of the project. This section will cover the materials needed and safety precautions to keep in mind.

Materials Needed

To build a wooden platform, you will need the following materials:

Materials Quantity
2×4 lumber Depends on the size of the platform
4×4 posts Depends on the size of the platform
Plywood Depends on the size of the platform
Deck screws Enough to secure the lumber and plywood
Concrete blocks Enough to support the posts
Level 1
Circular saw 1
Drill 1
Measuring tape 1
Pencil 1

Make sure to choose high-quality materials to ensure the durability and longevity of your platform.

Safety Precautions

Safety should always be a top priority when working on any DIY project. Here are some safety precautions to keep in mind when building a wooden platform:

  • Wear protective gear, such as safety glasses and gloves, to prevent injuries.
  • Use a level to ensure that the platform is even and stable.
  • Use a circular saw to cut the lumber and plywood to the correct size.
  • Secure the posts with concrete blocks to prevent them from shifting or falling over.
  • Avoid working in wet or slippery conditions to prevent accidents.

By following these safety precautions, you can ensure a safe and successful project.

Designing the Wooden Platform

When it comes to designing a wooden platform, there are a few important factors to consider. In this section, we will cover two key aspects of designing your wooden platform: choosing the right size and deciding on the shape.

Choosing the Right Size

The size of your wooden platform will depend on its intended use. If you plan to use it for a specific purpose, such as holding bee hives or as a stage for theatrical performances, you will need to measure the dimensions required for that specific use.

If you are building a platform for a general purpose, such as a work space or equipment mount, you will need to consider the space available and the size of the items you plan to place on the platform. You may also want to consider leaving extra space for future use.

Deciding the Shape

The shape of your wooden platform will also depend on its intended use. If you are building a platform for a specific purpose, such as holding bee hives, the shape may be predetermined.

If you are building a platform for a general purpose, you can choose from a variety of shapes, including square, rectangular, circular, or even irregular shapes. The shape you choose will depend on your personal preference, the space available, and the intended use of the platform.

When designing the shape of your platform, it is important to consider any obstacles or obstructions that may be present in the area where the platform will be located. You will also want to ensure that the platform is level and stable, so that it can safely support the weight of whatever items you plan to place on it.

By taking the time to carefully consider the size and shape of your wooden platform, you can ensure that it will meet your needs and provide a sturdy and reliable surface for whatever purpose you have in mind.

Building the Frame

Cutting the Wood

To build a wooden platform, you will need to start with a sturdy frame. The frame is the foundation of the platform and will need to be strong enough to support the weight of whatever you plan to put on it. To begin building the frame, you will need to cut the wood to the appropriate lengths.

Start by cutting four pieces of 2×4 lumber to the desired length of your platform. These will be the horizontal pieces that will form the top and bottom of the frame. Next, cut four more pieces of 2×4 lumber to the desired width of your platform. These will be the vertical pieces that will connect the top and bottom horizontal pieces.

Assembling the Frame

Once you have cut the wood to the appropriate lengths, it’s time to assemble the frame. Lay the four vertical pieces on the ground, parallel to each other, with the ends touching. Then, place the two top horizontal pieces on top of the vertical pieces, making sure they are flush with the ends. Do the same with the bottom horizontal pieces, placing them at the opposite ends of the vertical pieces.

To secure the frame, use wood screws to attach the top and bottom horizontal pieces to the vertical pieces. Be sure to pre-drill the holes to avoid splitting the wood. Once all the pieces are attached, use a level to make sure the frame is even and adjust as necessary.

Congratulations, you have now built the foundation of your wooden platform!

Installing the Platform Surface

Now that you have built the frame of your wooden platform, it’s time to install the surface. This is the part that will be visible and where you will be standing, so it’s important to make sure it’s sturdy and level.

Step 1: Measure and Cut the Boards

Measure the length and width of the frame and cut the boards to fit. Make sure to leave a small gap between each board for drainage and expansion. You can use a table saw or circular saw to make the cuts.

Step 2: Attach the Boards

Starting at one end of the platform, attach the boards to the frame using wood screws or nails. Make sure to countersink the screws or use finishing nails to avoid any sharp edges. Use a level to ensure each board is straight and level before securing it to the frame.

Step 3: Sand and Finish the Surface

Once all the boards are attached, sand the surface to remove any rough spots or splinters. You can use a belt sander or sandpaper to do this. Next, apply a finish to protect the wood from weather and wear. You can use a clear sealant, stain, or paint depending on your preference.

Step 4: Add Non-Slip Surface

To prevent slipping, you may want to add a non-slip surface to your platform. You can use a non-slip paint or add strips of non-slip tape to the surface. This is especially important if your platform will be used in wet or slippery conditions.

By following these simple steps, you can install a sturdy and attractive surface for your wooden platform. With proper care and maintenance, it will provide a safe and functional space for years to come.

Adding Finishing Touches

Once you have built your wooden platform, it’s time to add the finishing touches to make it look beautiful and protect it from wear and tear. This section will guide you through the two essential steps of finishing your wooden platform: sanding the surface and applying the finish.

Sanding the Surface

Sanding is an essential part of finishing a wooden platform. It helps to smooth out any rough patches and create a clean, even surface. Here are the steps to follow when sanding your wooden platform:

  1. Start with a coarse grit sandpaper and work your way up to a finer grit. Use 80-grit sandpaper to remove any rough patches and then switch to 120-grit sandpaper to smooth out the surface.
  2. Sand in the direction of the grain to avoid leaving any scratches on the surface.
  3. Use an orbital sander to make the process faster and more efficient.
  4. Finish off by hand-sanding with 220-grit sandpaper to create a smooth, even surface.

Applying the Finish

Once you have sanded the surface, it’s time to apply the finish. The finish will protect your wooden platform from moisture and wear and tear, and it will also enhance the natural beauty of the wood. Here are the steps to follow when applying the finish:

  1. Choose the type of finish you want to use. You can choose between oil-based, water-based, or polyurethane finishes. Each has its advantages and disadvantages, so choose the one that best suits your needs.
  2. Apply the finish with a brush or a roller, depending on the size of your platform. Start at one end and work your way across the surface, making sure to cover every inch.
  3. Wait for the first coat to dry completely before applying a second coat. This will ensure that the finish is even and smooth.
  4. Sand lightly between coats to remove any bumps or bubbles.
  5. Apply a final coat for added protection and a beautiful finish.

By following these simple steps, you can add the finishing touches to your wooden platform and protect it from wear and tear. Remember to take your time and be patient, as the finishing process can take some time.

Maintaining Your Wooden Platform

Congratulations, you have successfully built a wooden platform! Now, it’s time to ensure that it lasts for years to come. Proper maintenance can prevent the wood from rotting, warping, or cracking. Here are some tips to help you maintain your wooden platform:

1. Regular Cleaning

Dirt, debris, and moisture can accumulate on your platform, causing it to deteriorate. Therefore, it’s essential to clean your platform regularly. You can use a broom, a brush, or a pressure washer to remove dirt and debris. If you use a pressure washer, make sure to set it on low pressure to avoid damaging the wood. After cleaning, allow the platform to dry completely before applying any finish.

2. Applying Finish

A finish can protect your wooden platform from moisture, UV rays, and insects. You can use a stain, a sealant, or a combination of both to enhance the appearance and durability of your platform. Before applying any finish, make sure to sand the wood to remove any rough spots or splinters. Apply the finish evenly with a brush or a roller, and follow the manufacturer’s instructions for drying time and reapplication.

3. Inspecting for Damage

Regularly inspect your platform for any signs of damage, such as cracks, splits, or rot. If you notice any damage, repair it as soon as possible to prevent it from spreading. You can use wood filler, epoxy, or replacement boards to fix the damage. If the damage is severe, you may need to replace the entire platform.

4. Avoiding Common Mistakes

To ensure the longevity of your wooden platform, avoid common mistakes such as:

  • Allowing water to pool on the surface
  • Placing heavy objects on the platform
  • Neglecting to clean and maintain the platform regularly

By following these tips, you can maintain your wooden platform and enjoy it for years to come.

How to Build a Wooden Handrail for Outdoor Steps: A Step-by-Step Guide

If you have outdoor steps that need a handrail, you may be wondering how to go about making one yourself. Building a wooden handrail for your outdoor steps is a great DIY project that can provide safety and style to your home. With a few basic tools and some lumber, you can create a handrail that will last for years to come.

Before you begin building your handrail, it’s important to check with your local building codes to ensure that you are meeting any requirements for handrail height, spacing, and materials. Once you have determined the specifications for your handrail, you can begin gathering your materials. The most common materials for outdoor handrails are pressure-treated lumber and metal balusters, but you can also use other materials like cedar or wrought iron to create a unique look.

Once you have your materials, you can begin building your handrail. The process will involve cutting and assembling the pieces of lumber, attaching the balusters, and securing the handrail to the steps. With some patience and attention to detail, you can create a handrail that will not only provide safety but also enhance the look of your outdoor space.

Understanding the Basics of Handrails

If you have outdoor steps, it’s important to have a handrail for safety purposes. A handrail is a simple wooden structure that runs along the length of the stairs. It provides support and stability to people as they climb up or down the stairs. In this section, we will discuss the basics of handrails and how to make one for your outdoor steps.

Handrail Height and Length

Before you begin building your handrail, it’s important to know the height and length of the handrail. The height of the handrail should be between 34 and 38 inches from the top of the stair tread to the top of the handrail. The length of the handrail should extend the full length of the stairs and extend at least 12 inches beyond the top and bottom steps.

Handrail Materials

The most common material used for handrails is wood. Cedar, redwood, and pressure-treated pine are popular choices for outdoor use because they are resistant to rot and decay. Other materials such as metal or vinyl can also be used for handrails, but they may require more maintenance.

Handrail Design

There are many different designs for handrails, but the most common design is a simple straight railing. The railing should be at least 1.5 inches in diameter to provide a comfortable grip. It’s important to make sure that the handrail is securely attached to the stairs to prevent any accidents.

Building Codes

Before building your handrail, it’s important to check your local building codes to ensure that your handrail meets the required standards. Building codes may vary depending on your location, so it’s important to do your research before beginning any construction.

In summary, a handrail is an important safety feature for outdoor steps. It should be between 34 and 38 inches in height, extend the full length of the stairs, and be securely attached to the stairs. Wood is the most common material used for handrails, and there are many different designs to choose from. Always check your local building codes before beginning any construction.

Choosing the Right Wood

When it comes to choosing the right wood for your outdoor handrail, there are several factors to consider. You want a wood that is durable, weather-resistant, and able to withstand the elements. Here are some popular options:

Cedar

Cedar is a popular choice for outdoor handrails because it is naturally resistant to rot and insects. It has a warm, reddish-brown color and a pleasant aroma. Cedar is also lightweight and easy to work with, making it a great choice for DIY projects.

Redwood

Redwood is another popular choice for outdoor handrails. It has a beautiful, rich color and is naturally resistant to decay and insects. Redwood is also easy to work with and holds up well in wet conditions.

Pressure-Treated Pine

Pressure-treated pine is a budget-friendly option that is treated with chemicals to resist rot and insects. It can be stained or painted to match your outdoor decor. However, it is important to note that the chemicals used in pressure treatment can be harmful to humans and pets, so it is important to wear gloves and a mask when working with it.

Ipe

Ipe is a hardwood that is known for its durability and resistance to rot, insects, and weather. It has a rich, dark color and a beautiful grain pattern. However, it is also one of the most expensive options.

No matter which type of wood you choose, make sure it is properly sealed and maintained to ensure its longevity. Consider the climate and weather conditions in your area when making your decision.

Materials and Tools Needed

When it comes to building a wooden handrail for your outdoor steps, you will need to gather a few materials and tools to get the job done. In this section, we will go over the different materials and tools needed to build a sturdy and reliable handrail for your outdoor steps.

Wood Selection

The first thing you will need to do is select the right type of wood for your handrail. You want to choose a wood that is strong, durable, and able to withstand the elements. Some of the best wood options for outdoor handrails include cedar, redwood, and pressure-treated pine. These woods are all resistant to rot and decay, making them ideal for outdoor use.

Handrail Hardware

In addition to the wood, you will also need to gather some handrail hardware. This includes brackets, screws, and bolts to secure the handrail to the posts. You will also need to purchase a post cap to protect the top of the posts from water damage.

Woodworking Tools

To build your handrail, you will need a few basic woodworking tools. These include a circular saw, a jigsaw, a drill, and a level. You will also need a measuring tape, a pencil, and a square to ensure that your cuts are accurate and your handrail is level.

In summary, to build a wooden handrail for your outdoor steps, you will need to select the right type of wood, gather the necessary hardware, and have the right woodworking tools on hand. With these materials and tools, you will be able to build a sturdy and reliable handrail that will provide safety and support for years to come.

Measuring and Planning

Before you start building your wooden handrail for outdoor steps, you need to measure and plan accordingly. This will ensure that your handrail fits properly and provides the necessary support when climbing or descending stairs.

Step Measurement

The first step is to measure the height and width of your steps. Measure the height from the bottom of the step to the top, and the width from side to side. Make sure to measure each step individually, as they may vary in size.

Once you have your measurements, you can determine the number of posts and rails you will need. As a general rule, you should have a post for every four to six feet of railing, and a rail for every two to three feet of railing.

Handrail Design

The next step is to design your handrail. You can choose from a variety of designs, including straight, curved, or angled. You can also choose from a variety of materials, including wood, metal, or vinyl.

When designing your handrail, it’s important to consider the style of your home and the surrounding landscape. You want your handrail to blend in with the overall aesthetic of your property.

Once you have your design in mind, you can start selecting your materials. Make sure to choose high-quality materials that are durable and weather-resistant. Pressure-treated lumber is a popular choice for outdoor handrails.

In summary, measuring and planning is an essential step in building a wooden handrail for outdoor steps. Make sure to measure your steps carefully and design your handrail to fit your specific needs. With the right materials and design, you can create a beautiful and functional handrail that provides the necessary support and adds value to your home.

Cutting the Wood

Now that you have measured and marked the spots for your handrail, it’s time to start cutting the wood. Here’s how you can do it:

  1. Use a chop saw or a miter saw to cut the pressure-treated lumber into the desired lengths for the rails and posts. Remember to wear protective gear while using the saw.

  2. Use a spade drill bit to drill holes into the posts where the rails will be attached. Make sure to align the holes on both sides of the post.

  3. Use a masonry bit to drill holes into the concrete or brick where the post holders will be installed.

  4. If you need to cut the railings at an angle to fit the slope of the stairs, use a miter saw to make the cuts.

  5. Sand the edges of the wood to smooth out any rough spots or splinters.

  6. Apply a wood stain or sealant to protect the wood from weather damage.

Remember to double-check your measurements and make sure all the pieces fit together before securing them in place. With these steps, you’ll be well on your way to creating a sturdy and attractive handrail for your outdoor steps.

Assembling the Handrail

Now that you have installed the posts for your outdoor handrail, it’s time to assemble the handrail itself. Here’s how you can do it:

Step 1: Measure and Cut Rails and Posts

Measure the distance between the posts to determine the length of the rails. Cut the rails to the appropriate length using a saw. Make sure the rails are level and straight.

Step 2: Place the Post Holders

Place the post holders on the rails. The holders should be placed at regular intervals, depending on the length of the rails. Use a measuring tape to ensure that the holders are evenly spaced.

Step 3: Install the Posts

Insert the posts into the post holders. Make sure that the posts are securely in place. Use a level to ensure that the posts are straight and level.

Step 4: Attach the Handrail

Attach the handrail to the posts using screws. Make sure that the screws are long enough to go through the handrail and into the posts. Use a drill to make pilot holes for the screws.

Step 5: Seal the Handrail

Seal the handrail with a weather-resistant sealant. This will protect the wood from the elements and prevent it from rotting or warping. Apply the sealant with a brush or roller, following the manufacturer’s instructions.

And that’s it! Your outdoor handrail is now complete and ready to use. Remember to check the handrail regularly for any signs of wear or damage, and make repairs as necessary.

Installing the Handrail

Now that you have built your wooden handrail, it’s time to install it on your outdoor steps. Follow these steps to ensure a safe and secure installation:

  1. Measure and mark the placement of the handrail on your steps. Use a level to ensure that the handrail is straight and even.

  2. Pre-drill holes into the handrail and the steps. This will prevent the wood from splitting when you attach the handrail to the steps.

  3. Attach the handrail to the steps using screws and brackets. Make sure the screws are long enough to go through the handrail and into the steps securely.

  4. Test the handrail to make sure it is sturdy and can support weight. If it wobbles or feels loose, reinforce the installation with additional screws or brackets.

  5. Finish the handrail with a weather-resistant sealant or paint to protect it from the elements.

Remember, installing a handrail is an important safety feature for your outdoor steps. It provides stability and support, especially for those with mobility issues or disabilities. Take the time to install it properly to ensure the safety of yourself and your guests.

Finishing Touches

Once you have constructed your wooden handrail for your outdoor steps, it’s time to add the finishing touches to make it look great and protect it from the elements.

Sanding the Handrail

Before applying any finish, it’s important to sand the handrail to ensure a smooth surface. Start with a coarse grit sandpaper and work your way up to a finer grit. Be sure to sand with the grain of the wood to avoid scratches. After sanding, wipe the handrail with a damp cloth to remove any dust.

Applying Wood Stain

Applying wood stain to your handrail will not only give it a beautiful color but also protect it from UV rays and water damage. Choose a stain that is specifically designed for outdoor use and matches the color of your deck or steps. Apply the stain with a brush or rag, following the manufacturer’s instructions. Be sure to apply the stain evenly and wipe off any excess.

Sealing the Wood

After the stain has dried, it’s important to seal the wood to protect it from moisture. Choose a clear, waterproof sealer that is designed for outdoor use. Apply the sealer with a brush or roller, following the manufacturer’s instructions. Be sure to apply an even coat and let it dry completely before using the handrail.

By following these simple steps, you can add the finishing touches to your wooden handrail and ensure that it looks great and lasts for years to come.

Maintenance Tips

Once you have installed your wooden handrail for outdoor steps, it is important to maintain it properly to ensure it lasts for years to come. Here are a few tips to help you keep your handrail in good condition:

Regular Cleaning

Dirt, dust, and other debris can accumulate on your handrail over time, making it look dirty and unappealing. To keep it looking its best, you should clean it regularly. You can use a mixture of water and vinegar or a cleaning solution to wipe down the handrail. Be sure to dry it thoroughly afterward to prevent water damage.

Preventing Stains

Stains can be a common problem with wooden handrails, especially if they are not sealed properly. To prevent stains, you can apply a sealant to the handrail. This will help to protect it from moisture and other elements that can cause damage.

Preventing Drying Out

Wooden handrails can dry out over time, which can cause them to crack and split. To prevent this from happening, you should apply a coat of oil or wax to the handrail every few months. This will help to keep it moisturized and prevent it from drying out.

Regular Maintenance

Regular maintenance is key to keeping your wooden handrail in good condition. This includes checking for any signs of damage, such as cracks or splits, and repairing them as necessary. You should also inspect the handrail for any loose screws or other hardware and tighten them as needed.

By following these simple maintenance tips, you can keep your wooden handrail for outdoor steps looking its best and ensure that it lasts for years to come.