Tag Archives: subtle grain pattern

make-a-wooden-doll-house

How to Make a Wooden Doll House: A Beginner's Guide

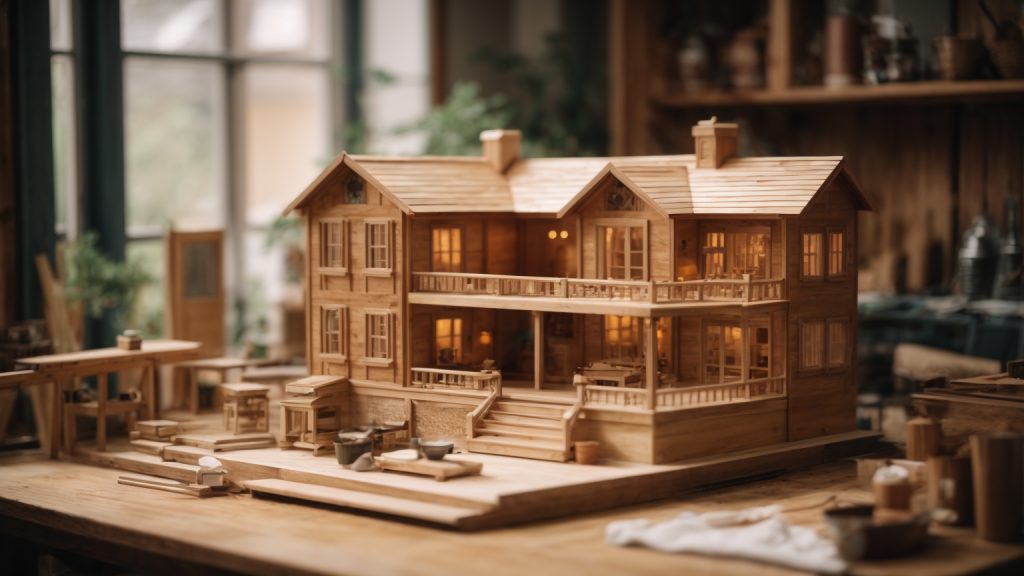
Are you looking for a fun and creative project to do with your kids or just for yourself? Making a wooden dollhouse from scratch is a great way to spend time together and create something beautiful that you can cherish for years to come. With a little bit of planning, patience, and some basic woodworking skills, you can build a dollhouse that is customized to your liking and fits perfectly in your home.

Before you start building your wooden dollhouse, there are a few things you need to consider. First, decide on the size and style of the dollhouse you want to build. You can choose from a variety of designs, such as a Victorian-style mansion or a modern minimalist house. You also need to determine what materials you will need and what tools you will use. Once you have all the necessary supplies, you can get started on your project. In the next section, we will go over some basic steps to help you build your very own wooden dollhouse.

Choosing the Right Wood

When building a wooden dollhouse, choosing the right type of wood is crucial. You want to select a wood that is sturdy, easy to work with, and will hold up over time. In this section, we will discuss how to identify different types of wood and how to select the best wood for dollhouses.

Identifying Different Types of Wood

Wood can be classified into two main categories: hardwood and softwood. Hardwood comes from deciduous trees such as oak, maple, and cherry, while softwood comes from coniferous trees such as pine, cedar, and spruce.

Hardwood is generally more expensive than softwood, but it is also stronger and more durable. Softwood is easier to work with and is often used in construction due to its affordability.

When selecting wood for your dollhouse, it’s important to consider the grain pattern. The grain pattern refers to the direction in which the wood fibers run. Some woods, such as oak, have a prominent grain pattern, while others, such as maple, have a more subtle grain pattern.

Selecting the Best Wood for Doll Houses

When selecting wood for your dollhouse, there are a few factors to consider. First, you want to choose a wood that is easy to work with. Softwoods such as pine and cedar are great options for beginners because they are easy to cut and shape.

Second, you want to choose a wood that is sturdy and will hold up over time. Hardwoods such as oak and maple are great options for dollhouses because they are strong and durable.

Finally, you want to choose a wood that will look great once it is finished. Woods such as cherry and mahogany have a beautiful finish and are perfect for dollhouses that will be on display.

In summary, when choosing wood for your dollhouse, consider the type of wood, the grain pattern, and the ease of use. Softwoods such as pine and cedar are great for beginners, while hardwoods such as oak and maple are strong and durable. Choose a wood that will look great once finished, and your dollhouse will be a beautiful addition to your collection.

Designing Your Doll House

make-a-wooden-doll-house

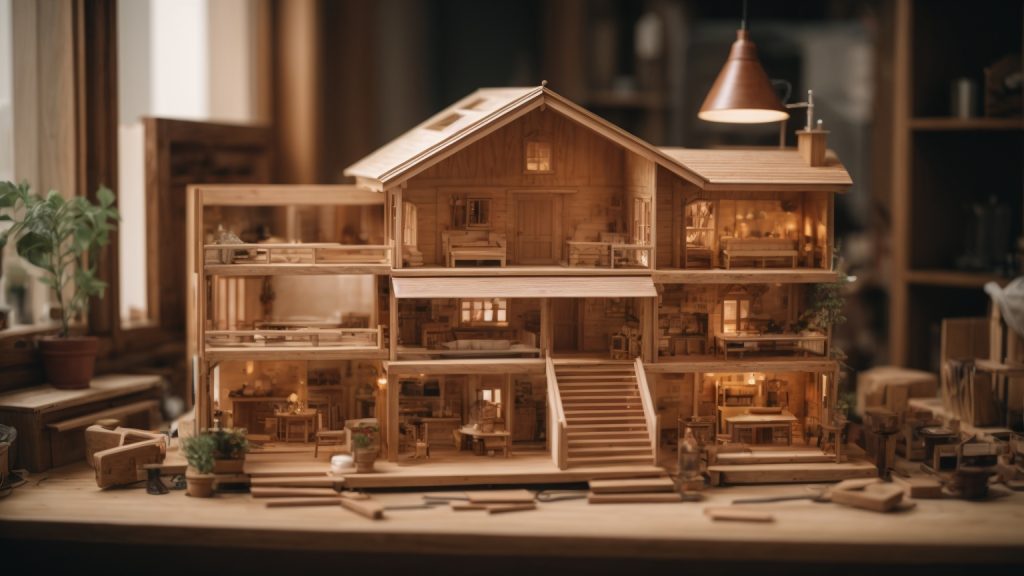
When it comes to designing your wooden doll house, there are a few things to consider to make sure your final product is everything you want it to be. Here are some tips to get you started:

Sketching Your Design

Before you start building, it’s a good idea to sketch out your design. This will help you visualize the final product and make any necessary adjustments before you start cutting wood. You can use graph paper to create a scale drawing of your design, or simply sketch it out on a piece of paper.

Consider the number of rooms you want, the size of each room, and any special features you want to include, such as a balcony or porch. Think about the style of the house you want to create, whether it’s a cozy cottage or a grand mansion.

Size and Scale Considerations

When designing your doll house, it’s important to consider the size and scale of your dolls. Make sure the rooms are large enough to accommodate your dolls and any furniture you plan to include. You should also consider the overall size of the doll house, as this will affect the amount of materials you will need and the time it will take to build.

Another important consideration is the scale of your doll house. Most doll houses are built to a scale of 1:12, which means that one inch of doll house equals one foot of real life. However, you can choose a different scale if you prefer. Just make sure all the elements of your doll house are in proportion to each other.

By taking the time to carefully design your wooden doll house, you’ll end up with a beautiful and functional toy that your child will love to play with for years to come.
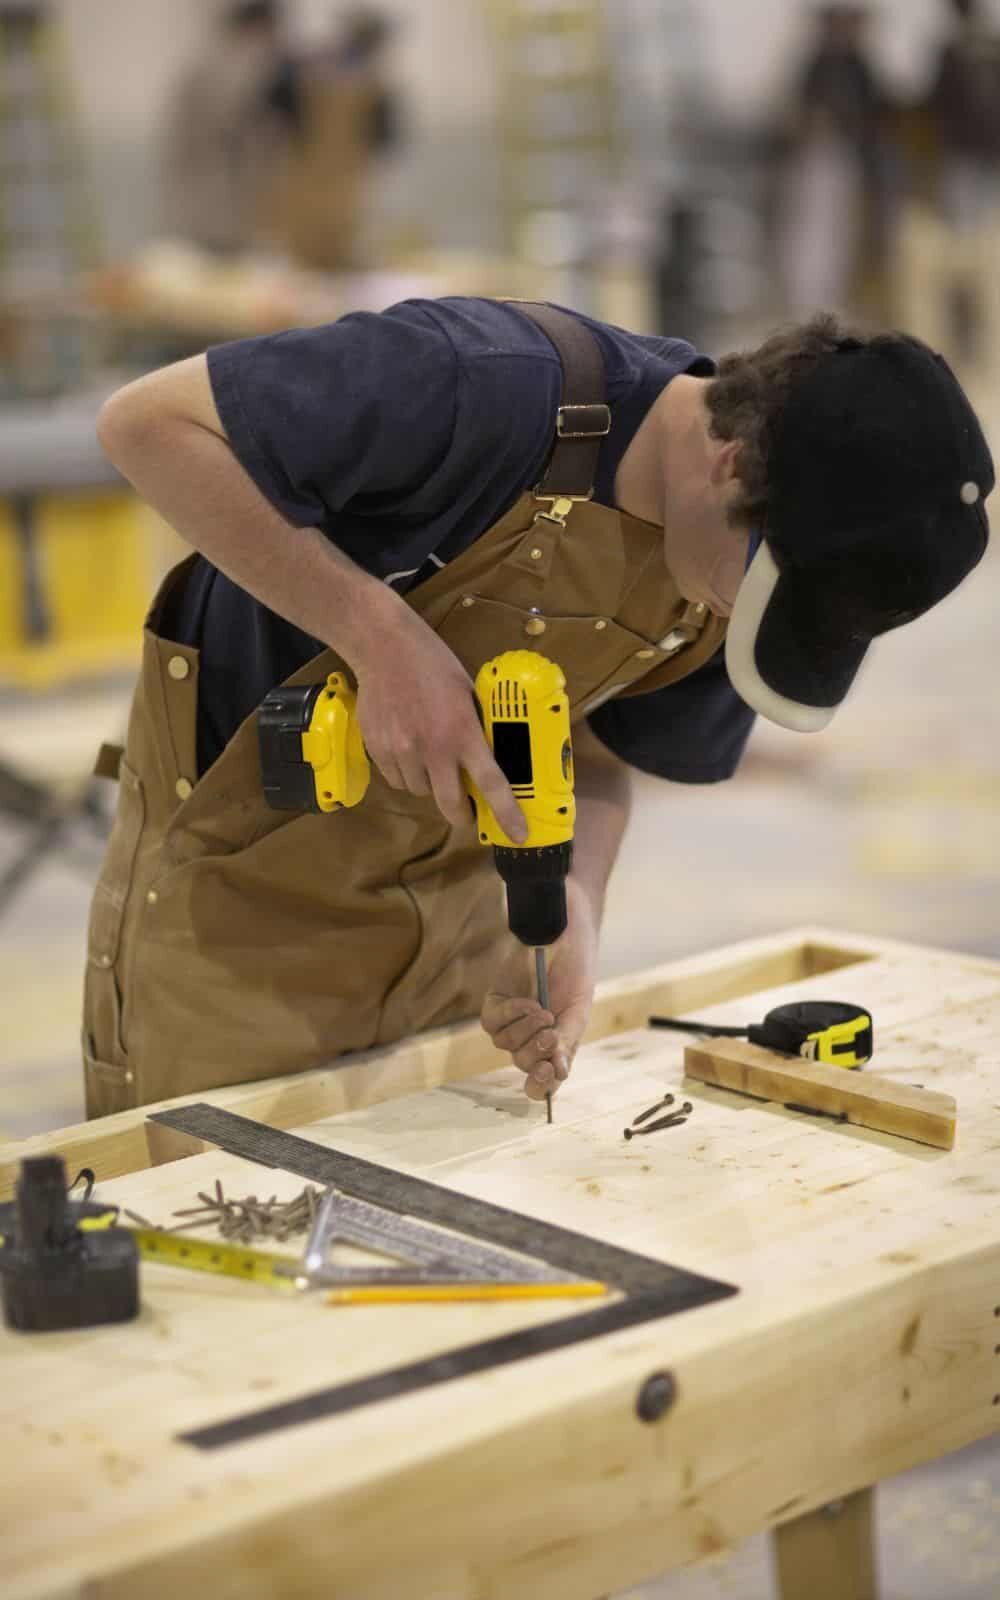
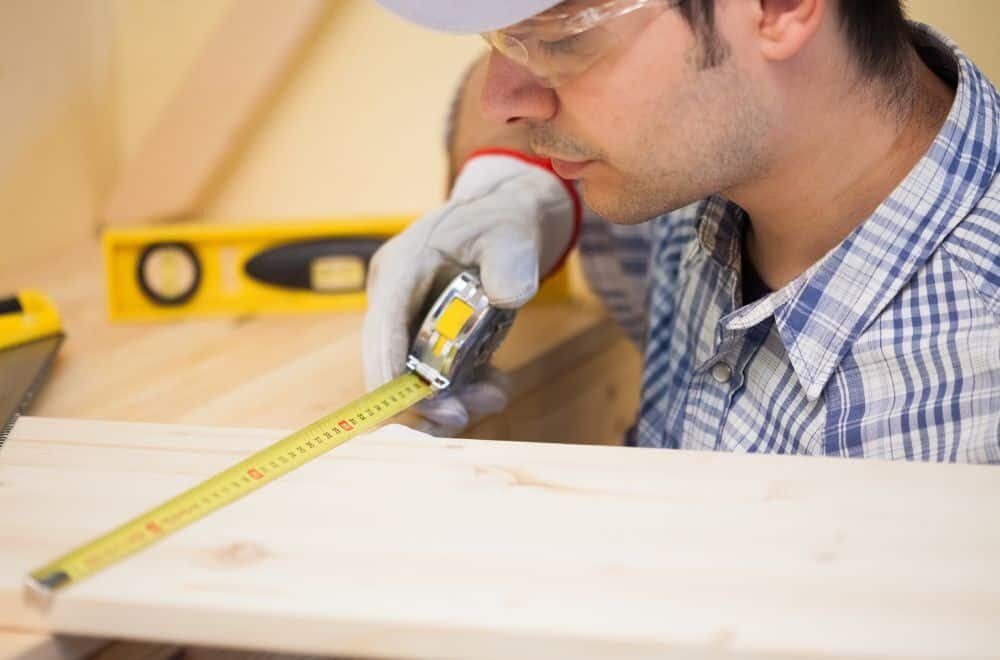
Cutting the Wood

Cutting the wood is an essential part of building a wooden dollhouse. In this section, we will discuss safety measures and how to use a saw when cutting the wood.

Safety Measures

Before you start cutting the wood, it is important to take some safety measures to avoid any accidents. Here are some tips to keep in mind:

  • Wear safety goggles to protect your eyes from sawdust and wood chips.
  • Use a dust mask to avoid inhaling sawdust.
  • Wear earplugs or earmuffs to protect your ears from the noise of the saw.
  • Use a clamp to secure the wood to the workbench to avoid any movement while cutting.
  • Keep your fingers away from the saw blade and use a push stick to guide the wood through the saw.

Using a Saw

There are different types of saws you can use to cut the wood for your dollhouse, such as a jigsaw, miter saw, or circular saw. Here are some tips on how to use a saw:

  • Read the instructions carefully before using the saw and make sure you know how to operate it.
  • Adjust the blade depth according to the thickness of the wood you are cutting.
  • Use a straight edge or a square to guide the saw for straight cuts.
  • For curved cuts, use a jigsaw and follow the lines carefully.
  • Use a miter saw to make angled cuts for corners and roof pieces.
  • Always keep the saw blade clean and sharp for better results.

By following these safety measures and tips on how to use a saw, you can cut the wood for your dollhouse accurately and safely.

Assembling the Doll House

photoreal_process_making_a_wooden_doll_house_1

Before you begin assembling your wooden doll house, make sure you have all the necessary materials and tools. You will need wood glue, nails, a hammer, a saw, and sandpaper. Once you have everything you need, you can begin the assembly process.

Joining the Pieces

The first step in assembling your doll house is to join the pieces together. To do this, you will need to use wood glue and nails. Apply a small amount of glue to the edges of the pieces you are joining together, and then use nails to secure them in place. Make sure the pieces are aligned properly before nailing them together.

It’s important to work slowly and carefully when joining the pieces together. Take your time to ensure that each piece is properly aligned and secured before moving on to the next one.

Securing with Glue

Once you have joined all the pieces together, you can use wood glue to reinforce the joints. Apply a small amount of glue to each joint, and then use a brush or your finger to spread it evenly. Make sure you apply enough glue to fully cover the joint, but not so much that it drips or runs.

After applying the glue, use clamps or weights to hold the pieces in place while the glue dries. This will help ensure that the joints are strong and secure.

Once the glue has dried, use sandpaper to smooth out any rough edges or surfaces. This will give your doll house a polished and professional look.

In conclusion, assembling a wooden doll house requires patience and attention to detail. By following these steps and taking your time, you can create a beautiful and sturdy doll house that will provide hours of enjoyment.

Finishing Touches

Once you have completed building your wooden dollhouse, it’s time to add the finishing touches that will make it look complete and beautiful. This section will cover two important sub-sections: Sanding the Edges and Painting and Decorating.

Sanding the Edges

Before painting and decorating your dollhouse, it’s essential to sand the edges to ensure that they are smooth and free of splinters. You can use a sanding block or sandpaper to sand the edges. Be sure to sand in the direction of the grain to avoid creating scratches on the surface of the wood.

Once you have sanded the edges, you can use a damp cloth to wipe away any dust or debris. Then, let the dollhouse dry completely before moving on to the next step.

Painting and Decorating

Painting and decorating your dollhouse is where you can get creative and add your personal touch. You can use a variety of materials such as paint, wallpaper, fabric, and stickers to decorate your dollhouse.

Before painting, it’s important to prime the surface with a primer to ensure that the paint adheres properly. You can use acrylic or latex paint to paint the dollhouse. Be sure to use a paintbrush that is appropriate for the size of the surface you are painting.

When decorating the dollhouse, you can use wallpaper to add patterns and texture to the walls. You can also use fabric to create curtains and bedding for the dollhouse. Stickers can be used to add small details such as flowers or animals.

It’s important to let each layer of paint or glue dry completely before adding another layer. This will ensure that the final result looks neat and professional.

In conclusion, sanding the edges and painting and decorating the dollhouse are essential steps in completing your wooden dollhouse. With a little bit of creativity and patience, you can create a beautiful and unique dollhouse that you will be proud to display.

Maintenance Tips

Taking care of your wooden dollhouse is essential to ensure it lasts for years to come. Here are some maintenance tips to keep your dollhouse in top condition:

Cleaning Your Wooden Doll House

Cleaning your wooden dollhouse is a crucial part of maintenance. Here are some tips to help you keep your dollhouse clean:

  • Use a soft cloth or brush to remove dust and dirt from the surface of your dollhouse.
  • Avoid using water or any cleaning agents that contain harsh chemicals as they can damage the wood.
  • If you need to clean the inside of your dollhouse, use a small vacuum cleaner or a soft brush to remove dust and dirt.
  • If you notice any stains or marks on your dollhouse, try using a mild soap and water solution to clean them off.

Minor Repairs

Over time, your wooden dollhouse may require minor repairs. Here are some tips to help you fix any minor issues:

  • If you notice any loose parts, use wood glue to reattach them.
  • If any parts of your dollhouse become damaged, use wood filler to fill in any cracks or holes.
  • If you need to repaint your dollhouse, use a primer before applying the paint to ensure it adheres properly to the wood.

By following these maintenance tips, you can ensure that your wooden dollhouse stays in great condition for years to come.

How to Build a Wooden Coffee Table: A Beginner's Guide

Building your own wooden coffee table can be a fun and rewarding DIY project. Not only can you customize it to fit your personal style and decor, but you can also save money compared to buying a pre-made table. With the right tools and materials, building a wooden coffee table can be a relatively simple project that even a beginner woodworker can tackle.

Before you start building your coffee table, you’ll need to decide on the design and size that you want. There are many different styles to choose from, including traditional, modern, rustic, and more. You’ll also need to consider the size of your space and how much room you want the table to take up. Once you have a design in mind, you can start gathering your materials and tools.

When it comes to materials, you’ll need to choose the type of wood you want to use for your coffee table. Popular choices include oak, pine, and maple, but there are many other types of wood to choose from as well. You’ll also need screws, wood glue, sandpaper, and a finish to protect the wood and give it a polished look. With these materials and the right tools, you’ll be ready to start building your very own wooden coffee table.

Understanding the Basics

If you’re looking to build a wooden coffee table, there are a few basics you need to understand before you get started. In this section, we’ll cover the types of wood you can use and the essential tools you’ll need.

Types of Wood

When it comes to building a coffee table, you have a few options when it comes to the type of wood you use. Here are some of the most popular options:

  • Pine: Pine is a softwood that’s easy to work with and relatively inexpensive. It’s a good option if you’re a beginner or on a budget.
  • Oak: Oak is a hardwood that’s durable and has a beautiful grain pattern. It’s more expensive than pine but can add a touch of elegance to your coffee table.
  • Maple: Maple is another hardwood that’s known for its durability. It has a lighter color than oak and a more subtle grain pattern.
  • Walnut: Walnut is a hardwood that’s known for its rich, dark color and beautiful grain pattern. It’s one of the more expensive options but can add a touch of sophistication to your coffee table.

Essential Tools

To build a wooden coffee table, you’ll need a few essential tools. Here are the tools you’ll need:

  • Circular saw or table saw: You’ll need a saw to cut the wood to size. A circular saw or table saw will work well for this.
  • Drill: You’ll need a drill to make pilot holes and attach screws.
  • Jigsaw: A jigsaw can be useful for cutting curves or other intricate shapes.
  • Clamps: Clamps can hold the wood in place while you work on it.
  • Sandpaper: Sandpaper will help you smooth out any rough edges or surfaces.

With these basics in mind, you’re ready to start building your wooden coffee table.

Designing Your Coffee Table

When it comes to designing your coffee table, there are a few important factors to consider. You want to make sure that the table fits your space, matches your decor, and serves the functions that you need it to. Here are some tips on how to design your coffee table to meet your needs.

Choosing the Style

The first step in designing your coffee table is to choose the style that you want. There are many different styles to choose from, including rustic, modern, traditional, and more. Consider the overall look and feel of your space when choosing a style for your coffee table. You want it to complement your existing decor and not clash with it.

Determining the Size

The next step in designing your coffee table is to determine the size that you need. Consider the size of your space, the size of your seating area, and the functions that you need your coffee table to serve. If you have a small space, you may want to choose a smaller coffee table to avoid overcrowding the area. If you have a large space, you may want to choose a larger coffee table to fill the space and provide ample surface area for drinks and snacks.

When determining the size of your coffee table, consider the height as well. You want to make sure that the table is the right height for your seating area. A coffee table that is too high or too low can be uncomfortable to use.

In conclusion, designing your coffee table is an important step in creating a functional and stylish living space. By choosing the right style and size for your needs, you can create a coffee table that perfectly complements your decor and serves the functions that you need it to.

Preparing the Wood

Before you can start building your wooden coffee table, you need to prepare the wood. This involves selecting the right type of wood and cutting it to the appropriate size.

Selecting the Wood

When selecting wood for your coffee table, you want to choose a type of wood that is both sturdy and attractive. Some popular choices include oak, maple, cherry, and walnut. Keep in mind that different types of wood have different properties, such as hardness, grain pattern, and color. Consider what will match the style of your home and what will fit your budget.

Once you have selected your wood, you need to make sure it is properly dried and cured. This will prevent the wood from warping or cracking later on. You can either buy pre-dried wood or dry it yourself by storing it in a dry, well-ventilated area for several weeks.

Cutting the Wood

After selecting the wood, the next step is to cut it to the appropriate size. This will depend on the dimensions of the coffee table you want to build. You can use a saw, such as a circular saw or a table saw, to cut the wood. Make sure to measure twice and cut once to avoid any mistakes.

You may also want to consider using a planer to smooth out the wood and remove any imperfections. This will give your coffee table a more polished look. Additionally, you can use a router to add decorative edges to the wood.

Overall, preparing the wood is an important step in building a wooden coffee table. By selecting the right type of wood and cutting it to the appropriate size, you can ensure that your coffee table will be both sturdy and attractive.

Assembling Your Coffee Table

Now that you have all the parts cut and ready, it’s time to assemble your coffee table. This section will guide you through the process of joining the parts and securing the structure.

Joining the Parts

  1. Start by assembling the base of your coffee table. Use pocket-hole screws to attach the legs to the aprons. Make sure to use a square to ensure that everything is aligned properly.

  2. Once the base is assembled, it’s time to attach the tabletop. Apply wood glue to the top of the aprons and place the tabletop on top. Make sure that the tabletop is centered and overhangs the aprons evenly on all sides.

  3. Use clamps to hold the tabletop in place while you attach it to the aprons. Drill pilot holes and use screws to secure the tabletop to the aprons.

  4. Finally, attach the tabletop trim using pocket-hole screws. Make sure that the trim is flush with the top of the tabletop.

Securing the Structure

  1. Once your coffee table is fully assembled, it’s important to make sure that it’s structurally sound. Check that all joints are tight and that the legs are level.

  2. If you notice any wobbling, adjust the legs until the table is stable. You can also use shims to level the table if necessary.

  3. Sand any rough edges or surfaces and apply a coat of finish to protect your coffee table and give it a polished look.

By following these steps, you’ll have a beautiful and sturdy wooden coffee table that you can be proud of.

Finishing Touches

Once your wooden coffee table is assembled, it’s time to add the finishing touches to make it look polished and professional. This section will cover the final steps of sanding and applying the finish.

Sanding the Surface

Before applying the finish, you’ll want to make sure the surface of your coffee table is smooth and free of any rough spots or imperfections. Start by using a coarse grit sandpaper, such as 80-grit, and work your way up to a finer grit, such as 220-grit, for a smooth finish.

To avoid scratching the surface of your table, make sure to sand with the grain of the wood. Use a sanding block or a power sander to make the job easier and more efficient. Once you’ve sanded the surface to your liking, wipe it down with a clean, dry cloth to remove any dust or debris.

Applying the Finish

There are many different finishes you can use to protect and enhance the beauty of your wooden coffee table. Some popular options include polyurethane varnish, tung oil, and wax. Here’s a brief overview of each:

  • Polyurethane Varnish: This is a durable and long-lasting finish that provides excellent protection against scratches and stains. It’s available in both oil-based and water-based formulas, and can be applied with a brush, roller, or spray gun.

  • Tung Oil: This is a natural oil that penetrates the wood to provide a deep, rich finish. It’s easy to apply and provides good protection against moisture and stains. However, it does require more maintenance than polyurethane varnish.

  • Wax: This is a traditional finish that provides a soft, matte sheen. It’s easy to apply and provides good protection against moisture and stains. However, it’s not as durable as polyurethane varnish or tung oil.

When applying the finish, make sure to follow the manufacturer’s instructions carefully. Apply the finish in a well-ventilated area, and use a clean brush or cloth to ensure a smooth and even application. Allow the finish to dry completely before using your coffee table.

How to Make a Wooden Ashtray: A Step-by-Step Guide

Making a wooden ashtray is a fun and easy woodworking project that you can complete in just a few hours. Whether you’re a smoker yourself or you’re looking for a unique gift for a smoker in your life, a handmade wooden ashtray is a great choice. In this article, we’ll show you step-by-step how to make a wooden ashtray using simple tools and materials.

To get started, you’ll need some basic woodworking tools, including a saw, a drill, and sandpaper. You’ll also need a piece of wood that’s large enough to cut into the shape of an ashtray. You can use any type of wood you like, but hardwoods like oak, cherry, and walnut are good choices because they’re durable and look great when finished. If you’re new to woodworking, don’t worry – this project is suitable for beginners and doesn’t require any advanced skills or techniques.

Understanding Wood Types

When it comes to making a wooden ashtray, choosing the right type of wood is crucial. Not all woods are created equal, and each has its own unique characteristics that can affect the final product. Here are the two main types of wood to consider:

Hardwood

Hardwood comes from deciduous trees, which are trees that lose their leaves in the fall. They are generally denser and more durable than softwoods, making them a popular choice for furniture and other woodworking projects. Some common hardwoods used for ashtrays include:

  • Oak: A strong and durable wood with a prominent grain pattern.
  • Walnut: A rich, dark wood with a smooth finish.
  • Maple: A light-colored wood with a subtle grain pattern.

When choosing a hardwood for your ashtray, consider the color, grain pattern, and density of the wood. Hardwoods can be more expensive than softwoods, so keep that in mind when making your selection.

Softwood

Softwood comes from evergreen trees, which are trees that keep their leaves year-round. They are generally lighter and less dense than hardwoods, making them easier to work with. Some common softwoods used for ashtrays include:

  • Pine: A light-colored wood with a straight grain pattern.
  • Cedar: A reddish-brown wood with a distinctive aroma.
  • Spruce: A light-colored wood with a fine grain pattern.

When choosing a softwood for your ashtray, consider the ease of working with the wood, as well as its color and grain pattern. Softwoods are generally less expensive than hardwoods, but may not be as durable.

In conclusion, choosing the right type of wood for your ashtray is an important decision that can affect the final product. Consider the characteristics of both hardwoods and softwoods before making your selection, and choose a wood that fits your needs and budget.

Gathering Materials

Before you start making a wooden ashtray, you need to gather all the materials required. In this section, we will discuss the two main sub-sections of gathering materials: Wood Selection and Tools Needed.

Wood Selection

Choosing the right type of wood is crucial for making a wooden ashtray. You want a wood that is dense and hard enough to withstand the heat of a cigarette or cigar. Here are some of the best wood types for making an ashtray:

Wood Type Description
Oak Durable and strong, with a beautiful grain pattern.
Maple Hard and dense, with a light color that looks great when finished.
Walnut A dark wood with a rich, warm color. Durable and resistant to scratches.
Cherry A beautiful wood with a reddish-brown color that darkens over time.

When selecting wood, make sure it is free of knots, cracks, or other defects that could weaken the structure of the ashtray. You can also choose to use reclaimed wood or scraps from previous projects, as long as they are in good condition.

Tools Needed

To make a wooden ashtray, you will need a few basic tools. Here is a list of the most essential tools you will need:

  • Saw: A saw is necessary for cutting the wood to the desired size and shape.
  • Drill: You will need a drill to make the holes for the cigarettes or cigars.
  • Sandpaper: Sandpaper is used to smooth out the rough edges and surfaces of the wood.
  • Clamps: Clamps are used to hold the pieces of wood together while the glue dries.
  • Wood Glue: You will need wood glue to attach the pieces of wood together.

Other tools that can be useful but are not necessary include a wood lathe, a chisel, and a router. These tools can help you create more intricate designs and shapes for your ashtray.

By selecting the right type of wood and having the necessary tools, you are now ready to start making your wooden ashtray.

Safety Precautions

When working with wood, it’s important to take the necessary safety precautions to avoid any accidents or injuries. Here are a few things to keep in mind when making a wooden ashtray:

Wear Protective Gear

Before you start working with wood, make sure to wear appropriate protective gear. This includes safety glasses, a dust mask, and gloves. Safety glasses will protect your eyes from flying wood chips, while a dust mask will prevent you from inhaling sawdust. Gloves will protect your hands from splinters and other injuries.

Use Proper Tools

Make sure to use the proper tools for the job. Using the wrong tool can be dangerous and can damage your workpiece. Always use sharp tools, as dull tools can slip and cause injuries. Keep your tools clean and well-maintained to ensure they work properly.

Keep Your Work Area Clean

A cluttered work area can be dangerous, as it increases the risk of accidents and injuries. Make sure to keep your work area clean and organized. Sweep up sawdust and wood chips regularly, and dispose of them properly. Keep your tools and materials organized and stored away when not in use.

Use Caution When Cutting

When cutting wood, always use caution. Make sure to keep your fingers and other body parts away from the blade. Use a push stick or push block to guide the wood through the saw, and never use your hands to push the wood. Always make sure the blade is properly aligned and tightened before making any cuts.

Avoid Distractions

Finally, it’s important to avoid distractions when working with wood. Focus on the task at hand and avoid using your phone or other electronic devices while working. Distractions can cause you to lose focus and make mistakes, which can be dangerous when working with power tools.

By following these safety precautions, you can ensure a safe and enjoyable woodworking experience.

Designing Your Ashtray

When making a wooden ashtray, it’s important to consider the design carefully. You want to create a functional and visually appealing ashtray that you will enjoy using. Here are some tips to help you design your ashtray.

Sketching

Before you start building your ashtray, it’s a good idea to sketch out some designs. This will help you visualize how your ashtray will look and make it easier to make any necessary adjustments before you start building.

Consider the size and shape of your ashtray, as well as any decorative elements you want to include. You can also experiment with different types of wood to see how they will look with your design.

Size and Shape

The size and shape of your ashtray will depend on your personal preference and how you plan to use it. If you plan to use it for cigarettes, you may want a smaller ashtray that can fit on a table or desk. If you plan to use it for cigars, you may want a larger ashtray that can accommodate the size of the cigar.

Consider the shape of your ashtray as well. A rectangular ashtray may be more practical, but a round ashtray may be more visually appealing. You can also experiment with different shapes, such as oval or triangular, to see what works best for your design.

Remember to keep the size and shape of your ashtray in proportion to the size of your smoking materials. You don’t want your ashtray to be too small or too large for your cigarettes or cigars.

In summary, sketching and carefully considering the size and shape of your ashtray are important steps in designing a functional and visually appealing ashtray. Experiment with different designs and materials to find the perfect ashtray for your needs.

Cutting the Wood

To start making your wooden ashtray, you will need to cut your wood into equal dimensions. This will ensure that your ashtray is symmetrical and aesthetically pleasing. Here are some steps to follow when cutting your wood:

  1. Choose the right type of wood: For your ashtray, it is best to use hardwood such as walnut, oak, or maple. These types of wood are durable and have a beautiful grain pattern that will enhance the look of your ashtray.

  2. Measure and mark your wood: Using a ruler and pencil, mark your wood at the desired length and width. Make sure to measure twice and cut once to avoid any mistakes.

  3. Cut your wood: Using a saw, cut your wood along the marked lines. It is important to use a saw that is appropriate for the thickness of your wood. A handsaw or circular saw is ideal for thinner pieces, while a jigsaw or band saw is better for thicker pieces.

  4. Sand your wood: After cutting, sand your wood to remove any rough edges or splinters. Start with a coarse-grit sandpaper and gradually move to a finer-grit sandpaper until the surface is smooth to the touch.

  5. Finish your wood: To protect your wood from moisture and give it a beautiful finish, you can apply a coat of wood stain or oil. This will also enhance the natural grain pattern of your wood.

By following these steps, you can easily cut your wood into equal dimensions and prepare it for the next step in making your wooden ashtray.

Carving the Ashtray

Carving the ashtray is the most important part of the process. It requires precision and patience to create the perfect shape and size for the bowl. In this section, we will cover two sub-sections: Creating the Bowl and Adding Grooves.

Creating the Bowl

To create the bowl of the ashtray, you will need to use a router or a chisel. If you are using a router, attach a bowl cutter bit to it. If you are using a chisel, choose a size that matches the desired size of your bowl.

  1. Clamp the wooden block onto your workbench to prevent it from moving while you work.
  2. Begin carving the bowl by making small cuts around the perimeter of the circle.
  3. Gradually increase the depth of your cuts until you reach the desired depth.
  4. Smooth out the bottom of the bowl with sandpaper or a chisel.

Adding Grooves

Adding grooves to your ashtray can help prevent ash and cigarette butts from falling out. Here’s how to do it:

  1. Mark the location of the grooves on the side of the ashtray.
  2. Use a router or a chisel to carve out the grooves.
  3. Sand the grooves to remove any rough edges.

Remember to take your time and be patient when carving the ashtray. It’s better to make small cuts and adjustments than to make a mistake that ruins the entire piece.

Sanding and Smoothing

Now that you have your wooden ashtray cut and shaped, it’s time to sand and smooth it to perfection. This step is crucial to ensure that the ashtray is not only functional but also visually appealing.

Start by using coarse sandpaper with a grit of around 80 to remove any rough spots or splinters on the surface of the wood. Be sure to sand in the direction of the grain to avoid damaging the wood fibers. You can use a sanding block or simply fold the sandpaper in half and grip it with your hand to make the process easier.

Once you have removed all the rough spots, switch to a finer grit sandpaper, around 120-150, to smooth out the surface further. Repeat this process with even finer grit sandpaper until you reach the desired level of smoothness.

After sanding, use a soft cloth to remove any dust or debris from the surface of the ashtray. You can also use compressed air to blow away any remaining dust from hard-to-reach areas.

If you want to take the smoothing process to the next level, you can use a wood file or a wood scraper to remove any remaining rough spots or edges. This will give your ashtray a polished and professional look.

Remember, the smoother the surface, the easier it will be to clean the ashtray and keep it looking new. So take your time and make sure to sand and smooth your wooden ashtray thoroughly.

Finishing Touches

Once your wooden ashtray has been sanded and shaped, it’s time to add the finishing touches to protect and enhance the natural beauty of the wood. Here are two sub-sections to guide you through the process of staining and sealing your ashtray.

Staining

Staining your wooden ashtray is an optional step, but it can add depth and color to the wood. Before starting, make sure the surface is clean and free from dust and debris. Here are the steps to follow:

  1. Choose a wood stain that complements the color of your wood. Test it on a small, inconspicuous area to see how it looks before applying it to the entire surface.
  2. Apply the stain with a foam brush or a clean cloth, following the direction of the wood grain. Work in small sections to ensure an even coat.
  3. Let the stain sit for a few minutes, then wipe off any excess with a clean cloth.
  4. Allow the stain to dry completely before moving on to the next step.

Sealing

Sealing your wooden ashtray will protect it from moisture, dirt, and other contaminants. It will also give it a smooth, glossy finish. Here’s how to do it:

  1. Choose a clear, protective finish that is appropriate for your wood type. Polyurethane and lacquer are popular choices.
  2. Apply the finish with a foam brush or a clean cloth, following the direction of the wood grain. Work in small sections to ensure an even coat.
  3. Let the finish dry for the recommended time, then sand lightly with a fine-grit sandpaper.
  4. Apply a second coat of finish, following the same process as before.
  5. Let the finish dry completely before using your ashtray.

Remember to follow the manufacturer’s instructions for the stain and finish you choose. With these simple steps, your wooden ashtray will be ready to use and will look beautiful for years to come.

How to Make a Wooden Treasure Chest: A Step-by-Step Guide

If you’re looking for a fun woodworking project, building a wooden treasure chest is a great option. Not only is it a practical way to store your valuables, but it can also be a unique and decorative piece for your home. With a few basic tools and some lumber, you can create a treasure chest that is both functional and aesthetically pleasing.

Before you start building, you’ll need to decide on the size of your chest. Consider what you plan to store inside and choose your dimensions accordingly. You can use a variety of lumber types, but hardwoods like maple or oak are a good choice for durability. Once you have your lumber, you’ll need to cut it to size and assemble the pieces using screws or nails. Don’t forget to add a hinged lid and a latch to keep your treasures secure. With some sanding and finishing, your wooden treasure chest will be ready to use.

Materials Needed

To make a wooden treasure chest, you will need the following materials:

  • Wood: You can use any type of wood, but hardwoods such as oak, maple, or cherry are recommended because they are durable and easy to work with. You will need enough wood to create the sides, top, bottom, and front and back pieces of the chest. The amount of wood you need will depend on the size of the chest you want to make.

  • Wood Glue: You will need wood glue to hold the pieces of the chest together. Choose a high-quality wood glue that dries clear and is easy to work with.

  • Sandpaper: You will need sandpaper to smooth out any rough edges and to prepare the wood for staining or painting.

  • Stain or Paint: You can choose to stain or paint your treasure chest. Stain will enhance the natural beauty of the wood, while paint will allow you to customize the chest to your liking.

  • Hardware: You will need hardware such as hinges, a hasp, and a latch to secure the lid of the chest. You can choose hardware that matches the style of the chest or that adds a decorative touch.

  • Tools: You will need a variety of tools to create your treasure chest, including a saw, drill, hammer, chisels, and clamps. Make sure you have all the necessary tools before you begin your project.

Once you have gathered all the necessary materials, you are ready to begin building your wooden treasure chest.

Choosing the Right Wood

When it comes to making a wooden treasure chest, choosing the right wood is crucial. You want a wood that is strong, durable, and can withstand the test of time. Here are some factors to consider when selecting the right wood for your project:

Type of Wood

Different types of wood have different properties that can affect the overall look and durability of your treasure chest. Some popular types of wood for building treasure chests include:

  • Cedar: Known for its natural resistance to rot and insects, cedar is a great option for outdoor treasure chests.

  • Pine: Pine is a softwood that is easy to work with and has a classic look. However, it is not as durable as some other types of wood.

  • Oak: Oak is a hardwood that is strong and durable. It has a beautiful grain pattern and a classic look.

  • Mahogany: Mahogany is a hardwood that is known for its rich color and durability. It is a popular choice for high-end furniture and can add a touch of elegance to your treasure chest.

Grain Pattern

The grain pattern of the wood can affect the overall appearance of your treasure chest. Some woods, like oak, have a prominent grain pattern that can add character to your project. Other woods, like pine, have a more subtle grain pattern that can give your treasure chest a clean, classic look.

Moisture Content

The moisture content of the wood is another important factor to consider. Wood that is too wet can warp or crack over time, while wood that is too dry can be brittle and difficult to work with. Make sure to choose wood that has been properly dried and stored to ensure the best results.

By considering these factors when selecting the right wood for your treasure chest, you can create a beautiful and durable piece that will last for years to come.

Designing Your Treasure Chest

When it comes to designing your treasure chest, there are a few things to consider. You want to create a chest that is both functional and aesthetically pleasing. Here are some tips to help you design the perfect treasure chest.

Size and Shape

The first thing you need to consider is the size and shape of your chest. Think about what you will be storing inside and how much space you will need. You also want to consider the overall shape of the chest. Do you want it to be rectangular or more rounded? Keep in mind that the shape will affect the overall look of the chest.

Materials

The materials you choose for your treasure chest will also play a big role in the design. Wood is a popular choice for treasure chests, but you can also use metal or even plastic. Consider the overall look you are going for and choose materials that will help you achieve that look.

Style and Decoration

The style and decoration of your chest are also important. Do you want a more rustic look, or do you prefer a more polished finish? You can add decorative elements like metal studs, carvings, or even paint to customize your chest and make it unique.

Functionality

Finally, you want to consider the functionality of your chest. Think about how you will be opening and closing the chest and whether you need any additional features like locks or hinges. It’s also a good idea to make sure the chest is sturdy enough to hold the weight of your treasures.

By considering these factors, you can design a treasure chest that is both beautiful and functional. Take your time and enjoy the process of creating a chest that will hold your most prized possessions.

Cutting the Wood

When it comes to making a wooden treasure chest, cutting the wood is the first step. This can be a bit intimidating if you’re not used to working with power tools, but with the right preparation, it can be a breeze. Here’s what you need to do:

Preparing the Planks

First, you’ll need to gather the lumber you’ll be using for your treasure chest. You can use any type of wood you like, but hardwoods like oak, maple, or cherry are popular choices because they are durable and have a beautiful grain pattern.

Once you have your lumber, you’ll need to measure and mark it for cutting. Use a straightedge and a pencil to make your marks, and double-check your measurements before you start cutting.

Creating the Base

The base of your treasure chest will be made up of four planks that are cut to the same length. To make sure they are all the same length, you can use a stop block on your saw. A stop block is a piece of wood that is clamped to your saw’s fence, and it will prevent you from cutting the plank too short.

Once you have your four planks cut to length, you’ll need to cut notches in the ends so they can be joined together. To do this, you can use a dado blade on your saw, or you can make multiple passes with a regular blade.

Forming the Lid

The lid of your treasure chest will be made up of two planks that are cut to the same length and width as the base planks. To create the curved shape of the lid, you’ll need to make angled cuts on the ends of each plank.

To do this, you can use a miter saw or a circular saw with a guide. Make sure to measure and mark your cuts carefully, and take your time to ensure they are all the same angle.

With the base and lid planks cut to size and shape, you’re ready to move on to the next step of building your wooden treasure chest.

Assembling the Chest

Now that you have all the pieces cut and sanded, it’s time to assemble the chest. This is where the magic happens and your treasure chest starts to take shape. In this section, we’ll cover two important steps in assembling the chest: joining the pieces and installing the lid.

Joining the Pieces

To join the pieces of the chest together, you will need to use wood glue and nails or screws. Here’s how to do it:

  1. Apply a thin layer of wood glue to the edges of the front, back, and side pieces where they will be joined together.
  2. Align the edges of the pieces and clamp them together until the glue dries. Make sure the corners are square.
  3. Once the glue is dry, you can reinforce the joints with nails or screws. Pre-drill the holes to avoid splitting the wood.

Installing the Lid

Installing the lid is the final step in assembling the chest. Here’s how to do it:

  1. Attach the hinges to the back of the chest and the lid. Make sure they are evenly spaced and aligned.
  2. Screw the hinges into place, making sure they are secure.
  3. Test the lid to make sure it opens and closes smoothly. Adjust the hinges if necessary.

Congratulations! You have successfully assembled your wooden treasure chest. Now it’s time to add any finishing touches, such as staining or painting, and fill it with your treasures.

Finishing Touches

Once you have assembled your wooden treasure chest, it’s time to add the finishing touches to make it look like a true treasure. Here are some steps to follow to add the final details to your chest.

Sanding the Surfaces

Before applying any finish, you should sand all surfaces of your chest to ensure that they are smooth and free of any rough spots or splinters. Use a fine-grit sandpaper (around 220 grit) to sand all surfaces, including the lid, sides, and bottom. Be sure to sand in the direction of the wood grain to avoid any scratches.

Applying the Finish

Once the sanding is complete, it’s time to apply a finish to your chest. There are many types of finishes you can use, such as stain, paint, or varnish. Choose the finish that best suits your desired look. If you want a natural wood look, consider using a clear coat of varnish.

To apply the finish, use a brush or cloth to evenly coat all surfaces of the chest. Be sure to follow the manufacturer’s instructions for drying time and number of coats needed. Allow the finish to dry completely before moving on to the next step.

Adding Decorative Elements

To add some extra flair to your treasure chest, consider adding some decorative elements. You can use brass corners or hinges, or even add some painted designs or stencils. Here are some ideas to get you started:

  • Add a metal lock and key
  • Paint on some pirate-themed designs, such as skulls or crossbones
  • Use stencils to add a decorative border around the edges of the chest
  • Attach some metal handles to the sides of the chest for easy carrying

With these finishing touches, your wooden treasure chest will be ready to hold all of your precious treasures.

understanding-different-types-of-wood

What's the Best Wood for a Homemade Desk Desktop and Why?

Are you thinking about building a homemade desk? One of the most important decisions you’ll have to make is what type of wood to use for the desktop. With so many options available, it can be overwhelming to choose the best one for your needs. In this article, we’ll explore the different types of wood commonly used for desktops and discuss the pros and cons of each.

When it comes to selecting the best type of wood for a desktop, there are several factors to consider. You’ll want a wood that is sturdy, durable, and can withstand daily wear and tear. It should also be aesthetically pleasing and complement the overall design of your desk. Additionally, you’ll want to consider the cost and availability of the wood. By taking these factors into account, you can make an informed decision about which type of wood is right for your project. So, let’s dive in and explore your options!

Understanding Different Types of Wood

understanding-different-types-of-wood

When it comes to choosing the best type of wood for your homemade desk, it’s important to understand the different options available to you. Here are the three main categories of wood to consider:

Hardwoods

Hardwoods come from deciduous trees, which means they lose their leaves annually. They are generally more durable and dense than softwoods, making them an excellent choice for a desktop. Some popular hardwood options for a desk include:

  • Oak: A classic choice that is strong and durable, with a distinctive grain pattern.
  • Maple: Known for its light color and smooth grain, maple is a popular choice for modern desks.
  • Walnut: A beautiful dark wood with a rich, warm tone that makes for an elegant desk.

Softwoods

Softwoods come from evergreen trees, which means they keep their leaves year-round. They are generally less dense and less expensive than hardwoods, but can still make a great choice for a desktop. Some popular softwood options for a desk include:

  • Pine: A light-colored wood with a straight grain that is easy to work with.
  • Cedar: A softwood with a distinctive scent that repels insects, making it a good choice for outdoor desks.
  • Spruce: A light-colored wood with a fine grain that is strong and lightweight.

Engineered Woods

Engineered woods are made from a combination of wood fibers and adhesives, and are designed to be stronger and more durable than solid wood. They can be a good choice for a desktop if you want something that is resistant to warping and cracking. Some popular engineered wood options for a desk include:

  • Plywood: Made from thin layers of wood that are glued together, plywood is strong and stable.
  • MDF: Short for medium-density fiberboard, MDF is made from wood fibers and resin, and is known for its smooth surface and uniform density.
  • Particleboard: Made from wood chips and resin, particleboard is a cost-effective option that is less durable than other engineered woods.

By understanding the different types of wood available, you can make an informed decision about which one is right for your homemade desk. Consider factors such as durability, aesthetics, and cost when making your choice.

Key Factors to Consider

key-factors-to-consider

When it comes to choosing the best type of wood for a desktop on a homemade desk, there are several factors that you should consider. Here are the key factors to keep in mind:

Durability

One of the most important factors to consider when choosing the best type of wood for a desktop is durability. You want a wood that can withstand the wear and tear of daily use without showing signs of damage. Some of the most durable woods for desktops include oak, maple, and birch plywood. These woods are strong, sturdy, and can last for years with proper maintenance.

Aesthetic Appeal

Another important factor to consider when choosing the best type of wood for a desktop is aesthetic appeal. You want a wood that looks good and complements the overall design of your homemade desk. Some woods, like maple and oak, have attractive grain patterns that can add visual interest to your desktop. Other woods, like birch plywood, have a more uniform appearance that can create a clean, modern look.

Cost

Cost is also an important factor to consider when choosing the best type of wood for a desktop. Some woods, like oak and maple, can be more expensive than others. If you’re on a tight budget, you may want to consider using a less expensive wood, like birch plywood. However, keep in mind that cheaper woods may not be as durable or aesthetically pleasing as more expensive options.

In summary, when choosing the best type of wood for a desktop on a homemade desk, you should consider factors like durability, aesthetic appeal, and cost. By keeping these factors in mind, you can choose a wood that not only looks good but also stands up to daily use.

Top Wood Choices for Desktops

top-wood-choices-for-desktops

When it comes to building a homemade desk, choosing the right type of wood for your desktop is crucial. The type of wood you choose can affect the durability, appearance, and overall quality of your desk. Here are some of the top wood choices for desktops:

Oak

Oak is one of the most popular choices for desktops, and for good reason. It is a hardwood that is known for its strength and durability. Oak desks can last for several decades, making them a great investment. Oak also has a beautiful grain pattern that can add character to your desk.

Maple

Maple is another great choice for desktops. It is a hardwood that is known for its light color and smooth texture. Maple is also a very hard and durable wood, making it a great choice for a desk that will see a lot of use.

Walnut

Walnut is a beautiful hardwood that is known for its rich, dark color. It has a straight grain pattern that can add a touch of elegance to your desk. Walnut is also a very durable wood, making it a great choice for a desk that will see a lot of use.

Plywood

If you are on a budget, plywood can be a great choice for your desktop. Plywood is made from thin layers of wood that are glued together, making it strong and durable. It is also very affordable and easy to work with. Plywood can be stained or painted to match your decor, making it a versatile choice for a homemade desk.

In conclusion, choosing the right type of wood for your desktop is an important decision when building a homemade desk. Oak, maple, walnut, and plywood are all great choices depending on your budget and desired aesthetic. Consider the durability, appearance, and cost of each type of wood before making your final decision.

Benefits of Each Wood Type

benefits-of-each-wood-type

Benefits of Oak

Oak is a popular choice for desktops because of its durability and strength. It is a hardwood that is resistant to wear and tear, making it ideal for a desk that will be used frequently. Oak has a distinctive grain pattern that gives it a unique look, and it is available in a range of colors from light to dark.

Other benefits of oak include:

  • Resistant to moisture and humidity
  • Easy to work with
  • Long-lasting and durable
  • Can be stained or painted to match your desired aesthetic

Benefits of Maple

Maple is a light-colored hardwood that is affordable and easy to work with. It is a popular choice for desks because of its smooth surface and durability. Maple has a subtle grain pattern that makes it a versatile option for any style of desk.

Other benefits of maple include:

  • Resistant to scratches and dents
  • Lightweight and easy to move
  • Available in a range of finishes
  • Affordable compared to other hardwoods

Benefits of Walnut

Walnut is a high-end hardwood that is known for its rich, dark color and beautiful grain pattern. It is a popular choice for desks because of its durability and resistance to wear and tear. Walnut has a smooth surface that is easy to work with, and it is available in a range of finishes.

Other benefits of walnut include:

  • Resistant to moisture and humidity
  • Long-lasting and durable
  • Can be stained or oiled to enhance its natural beauty
  • Adds warmth and elegance to any room

Benefits of Plywood

Plywood is a composite wood material made from thin layers of wood veneer glued together. It is a popular choice for desktops because of its affordability and versatility. Plywood comes in a range of thicknesses and can be easily cut and shaped to fit any desk design.

Other benefits of plywood include:

  • Lightweight and easy to move
  • Available in a range of finishes
  • Affordable compared to solid wood options
  • Resistant to warping and cracking

Overall, the best type of wood for your desktop will depend on your budget, style preferences, and intended use. Consider the benefits of each wood type before making your final decision.

Potential Drawbacks

potential-drawbacks-1

When it comes to choosing the best type of wood for a desktop on a homemade desk, there are several factors to consider. While each type of wood has its own unique advantages, there are also some potential drawbacks to keep in mind.

Drawbacks of Oak

Although oak is a popular choice for a desktop due to its strength and durability, it does have some potential drawbacks. One of the main issues with oak is that it can be quite heavy, which may make it difficult to move around or adjust the desk height. Additionally, oak can be more expensive than some other types of wood, which may not fit within everyone’s budget.

Drawbacks of Maple

Maple is another popular choice for a desktop due to its light color and smooth, even grain. However, there are some potential drawbacks to consider. For one, maple can be quite soft, which may make it more prone to scratches and dents. Additionally, maple can be more difficult to stain than other types of wood, which may limit your options for customization.

Drawbacks of Walnut

While walnut is known for its rich, dark color and beautiful grain patterns, it also has some potential drawbacks. For one, walnut can be quite expensive compared to other types of wood, which may not be feasible for everyone’s budget. Additionally, walnut can be quite heavy, which may make it difficult to move around or adjust the desk height.

Drawbacks of Plywood

Plywood is a popular choice for a desktop due to its affordability and ease of use. However, there are some potential drawbacks to consider. For one, plywood may not be as durable as solid wood options, which may result in a shorter lifespan for your desk. Additionally, plywood may not have the same level of aesthetic appeal as other types of wood, which may not be ideal for those looking for a more visually appealing desk.

Frequently Asked Questions

What are some common types of wood used for desktops on homemade desks?

There are several types of wood that are commonly used for desktops on homemade desks. Some of the most popular ones include oak, maple, cherry, elm, cedar, and rosewood. Each of these woods has its own unique characteristics, such as color, grain pattern, and durability.

What are the advantages of using oak wood for a desk top?

Oak wood is one of the most popular choices for a desk top because of its strength and durability. It can withstand heavy use and can last for several decades with proper maintenance. Oak also has a beautiful grain pattern that can add character to your desk.

What is the difference between using maple wood and oak wood for a desk top?

While both maple and oak wood are great choices for a desk top, there are some differences between the two. Maple wood is lighter in color and has a more consistent grain pattern, while oak wood has a more pronounced grain pattern and is darker in color. Oak wood is also generally more durable than maple wood.

How thick should the wood be for a sturdy and durable desktop on a homemade desk?

The thickness of the wood for a desktop on a homemade desk depends on several factors, such as the size of the desk and the weight it will need to support. Generally, a thickness of at least 1 inch is recommended for a sturdy and durable desktop.

Are there any alternative materials that can be used for a desktop on a homemade desk?

Yes, there are several alternative materials that can be used for a desktop on a homemade desk. Some of these include plywood, MDF, MDO, and particleboard. While these materials may not be as durable as hardwood, they can still provide a sturdy and functional desktop at a lower cost.

What are some tips for building a DIY hardwood desk with a high-quality desktop?

When building a DIY hardwood desk with a high-quality desktop, it is important to choose the right type of wood for your needs and budget. You should also make sure to properly prepare and finish the wood to ensure its durability and longevity. Additionally, using high-quality hardware and taking your time during the construction process can help ensure a successful outcome.