Tag Archives: progressively finer grits

How to Make a Wooden Table: A Beginner's Guide to Crafting Your Own Furniture

Are you looking to add a unique touch to your home decor? Building your own wooden table can be a great DIY project that will not only save you money but also provide you with a sense of accomplishment. Whether you’re a seasoned woodworker or a beginner, making a wooden table is a project that can be completed with a few basic tools and materials.

Before you begin, it’s important to determine the type of table you want to make. There are many different styles and designs to choose from, so take some time to consider your preferences. You can browse furniture catalogs or woodworking magazines for inspiration, or simply search online for pictures of tables to get ideas. Once you have a clear idea of the type of table you want to build, you can start gathering the necessary materials and tools.

Choosing the Right Wood

When it comes to building a wooden table, choosing the right wood is crucial. The type of wood you select will determine the durability, appearance, and overall quality of your table. Here are some factors to consider when choosing the right wood for your project.

Hardwood Vs Softwood

The first decision you need to make is whether to use hardwood or softwood. Hardwoods are generally more durable and denser, making them ideal for furniture projects that require long-term durability, such as dining room tables. Examples of hardwoods include Beech, Hickory, Maple, Oak (including red oak and white oak), Teak, Walnut, and Cherry wood. Softwoods, on the other hand, are generally less dense and less durable, but they can be less expensive and easier to work with. Examples of softwoods include Pine, Cedar, and Fir.

Considering Wood Grain

The wood grain is an important factor to consider when choosing the right wood for your table. The grain refers to the pattern of the wood fibers, and it can affect the appearance and stability of your table. There are two main types of grain: straight grain and cross-grain. Straight grain runs parallel to the length of the board and is generally more stable. Cross-grain runs perpendicular to the length of the board and can be less stable. When choosing your wood, look for boards with straight grain and minimal knots or defects.

Understanding Wood Sizes

Understanding wood sizes is important when selecting the right wood for your table. Wood is usually sold in standard sizes, such as 1×4, 2×6, and 4×4. These sizes refer to the nominal size, which is the size of the board before it is planed and sanded. The actual size of the board will be slightly smaller. For example, a 1×4 board will actually measure 3/4 inch by 3 1/2 inches. When selecting your wood, make sure to choose boards that are straight, flat, and free from cracks or defects. It’s also a good idea to purchase extra wood in case of mistakes or defects.

By considering the type of wood, wood grain, and wood sizes, you can choose the right wood for your table project. With the right wood, you can create a beautiful and durable table that will last for years to come.

Designing Your Table

When it comes to designing your wooden table, there are a few important considerations to keep in mind. In this section, we’ll explore how to determine the dimensions of your table and how to sketch out your design.

Determining Table Dimensions

Before you start building your table, you’ll need to determine the dimensions that will work best for your space and needs. Here are a few factors to consider:

  • Size of the room: Make sure your table fits comfortably in the room without taking up too much space.
  • Number of people: Think about how many people you want to seat at the table. A standard table is about 30 inches high and can seat four to six people.
  • Purpose of the table: Will you be using the table for dining, work, or another purpose? This can affect the size and shape of the table.

Once you’ve determined the dimensions you need, make sure to measure your space carefully to ensure your table will fit.

Sketching the Table Design

Once you’ve determined the dimensions of your table, it’s time to sketch out your design. Here are a few tips to get you started:

  • Decide on a style: Do you want a modern, rustic, or traditional look? Look online or in magazines for inspiration.
  • Choose your materials: Think about what type of wood you want to use and any other materials you may need, such as screws or brackets.
  • Sketch out your design: Use graph paper to sketch out your table design, making sure to include accurate measurements. This will help you visualize your table and make any necessary adjustments before you start building.

Remember, your table design doesn’t have to be perfect. Use your sketches as a starting point and make adjustments as you go. With a little creativity and planning, you can create a beautiful wooden table that fits perfectly in your space.

Gathering Tools and Materials

Before you begin building your wooden table, it’s important to gather all the necessary tools and materials. Here are the essential items you will need:

Essential Woodworking Tools

  1. Circular saw: This tool is perfect for cutting large pieces of wood.

  2. Jigsaw: A jigsaw is great for making curved cuts.

  3. Table saw: A table saw is essential for making precise cuts.

  4. Drill: You’ll need a drill for making holes and attaching screws.

  5. Sander: A sander is necessary for smoothing out rough edges and surfaces.

  6. Clamps: Clamps are useful for holding pieces of wood together while glue dries.

  7. Chisels: Chisels are handy for removing excess wood and creating intricate details.

Safety Equipment

  1. Safety goggles: Protect your eyes from sawdust and flying debris.

  2. Earplugs: Loud power tools can damage your hearing, so make sure to wear earplugs.

  3. Dust mask: Protect your lungs from sawdust by wearing a dust mask.

  4. Work gloves: Keep your hands safe from splinters and cuts with a good pair of work gloves.

Make sure to purchase high-quality wood, such as pine, cherry, poplar, or cedar, from your local home improvement store. You’ll also need wood glue, screws, and sandpaper.

With all the necessary tools and materials gathered, you’re ready to move on to the next step in building your wooden table.

Preparing the Wood

Before you can start building your wooden table, you need to prepare the wood. This involves cutting the wood to the correct size and sanding it to ensure a smooth finish. Here’s how to do it:

Cutting the Wood

The first step in preparing the wood for your table is to cut it to the correct size. You’ll need a saw for this, as well as a measuring tape to ensure accuracy. Here are the steps to follow:

  1. Measure the length and width of the table you want to build.
  2. Mark the measurements on your wood using a pencil and a straight edge.
  3. Use your saw to cut the wood along the marked lines.

It’s important to take your time when cutting the wood to ensure that you get straight, even cuts. If you’re not confident using a saw, consider asking a friend or professional for help.

Sanding the Wood

Once you’ve cut the wood to the correct size, it’s time to sand it. Sanding is important because it helps to smooth out any rough spots or imperfections in the wood. Here’s how to do it:

  1. Start with a coarse sandpaper (around 80 grit) and work your way up to a finer grit (around 220 grit).
  2. Sand the wood in the direction of the grain, using long, even strokes.
  3. Be sure to sand all surfaces of the wood, including the edges and corners.
  4. Use a vacuum or brush to remove any sawdust or debris from the wood.

If you want an even smoother finish, you can use a wood conditioner or sealer after sanding. This will help to protect the wood and give it a nice, polished look.

By following these steps, you’ll be well on your way to preparing the wood for your new wooden table.

Assembling the Table

Now that you have all the pieces cut and sanded, it’s time to assemble your wooden table. This process can be done in a few steps: joining the table top, attaching the legs, and securing the frame.

Joining the Table Top

Start by laying out the table top boards on a flat surface. Arrange them in the order you want them to appear on the finished table. Use wood glue to attach the boards together, applying a generous amount to the edges of each board. Clamp the boards together and let the glue dry overnight.

Once the glue has dried, use a belt sander or hand plane to even out any unevenness in the table top surface. Sand the surface with progressively finer grits of sandpaper until it is smooth and even.

Attaching the Legs

Flip the table top over and attach the legs. Measure and mark the center of each end of the table top. Use a square to draw a line across the width of the table top at each mark. This line will be the center line for the legs.

Attach the legs to the table top using wood screws. Drill pilot holes before screwing in the screws to prevent the wood from splitting. Make sure the legs are flush with the edges of the table top and perpendicular to the center line.

Securing the Frame

Finally, attach the frame to the underside of the table top. The frame will provide additional support and stability to the table. Measure and cut the frame pieces to fit between the legs. Attach the frame to the legs using wood screws and glue.

Once the frame is attached, sand any rough edges or corners. Apply a finish of your choice to protect the wood and give it a polished look.

Congratulations! You have successfully assembled your own wooden table.

Finishing the Table

Once you’ve built your wooden table, it’s time to finish it to protect the wood and give it a beautiful appearance. Here are the steps to finish your table.

Applying Wood Stain

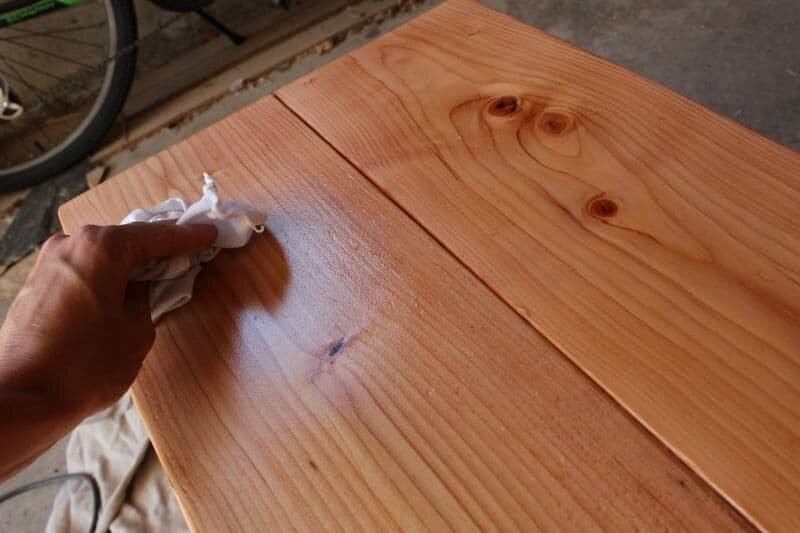
Before applying wood stain, make sure the table is clean and free of any dust or debris. Sand the table surface starting with a coarse grit sandpaper and working your way up to a fine grit sandpaper. This will ensure a smooth surface for the stain to be applied.

Next, apply the wood stain using a brush or cloth. Apply the stain in the direction of the grain and make sure to cover the entire surface evenly. Let the stain sit for the recommended time on the product label before wiping off any excess with a clean cloth.

If you want a darker shade, you can apply a second coat of stain after the first coat has dried. Once you’re satisfied with the color, let the stain dry completely before moving on to the next step.

Sealing with Polyurethane

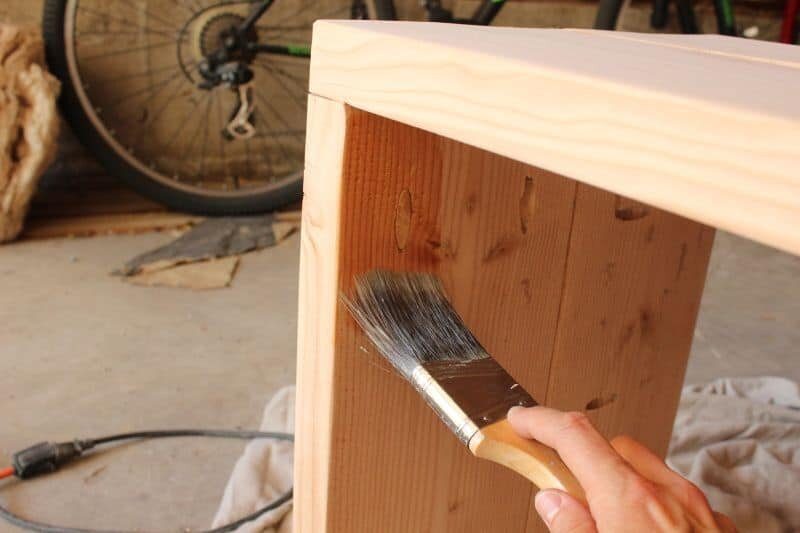
To seal the wood and protect it from scratches and water damage, apply a coat of polyurethane. You can choose between a matte, satin, or glossy finish depending on your preference.

Before applying the polyurethane, make sure the stain has dried completely. Use a brush or cloth to apply the polyurethane in the direction of the grain. Apply a thin coat and let it dry completely before applying a second coat. Repeat this process until you’ve applied the desired number of coats.

After the final coat has dried, lightly sand the surface with a fine grit sandpaper to remove any imperfections. Wipe the surface with a clean cloth and your wooden table is ready to use!

Remember to always work in a well-ventilated area and wear protective gear such as gloves and a mask when working with wood stain and polyurethane. With these simple steps, you can create a beautiful and durable finish for your wooden table.

How to Make a Wooden Mug: A Step-by-Step Guide for Beginners

If you’re a coffee lover or tea enthusiast, you know that a good mug can make all the difference in your morning routine. Why not take it a step further and make your own wooden mug? Not only is it a unique and personalized addition to your collection, but it’s also a fun and rewarding DIY project. In this article, we’ll guide you through the steps to make your very own wooden mug from scratch.

To start, you’ll need to gather some materials. Scrap hardwood is a great option, and you can often find it for free at local shops and schools. You’ll also need some tools, such as a lathe, forstner bit, coping saw, and spindle sander. Don’t worry if you don’t have all of these tools – we’ll provide alternatives and workarounds throughout the process. Once you have your materials and tools, you’re ready to begin crafting your wooden mug.

Making a wooden mug is a great opportunity to get creative with your design. You can choose the type of wood, the shape and size of the mug, and even add unique details like a carved handle or etched pattern. Plus, you’ll have the satisfaction of knowing that you made something with your own two hands. So grab your materials and let’s get started on this fun and rewarding project.

Understanding Wood Types

When it comes to making a wooden mug, choosing the right wood is crucial. The type of wood you use will affect the durability, appearance, and overall quality of your mug. In this section, we’ll go over the two main types of wood: hardwood and softwood.

Hardwood

Hardwood comes from deciduous trees, which are trees that lose their leaves annually. Some common hardwoods used in woodworking include oak, maple, cherry, and walnut. Hardwood is generally denser and more durable than softwood, making it a great choice for items like mugs that will be used frequently.

When selecting hardwood for your mug, consider the following factors:

  • Grain pattern: The grain pattern can affect the appearance of your mug. Some woods, like oak, have a prominent grain pattern that can add character to your mug.
  • Color: Different hardwood species have different colors. Consider the color of the wood and how it will complement the design of your mug.
  • Hardness: Hardness can affect how easy or difficult it is to work with the wood. Some hardwoods, like oak, can be quite hard and may require more effort to shape.

Softwood

Softwood comes from coniferous trees, which are trees that have needles instead of leaves. Some common softwoods used in woodworking include pine, cedar, and spruce. Softwood is generally less dense and less durable than hardwood, making it a less common choice for items like mugs.

When selecting softwood for your mug, consider the following factors:

  • Grain pattern: Softwoods generally have a more uniform grain pattern than hardwoods. This can make them a good choice if you want a more consistent appearance for your mug.
  • Color: Softwoods tend to be lighter in color than hardwoods. Consider the color of the wood and how it will complement the design of your mug.
  • Softness: Softwood is generally easier to work with than hardwood. This can make it a good choice if you’re new to woodworking or if you want to save time and effort. However, keep in mind that softwood may not be as durable as hardwood.

Choosing the Right Wood

When it comes to making a wooden mug, choosing the right type of wood is crucial. Not all woods are created equal, and some are better suited for this task than others. Here are some things to consider when selecting the right wood for your wooden mug:

Types of Woods

There are two main types of woods: hardwoods and softwoods. Hardwoods come from deciduous trees such as oak or maple, while softwoods come from evergreen trees such as pine or cedar. Exotic woods, such as rosewood or teak, are also an option but can be more expensive.

Selecting the Right Wood

When selecting the right wood for your mug, there are a few things to consider. First, the wood should be food safe and non-toxic. You don’t want any harmful chemicals leaching into your beverage. Second, the wood should be durable and able to withstand the heat and moisture that comes with drinking hot beverages. Third, the wood should be easy to work with and able to hold detail if you plan on adding any decorative features.

Considering the Grain

The grain of the wood is also an important factor to consider. Open grains, such as those found in oak or ash, can absorb liquids and retain odors, which can affect the taste of your beverage. Closed grains, such as those found in maple or cherry, are less porous and won’t absorb liquids or odors as readily.

Most Popular Woods to Make a Mug

Some of the most popular woods for making a wooden mug include pine, maple, walnut, and rosewood. Pine is a softwood that is easy to work with and has a light color. Maple is a hardwood that is strong and durable, with a light color and closed grain. Walnut is a hardwood that is darker in color and has a closed grain. Rosewood is an exotic wood that is known for its beauty and durability.

Choosing the right wood for your wooden mug is an important step in the process. Consider the type of wood, its durability, and the grain when making your selection. With the right wood and some basic woodworking skills, you can create a beautiful and functional wooden mug that will last for years to come.

Tools and Materials Needed

When it comes to making a wooden mug, you’ll need a few essential tools and materials. In this section, we’ll provide you with a list of everything you’ll need to get started.

Woodworking Tools

To create a wooden mug, you’ll need some basic woodworking tools. These include:

  • Lathe: A lathe is a machine that rotates a piece of wood while you shape it with cutting tools. You can use a lathe to turn a block of wood into a cylindrical shape, which is the first step in making a wooden mug.
  • Bandsaw: A bandsaw is a power tool that uses a blade to cut through wood. You can use a bandsaw to cut your wood into the rough shape of a mug before you start turning it on the lathe.
  • Chisels: You’ll need a set of chisels to shape the wood as it spins on the lathe. You can use different types of chisels to create different shapes and textures on your mug.
  • Sandpaper: You’ll need sandpaper to smooth out the surface of your mug and remove any rough spots or tool marks.
  • Drill: You’ll need a drill to create a hole in the bottom of your mug for the handle.

Safety Equipment

Working with wood can be dangerous, so it’s important to use the right safety equipment. Here are a few things you’ll need:

  • Safety glasses: You should always wear safety glasses when working with power tools to protect your eyes from flying debris.
  • Dust mask: Sanding and cutting wood can create a lot of dust, which can be harmful to your lungs. Wear a dust mask to protect yourself.
  • Ear protection: Power tools can be loud, so wear ear protection to protect your hearing.
  • Lathe guards: A lathe can be dangerous if you’re not careful, so make sure to use the guards that come with your machine to protect yourself from flying wood chips.

Designing Your Wooden Mug

When it comes to designing your wooden mug, the possibilities are endless. You can create a mug that is simple and elegant, or one that is bold and colorful. The choice is yours!

Here are a few tips to help you get started:

Consider the Wood Grain

One of the most important things to consider when designing your wooden mug is the wood grain. The grain can add a lot of character to your mug and can help to make it unique.

Take a close look at the wood you are using and think about how the grain pattern will look on your finished mug. You may want to choose a piece of wood with an interesting grain pattern or one that has a lot of knots or other natural features.

Think About the Shape

The shape of your mug is also an important consideration. Do you want a mug that is tall and narrow, or one that is short and wide? Think about how the shape of your mug will affect how it feels in your hand and how it will look on your table.

You may want to sketch out a few different designs before you start cutting your wood. This will give you a better idea of how your mug will look and feel once it is finished.

Add Some Personalization

Finally, consider adding some personalization to your wooden mug. You can carve your initials or a design into the wood, or you can paint or stain the mug to give it a unique look.

Adding personalization to your mug can make it a great gift for someone special or a fun addition to your own collection.

With these tips in mind, you are ready to start designing your own wooden mug. Have fun and get creative!

Cutting and Shaping the Wood

Now that you have collected your scrap hardwood, it’s time to start cutting and shaping the wood to create your wooden mug. Here are the steps you need to follow:

  1. Choose the Right Saw: First, you need to choose the right saw for the job. A band saw or a scroll saw works best for cutting the wood to shape. Make sure the saw is sharp and in good condition before you start.

  2. Mark the Wood: Once you have chosen your saw, you need to mark the wood with the shape you want to cut. Use a pencil to draw the outline of the mug on the wood. You can use a template or draw the shape freehand.

  3. Cut the Wood: Now it’s time to cut the wood along the marked lines. Use the saw to carefully cut the wood to shape. Take your time and make precise cuts to achieve the desired shape. Remember to prioritize safety by wearing protective goggles and gloves while operating the saw.

  4. Sand the Wood: Once the mug body is cut, use sandpaper in progressively finer grits to smooth the surfaces. Sanding the wood will remove any rough edges or splinters and give it a smooth finish.

  5. Create the Handle: To create the handle, cut a piece of wood to the desired shape and size. Sand the handle to smooth out any rough edges. Then, attach the handle to the mug body using wood glue and clamps. Allow the glue to dry completely before moving on to the next step.

  6. Finish the Mug: Now that your wooden mug is taking shape, it’s time to finish it. You can choose to stain the wood or apply a coat of your favorite finish. If you want a wood finish that is durable and high in sheen, walnut oil could be the best option.

By following these steps, you can create a beautiful and functional wooden mug from scrap hardwood. Remember to take your time and prioritize safety while cutting and shaping the wood.

Assembling the Mug

Now that you have all the necessary pieces for your wooden mug, it’s time to assemble them. Follow these steps to put everything together:

  1. Start by gluing the handle to the side of the mug. Apply a small amount of wood glue to the end of the handle and press it firmly into place on the side of the mug. Hold it in place for a few minutes until the glue sets.

  2. Next, glue the bottom of the mug to the sides. Apply a thin layer of wood glue to the bottom of the mug and press it firmly into place on the sides. Make sure everything is aligned properly before the glue sets.

  3. Once the bottom is attached, you can add the top. Apply a thin layer of glue to the top rim of the mug and press the top into place. Hold it in place until the glue sets.

  4. Finally, sand the mug to smooth out any rough edges or uneven surfaces. You can use sandpaper or a sanding block to do this. Start with a coarse grit and work your way up to a finer grit until the mug is smooth to the touch.

Congratulations, you have now assembled your very own wooden mug! You can now enjoy your favorite hot or cold beverage in a unique and beautiful vessel that you made yourself.

Finishing the Mug

Once you have carved your wooden mug, it’s time to give it a finishing touch to make it look great and to protect it from liquids. Here are the two essential steps to finish your wooden mug:

Sanding

The first step to finishing your wooden mug is sanding. Sanding will help you smooth out any rough edges and make the surface of your mug even. To sand your wooden mug, you will need sandpaper with different grits, starting with a coarse grit and ending with a fine grit. Here are the steps to sand your wooden mug:

  1. Begin by sanding the outside of the mug with a coarse grit sandpaper. Sand in the direction of the grain to avoid scratches.
  2. Move on to a finer grit sandpaper and repeat the process until you reach the desired smoothness.
  3. Sand the inside of the mug using the same process.

Sealing

The second step to finishing your wooden mug is sealing. Sealing will help protect your mug from liquids and prevent it from cracking or warping. Here are the steps to seal your wooden mug:

  1. Choose a food-grade sealer that is safe for use on wooden mugs.
  2. Apply a thin layer of sealer to the inside and outside of the mug using a brush or cloth.
  3. Let the sealer dry completely before applying another coat.
  4. Apply multiple coats of sealer until you achieve the desired level of protection.

Now that you have sanded and sealed your wooden mug, it’s ready to use! Enjoy your new handmade wooden mug, and don’t forget to hand wash it to maintain its finish.

Caring for Your Wooden Mug

Congratulations on making your own wooden mug! With proper care, your mug can last for years and become a cherished item in your kitchen or home. Here are some tips for caring for your wooden mug:

Cleaning

After each use, rinse your wooden mug with warm water and mild soap. Avoid using harsh detergents or soaking your mug in water for extended periods of time as this can cause warping or cracking. Dry your mug thoroughly with a clean towel and allow it to air dry completely before storing.

Oiling

To keep your wooden mug looking its best, apply a food-safe oil such as mineral oil or beeswax to the surface every few months. This will help to protect the wood and prevent it from drying out or becoming damaged. Simply apply a small amount of oil to a clean cloth and rub it into the surface of the mug, taking care to cover all areas.

Storing

When not in use, store your wooden mug in a cool, dry place away from direct sunlight or heat sources. Avoid stacking your mugs or placing heavy objects on top of them as this can cause them to become misshapen or damaged.

Additional Tips

  • Do not use your wooden mug in the microwave, dishwasher, or oven.
  • Avoid exposing your mug to extreme temperatures or sudden changes in temperature.
  • If your mug becomes stained or discolored, you can sand it lightly with fine-grit sandpaper and reapply oil to the surface.

By following these simple tips, you can enjoy your wooden mug for years to come. Cheers!

the-basics-of-applying-wood-stain

Can You Apply Multiple Coats of Stains to Wood? Exploring the Best Practices

Are you wondering if you can apply more than one coat of stain to your wood project? The answer is yes, you can apply multiple coats of stain to wood, but it is important to do it correctly to achieve the desired results. Applying too many coats can result in an uneven finish, while not applying enough can leave the wood looking dull or unfinished.

When it comes to applying multiple coats of stain, it is important to properly prepare the wood surface before each application. This includes sanding the wood to ensure an even surface and removing any dust or debris. It is also important to apply each coat of stain evenly and allow sufficient drying time between coats.

Keep in mind that the number of coats needed will depend on several factors, including the type of wood, the color of the stain, and the desired finish. Lighter colored stains may only require one or two coats, while darker stains or glossy finishes may require three or more coats. By following the proper techniques and taking these factors into consideration, you can achieve a beautiful, even finish on your wood project.

Understanding Wood Stains

If you’re planning to stain your wood project, you may be wondering if you can apply more than one coat of stain. The answer is yes, you can apply multiple coats of stain to achieve the desired look. However, there are some things you should keep in mind before applying multiple coats of stain.

First, it’s important to understand that wood stains are designed to penetrate the wood fibers and enhance the natural beauty of the wood. Applying too many coats of stain can result in a buildup of the product on the surface of the wood, which can affect the final look and durability of the finish.

Second, the number of coats you apply will depend on the type of stain you’re using and the desired look you want to achieve. Some stains, such as solid color stains, may require two or more coats to achieve full coverage and hide imperfections in the wood. Other stains, such as semi-transparent or transparent stains, may only require one or two coats to achieve the desired color and protection.

When applying multiple coats of stain, it’s important to follow the manufacturer’s instructions and allow each coat to fully dry before applying the next. This will ensure that the stain fully penetrates the wood and doesn’t create a sticky or tacky surface.

In addition, you may want to consider using a wood conditioner between coats of stain. Wood conditioners can help to even out the absorption of the stain and prevent blotching or uneven coloring. However, it’s important to note that wood conditioners should only be applied before the first coat of stain.

Overall, applying multiple coats of stain can be a great way to achieve a rich, deep color and enhance the natural beauty of your wood project. Just be sure to follow the manufacturer’s instructions and take the necessary steps to ensure a smooth and even finish.

The Basics of Applying Wood Stain

the-basics-of-applying-wood-stain

When it comes to staining wood, there are a few basics you should keep in mind to ensure the best results. Here are some tips to help you get started:

1. Sand the Wood

Before applying any stain, make sure to sand the wood thoroughly. This will help to remove any rough spots or imperfections, and will also help the wood to absorb the stain more evenly. You can use a sanding block or a random orbital sander to do the lion’s share of the work. Begin by sanding the project well a few times using progressively finer grits of sandpaper as you go.

2. Apply the Stain

Once the wood is sanded, you can apply the stain. You can use a brush or a rag to apply the stain, depending on your preference. Apply the stain in the direction of the wood grain, and make sure to apply it evenly. If you’re using a brush, use a natural-bristle brush for oil stains and a synthetic-bristle brush for latex stains.

3. Wipe Off the Excess

After applying the stain, you’ll want to wipe off any excess with a clean cloth. This will help to prevent the stain from becoming too dark or blotchy. Make sure to wipe off the excess stain in the direction of the wood grain.

4. Allow the Stain to Dry

Once you’ve wiped off the excess stain, allow the wood to dry completely. This usually takes around 24 hours, but can vary depending on the type of stain and the humidity level in your area. Don’t rush the drying process, as this can cause the stain to become uneven or blotchy.

5. Apply a Second Coat (Optional)

If you want a darker or richer color, you can apply a second coat of stain. However, it’s important to note that adding a second coat of stain will usually darken the overall color. This is because adding more stain to the surface can penetrate deeper into the wood’s pores and deposit more pigment. Make sure to test your color on a scrap piece of wood before applying a second coat to your project.

Multiple Coats of Wood Stain: Pros and Cons

When staining wood, you may wonder if you can apply more than one coat of stain to achieve the desired color and finish. The answer is yes, but there are pros and cons to consider before doing so.

Pros of Applying Multiple Coats of Wood Stain

  • Achieve a darker color: Applying multiple coats of stain can help you achieve a darker and richer color than a single coat.
  • Enhance the wood grain: Each coat of stain can bring out the natural grain of the wood, adding depth and character to your project.
  • Add more protection: Multiple coats of stain can provide more protection from the elements, especially if you use a varnish or drying oil as your topcoat.

Cons of Applying Multiple Coats of Wood Stain

  • Risk of blotchiness: Applying too many coats of stain can cause blotchiness, especially on softwoods like pine and spruce. It’s important to test your stain on a scrap piece of wood before applying it to your project.
  • Longer drying time: Each consecutive coat of stain will take longer to dry, which can prolong the staining process.
  • No added durability: Multiple coats of stain do not build up a protective surface coating, so if you’re after durability, you’ll need to use a film-forming material like a varnish or drying oil.

In summary, applying multiple coats of wood stain can help you achieve a darker color and enhance the natural grain of the wood, but it can also lead to blotchiness and longer drying times. Keep in mind that multiple coats of stain do not add durability, so consider using a topcoat for added protection.

Preparation for Applying Multiple Coats

preparation-for-applying-multiple-coats

When applying stains to wood, you may need to use multiple coats to achieve the desired color and finish. However, before you start applying multiple coats, there are certain preparations you need to make to ensure the best results.

Choosing the Right Stain

Choosing the right stain is crucial when planning to apply multiple coats. While some stains are designed to be applied in a single coat, others may require multiple coats to achieve the desired color and finish. Therefore, it’s important to read the manufacturer’s instructions carefully to determine the recommended number of coats for the stain you’ve chosen.

Wood Condition Considerations

Before applying multiple coats of stain, it’s important to consider the condition of the wood you’re working with. If the wood is rough or porous, you may need to use multiple coats to get even coverage. On the other hand, if the wood has an existing finish, you may need to use multiple coats to fully obscure the old color.

To prepare the wood for staining, you may need to sand it lightly to remove any rough spots or imperfections. You should also clean the wood thoroughly to remove any dirt or debris that may interfere with the staining process.

Safety Measures

When applying multiple coats of stain, it’s important to take appropriate safety measures. This includes wearing protective gloves and eyewear to prevent direct contact with the stain. You should also work in a well-ventilated area to avoid inhaling fumes from the stain.

In addition to these safety measures, you should also follow the manufacturer’s instructions carefully when applying multiple coats of stain. This may include waiting a certain amount of time between coats to allow the stain to dry properly.

By taking these preparation steps, you can ensure that your multiple coats of stain are applied evenly and provide the desired color and finish for your wood project.

Step-by-Step Guide to Applying Multiple Coats

step-by-step-guide-to-applying-multiple-coats

If you want to achieve a darker or richer color for your wood project, applying multiple coats of stain is a great option. However, it’s important to apply each coat correctly to avoid issues like blotching or uneven coloring. Follow these steps to apply multiple coats of stain to your wood:

First Coat Application

Before applying the first coat, make sure your wood is clean and dry. If necessary, sand the surface to remove any roughness or imperfections. Then, apply the first coat of stain using a brush, cloth, or sprayer. Make sure to apply the stain evenly, following the wood grain. Let the stain dry completely before moving on to the next step.

Interim Sanding

After the first coat has dried, lightly sand the surface with fine-grit sandpaper. This will help smooth out any raised grain or rough spots and prepare the surface for the next coat. Make sure to remove any sanding dust before applying the second coat.

Second Coat Application

Apply the second coat of stain in the same manner as the first, making sure to follow the wood grain and apply the stain evenly. Let the second coat dry completely before deciding if you need to apply additional coats.

Additional Coats

Depending on the desired color and the type of wood you’re working with, you may need to apply additional coats of stain. If so, repeat the process of interim sanding and applying the stain until you achieve the desired color. However, be careful not to over-apply the stain, as this can result in a blotchy or uneven finish.

By following these steps, you can achieve a rich, even color for your wood project. Just remember to take your time and apply each coat carefully and evenly.

Maintenance Tips for Stained Wood

After staining your wood, it is important to maintain it properly to ensure it lasts for a long time. Here are some tips to help you maintain your stained wood:

  • Clean Regularly: Dirt and dust can accumulate on your stained wood, making it look dull. To prevent this, clean your wood regularly with a soft cloth or a vacuum cleaner. Avoid using harsh chemicals that can damage the wood or the stain.
  • Avoid Water Damage: Stained wood can be damaged by water, so it is important to keep it dry. Wipe up any spills immediately and avoid placing wet items on the wood surface. If you need to clean the wood with water, use a damp cloth and dry it thoroughly afterward.
  • Protect from Sunlight: Sunlight can cause the stain to fade and the wood to dry out, so it is important to protect your stained wood from direct sunlight. Use curtains or blinds to block out the sun, or move the wood to a shaded area.
  • Reapply Stain: Over time, the stain on your wood may start to fade or wear off. To keep your wood looking its best, you can reapply the stain. Follow the manufacturer’s instructions for applying the stain and make sure to clean the wood thoroughly before applying the new coat.
  • Use Protective Coating: A protective coating can help to protect your stained wood from scratches, dings, and other damage. You can use a clear coat or a tinted coat to enhance the color of the stain. Follow the manufacturer’s instructions for applying the protective coating and allow it to dry completely before using the wood.

By following these maintenance tips, you can keep your stained wood looking beautiful for years to come.

Common Mistakes to Avoid

When it comes to staining wood, there are some common mistakes that many people make. Here are a few things to keep in mind to avoid these mistakes:

Applying Too Many Coats

One of the biggest mistakes people make when staining wood is applying too many coats. While it may seem like adding more coats will make the color richer and deeper, it can actually have the opposite effect. Too many coats can lead to a buildup of stain that can obscure the wood grain and create a splotchy, uneven finish.

Not Sanding Between Coats

Another mistake people make is not sanding between coats. Sanding between coats helps to smooth out any rough spots or raised grain, which can make the final finish look much better. If you skip this step, you may end up with a rough, uneven finish that is difficult to fix.

Using the Wrong Brush

Using the wrong brush can also be a mistake. For example, if you use a natural bristle brush with a water-based stain, the bristles can swell and become misshapen, making it difficult to apply the stain evenly. Make sure you use the right brush for the type of stain you are using.

Not Testing the Stain

Finally, not testing the stain can be a big mistake. Before you apply the stain to your entire project, it’s a good idea to test it on a small, inconspicuous area first. This will help you see how the stain will look on your particular type of wood and whether you like the color. If you don’t test the stain first, you may end up with a finish that you don’t like and have to redo the entire project.

Frequently Asked Questions

How many coats of stain should be applied to wood?

The number of coats of stain that should be applied to wood depends on the type of stain and the desired outcome. In general, one to two coats of stain are sufficient for most projects. However, some stains may require more coats to achieve the desired color or level of protection.

Is one coat of stain enough for wood?

One coat of stain may be enough for some projects, but it depends on the type of stain and the desired outcome. If you want a deeper color or more protection, you may need to apply more than one coat of stain.

Can you apply multiple coats of oil-based stain?

Yes, you can apply multiple coats of oil-based stain. However, you should wait for the first coat to dry completely before applying the second coat. This will ensure that the second coat adheres properly and doesn’t create a blotchy appearance.

How soon can a second coat of stain be applied to wood?

The drying time for stain varies depending on the type of stain and environmental conditions. In general, you should wait at least 24 hours before applying a second coat of stain. However, some stains may dry faster and allow for a second coat to be applied sooner.

Will applying two coats of stain make the color darker?

Applying two coats of stain may make the color darker, but it depends on the type of stain and the desired outcome. Some stains may not darken significantly with a second coat, while others may become much darker.

Can different types of stains be layered on wood?

Different types of stains can be layered on wood, but it may not always produce the desired outcome. For example, layering a water-based stain over an oil-based stain may not work well, as the water-based stain may not adhere properly. It’s best to stick with the same type of stain or consult with a professional if you want to layer different types of stains.