Tag Archives: avoid placing wet items

How to Build a Wooden Side Table: A Beginner's Guide

Building your own side table can be a fun and rewarding DIY project. Not only can you save money by building it yourself, but you can also customize it to fit your specific style and needs. A wooden side table can add warmth and character to any room, and it’s a great beginner woodworking project.

Before you start building, it’s important to have a plan and gather all the necessary materials and tools. You can find free plans online or create your own design. The materials you’ll need will depend on the size and style of the table, but typically include wood boards, screws, wood glue, and a finish. You’ll also need basic woodworking tools like a saw, drill, and sander. Once you have everything you need, it’s time to get started on your wooden side table project.

Understanding the Basics

Before you start building your own wooden side table, it is important to understand the basics of woodworking. This will help you create a sturdy and functional piece of furniture that you can be proud of. In this section, we will cover the types of wood you can use for your project and the safety measures you need to take to avoid accidents.

Types of Wood

Choosing the right type of wood is crucial for the success of your project. There are many types of wood available, each with its own unique characteristics. Here are some of the most popular types of wood for furniture making:

  • Pine: A softwood that is easy to work with and has a rustic look.
  • Oak: A hardwood that is strong and durable, with a distinct grain pattern.
  • Maple: A hardwood that is hard and dense, with a fine grain pattern.
  • Cherry: A hardwood that is known for its rich, warm color and smooth texture.

When choosing your wood, consider the look you want to achieve and the durability you need. It is also important to choose wood that is straight and free of knots, as this will make it easier to work with and create a smooth finish.

Safety Measures

When working with wood, safety should always be your top priority. Here are some safety measures you should take before starting your project:

  • Wear protective gear: This includes safety glasses, earplugs, and a dust mask.
  • Use sharp tools: Dull tools can be dangerous and cause accidents. Make sure your tools are sharp and in good condition.
  • Keep your workspace clean: A cluttered workspace can lead to accidents. Keep your workspace clean and organized.
  • Use clamps: Clamps can help keep your wood in place and prevent it from moving while you work on it.
  • Follow instructions: Make sure you read and understand the instructions for your tools and equipment before using them.

By following these safety measures, you can ensure that your woodworking project is not only successful but also safe.

Gathering Your Materials

Before you begin building your wooden side table, you’ll need to gather all the necessary materials. Here are the two main things you’ll need to consider:

Wood Selection

Choosing the right wood for your side table is crucial. You want to select a wood that is strong, durable, and visually appealing. Here are some popular options:

  • Pine: A softwood that is easy to work with and affordable.
  • Oak: A hardwood that is strong and durable, but can be more expensive.
  • Maple: Another hardwood that is strong and durable, with a smooth and uniform grain pattern.
  • Walnut: A high-end hardwood that is known for its rich, dark color and beautiful grain pattern.

When selecting your wood, be sure to consider the size of your side table and the weight it will need to support. You’ll also want to choose a wood that matches your personal style and the overall look of your home.

Tool Requirements

In addition to your wood selection, you’ll also need to gather the necessary tools to build your side table. Here are some of the most common tools you’ll need:

  • Saw (circular or table saw)
  • Drill
  • Wood glue
  • Clamps
  • Sandpaper
  • Wood stain or paint (optional)

You may also need additional tools depending on the specific design of your side table. Be sure to review the instructions carefully and gather all the necessary tools before you begin.

Creating Your Design

When building a wooden side table, the first step is to create a design that fits your needs and style. Here are a few things to consider when creating your design:

Size and Shape

Think about where you will be placing your side table and how much space you have available. Consider the height of the table in relation to the furniture around it. You want to make sure that the table is the right size and shape for your space and needs.

Materials

Wood is a popular material for side tables because it is sturdy and durable. However, there are many different types of wood to choose from, each with its own unique characteristics. Consider the type of wood that will work best for your design and budget.

Style

The style of your side table should match the overall decor of your room. Do you want a modern or traditional look? Do you want a simple or ornate design? Consider the style of your existing furniture and choose a design that complements it.

Functionality

Think about how you will be using your side table. Will it be used for storage or as a decorative piece? Will it be used for holding drinks or as a place to set down your book? Consider the functionality of your table and design it accordingly.

Once you have considered these factors, you can start sketching out your design. Use graph paper to create a scale drawing of your table, including the dimensions and any decorative elements. This will help you visualize your design and make any necessary adjustments before you start building.

Remember, the design process is an important part of building a wooden side table. Take your time and create a design that reflects your personal style and meets your needs.

Cutting the Wood

Before you begin building your wooden side table, you need to cut the wood to the appropriate sizes. Here are the steps to follow:

  1. Measure and mark the wood. Use a measuring tape to measure the length and width of each piece of wood you need to cut. Mark the measurements on the wood using a pencil and a straight edge.

  2. Prepare your saw. You can use a miter saw or a table saw to cut the wood. Make sure your saw is properly set up and adjusted before you begin cutting.

  3. Cut the wood. Use your saw to cut the wood along the marked lines. Take your time and be careful to make straight and accurate cuts. If you’re using a miter saw, use the appropriate angle settings to make angled cuts.

  4. Sand the edges. After you’ve cut the wood, use sandpaper to smooth out any rough edges or splinters. This will help prevent injuries and give your table a more polished look.

  5. Repeat as necessary. Depending on the design of your table, you may need to cut multiple pieces of wood to the same size. Repeat the above steps for each piece of wood.

By following these steps, you’ll be able to cut your wood to the correct sizes and prepare it for assembly. Remember to always wear appropriate safety gear, such as safety glasses and ear protection, when using power tools.

Assembling the Table

Once you have all the pieces cut and ready, it’s time to assemble your side table. In this section, we’ll go over the steps to join the pieces and secure the table top.

Joining the Pieces

To join the legs and aprons, you can use pocket hole joinery or mortise and tenon joints. Pocket hole joinery is easier and faster, while mortise and tenon joints provide a stronger and more traditional joint.

Pocket Hole Joinery

If you’re using pocket hole joinery, start by drilling pocket holes in the aprons. Then, attach the aprons to the legs using pocket hole screws. Make sure the aprons are flush with the top of the legs and use clamps to hold them in place while you screw them together.

Mortise and Tenon Joints

If you’re using mortise and tenon joints, start by cutting the mortises in the legs and the tenons in the aprons. Then, dry fit the pieces together to make sure everything fits snugly. Finally, apply glue to the mortises and tenons and clamp the pieces together until the glue dries.

Securing the Table Top

To secure the table top, you can use screws or dowels. Screws are easier and faster, while dowels provide a more traditional and elegant look.

Screws

If you’re using screws, start by drilling pilot holes in the table top. Then, attach the top to the aprons using screws. Make sure the top is centered and use clamps to hold it in place while you screw it down.

Dowels

If you’re using dowels, start by drilling holes in the table top and aprons. Then, insert the dowels and apply glue to the holes. Finally, clamp the pieces together until the glue dries.

That’s it! Your side table is now assembled and ready to use.

Sanding and Finishing

Sanding Process

Before applying a finish to your wooden side table, it’s important to properly sand it to ensure a smooth surface. Follow these steps to sand your table:

  1. Start with coarse-grit sandpaper, around 100 grit, and sand in the direction of the grain. This will remove any rough spots or imperfections on the surface of the wood.

  2. Next, move on to a finer-grit sandpaper, around 150 grit, and sand again in the direction of the grain. This will help to smooth out the surface even more.

  3. Finally, use a very fine-grit sandpaper, around 220 grit, to give the surface a final sanding. This will create a smooth surface that is ready for finishing.

Be sure to wipe down the surface of the table with a tack cloth after each sanding step to remove any dust or debris.
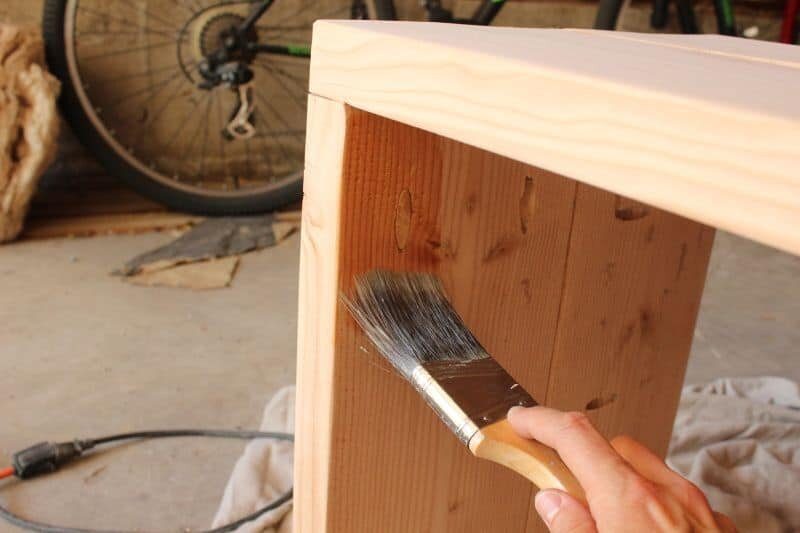
Applying Finish

Once your wooden side table is sanded, it’s time to apply a finish to protect the wood and give it a beautiful, polished look. Here are some tips for applying finish:

  1. Apply a wood conditioner to the surface of the table before staining. This will help the stain to absorb evenly and prevent blotching.

  2. Apply the stain with a brush or cloth, making sure to work in the direction of the grain. Apply a thin, even coat and wipe away any excess with a clean cloth.

  3. Allow the stain to dry completely before applying a protective finish. You can use a clear coat of polyurethane or a wax finish to protect the wood and give it a polished look.

  4. Apply the protective finish with a brush or cloth, making sure to work in the direction of the grain. Apply a thin, even coat and allow it to dry completely before applying additional coats.

By following these steps, you can create a beautiful, polished wooden side table that will last for years to come.

Maintenance Tips

After building your wooden side table, you’ll want to keep it looking its best for years to come. Here are some simple maintenance tips to follow:

  • Clean regularly: Dust and debris can accumulate on your side table over time, so it’s important to clean it regularly. Use a soft cloth or a feather duster to remove any dirt or dust that has collected on the surface.

  • Avoid water damage: Water can cause damage to your wooden side table, so be sure to wipe up any spills immediately. Avoid placing wet items on the table, such as glasses or vases that may leave water rings.

  • Protect from direct sunlight: Direct sunlight can cause the wood to fade or discolor over time. To prevent this, try to position your side table away from direct sunlight or use window coverings to filter the light.

  • Use coasters: To prevent scratches or damage to the surface of your side table, use coasters under drinks and other items that may scratch the wood.

  • Apply furniture polish: To keep your side table looking shiny and new, apply furniture polish or wax every few months. Be sure to follow the manufacturer’s instructions and use a soft cloth to apply the polish evenly.

By following these simple maintenance tips, you can keep your wooden side table looking beautiful for years to come.

the-basics-of-applying-wood-stain

Can You Apply Multiple Coats of Stains to Wood? Exploring the Best Practices

Are you wondering if you can apply more than one coat of stain to your wood project? The answer is yes, you can apply multiple coats of stain to wood, but it is important to do it correctly to achieve the desired results. Applying too many coats can result in an uneven finish, while not applying enough can leave the wood looking dull or unfinished.

When it comes to applying multiple coats of stain, it is important to properly prepare the wood surface before each application. This includes sanding the wood to ensure an even surface and removing any dust or debris. It is also important to apply each coat of stain evenly and allow sufficient drying time between coats.

Keep in mind that the number of coats needed will depend on several factors, including the type of wood, the color of the stain, and the desired finish. Lighter colored stains may only require one or two coats, while darker stains or glossy finishes may require three or more coats. By following the proper techniques and taking these factors into consideration, you can achieve a beautiful, even finish on your wood project.

Understanding Wood Stains

If you’re planning to stain your wood project, you may be wondering if you can apply more than one coat of stain. The answer is yes, you can apply multiple coats of stain to achieve the desired look. However, there are some things you should keep in mind before applying multiple coats of stain.

First, it’s important to understand that wood stains are designed to penetrate the wood fibers and enhance the natural beauty of the wood. Applying too many coats of stain can result in a buildup of the product on the surface of the wood, which can affect the final look and durability of the finish.

Second, the number of coats you apply will depend on the type of stain you’re using and the desired look you want to achieve. Some stains, such as solid color stains, may require two or more coats to achieve full coverage and hide imperfections in the wood. Other stains, such as semi-transparent or transparent stains, may only require one or two coats to achieve the desired color and protection.

When applying multiple coats of stain, it’s important to follow the manufacturer’s instructions and allow each coat to fully dry before applying the next. This will ensure that the stain fully penetrates the wood and doesn’t create a sticky or tacky surface.

In addition, you may want to consider using a wood conditioner between coats of stain. Wood conditioners can help to even out the absorption of the stain and prevent blotching or uneven coloring. However, it’s important to note that wood conditioners should only be applied before the first coat of stain.

Overall, applying multiple coats of stain can be a great way to achieve a rich, deep color and enhance the natural beauty of your wood project. Just be sure to follow the manufacturer’s instructions and take the necessary steps to ensure a smooth and even finish.

The Basics of Applying Wood Stain

the-basics-of-applying-wood-stain

When it comes to staining wood, there are a few basics you should keep in mind to ensure the best results. Here are some tips to help you get started:

1. Sand the Wood

Before applying any stain, make sure to sand the wood thoroughly. This will help to remove any rough spots or imperfections, and will also help the wood to absorb the stain more evenly. You can use a sanding block or a random orbital sander to do the lion’s share of the work. Begin by sanding the project well a few times using progressively finer grits of sandpaper as you go.

2. Apply the Stain

Once the wood is sanded, you can apply the stain. You can use a brush or a rag to apply the stain, depending on your preference. Apply the stain in the direction of the wood grain, and make sure to apply it evenly. If you’re using a brush, use a natural-bristle brush for oil stains and a synthetic-bristle brush for latex stains.

3. Wipe Off the Excess

After applying the stain, you’ll want to wipe off any excess with a clean cloth. This will help to prevent the stain from becoming too dark or blotchy. Make sure to wipe off the excess stain in the direction of the wood grain.

4. Allow the Stain to Dry

Once you’ve wiped off the excess stain, allow the wood to dry completely. This usually takes around 24 hours, but can vary depending on the type of stain and the humidity level in your area. Don’t rush the drying process, as this can cause the stain to become uneven or blotchy.

5. Apply a Second Coat (Optional)

If you want a darker or richer color, you can apply a second coat of stain. However, it’s important to note that adding a second coat of stain will usually darken the overall color. This is because adding more stain to the surface can penetrate deeper into the wood’s pores and deposit more pigment. Make sure to test your color on a scrap piece of wood before applying a second coat to your project.

Multiple Coats of Wood Stain: Pros and Cons

When staining wood, you may wonder if you can apply more than one coat of stain to achieve the desired color and finish. The answer is yes, but there are pros and cons to consider before doing so.

Pros of Applying Multiple Coats of Wood Stain

  • Achieve a darker color: Applying multiple coats of stain can help you achieve a darker and richer color than a single coat.
  • Enhance the wood grain: Each coat of stain can bring out the natural grain of the wood, adding depth and character to your project.
  • Add more protection: Multiple coats of stain can provide more protection from the elements, especially if you use a varnish or drying oil as your topcoat.

Cons of Applying Multiple Coats of Wood Stain

  • Risk of blotchiness: Applying too many coats of stain can cause blotchiness, especially on softwoods like pine and spruce. It’s important to test your stain on a scrap piece of wood before applying it to your project.
  • Longer drying time: Each consecutive coat of stain will take longer to dry, which can prolong the staining process.
  • No added durability: Multiple coats of stain do not build up a protective surface coating, so if you’re after durability, you’ll need to use a film-forming material like a varnish or drying oil.

In summary, applying multiple coats of wood stain can help you achieve a darker color and enhance the natural grain of the wood, but it can also lead to blotchiness and longer drying times. Keep in mind that multiple coats of stain do not add durability, so consider using a topcoat for added protection.

Preparation for Applying Multiple Coats

preparation-for-applying-multiple-coats

When applying stains to wood, you may need to use multiple coats to achieve the desired color and finish. However, before you start applying multiple coats, there are certain preparations you need to make to ensure the best results.

Choosing the Right Stain

Choosing the right stain is crucial when planning to apply multiple coats. While some stains are designed to be applied in a single coat, others may require multiple coats to achieve the desired color and finish. Therefore, it’s important to read the manufacturer’s instructions carefully to determine the recommended number of coats for the stain you’ve chosen.

Wood Condition Considerations

Before applying multiple coats of stain, it’s important to consider the condition of the wood you’re working with. If the wood is rough or porous, you may need to use multiple coats to get even coverage. On the other hand, if the wood has an existing finish, you may need to use multiple coats to fully obscure the old color.

To prepare the wood for staining, you may need to sand it lightly to remove any rough spots or imperfections. You should also clean the wood thoroughly to remove any dirt or debris that may interfere with the staining process.

Safety Measures

When applying multiple coats of stain, it’s important to take appropriate safety measures. This includes wearing protective gloves and eyewear to prevent direct contact with the stain. You should also work in a well-ventilated area to avoid inhaling fumes from the stain.

In addition to these safety measures, you should also follow the manufacturer’s instructions carefully when applying multiple coats of stain. This may include waiting a certain amount of time between coats to allow the stain to dry properly.

By taking these preparation steps, you can ensure that your multiple coats of stain are applied evenly and provide the desired color and finish for your wood project.

Step-by-Step Guide to Applying Multiple Coats

step-by-step-guide-to-applying-multiple-coats

If you want to achieve a darker or richer color for your wood project, applying multiple coats of stain is a great option. However, it’s important to apply each coat correctly to avoid issues like blotching or uneven coloring. Follow these steps to apply multiple coats of stain to your wood:

First Coat Application

Before applying the first coat, make sure your wood is clean and dry. If necessary, sand the surface to remove any roughness or imperfections. Then, apply the first coat of stain using a brush, cloth, or sprayer. Make sure to apply the stain evenly, following the wood grain. Let the stain dry completely before moving on to the next step.

Interim Sanding

After the first coat has dried, lightly sand the surface with fine-grit sandpaper. This will help smooth out any raised grain or rough spots and prepare the surface for the next coat. Make sure to remove any sanding dust before applying the second coat.

Second Coat Application

Apply the second coat of stain in the same manner as the first, making sure to follow the wood grain and apply the stain evenly. Let the second coat dry completely before deciding if you need to apply additional coats.

Additional Coats

Depending on the desired color and the type of wood you’re working with, you may need to apply additional coats of stain. If so, repeat the process of interim sanding and applying the stain until you achieve the desired color. However, be careful not to over-apply the stain, as this can result in a blotchy or uneven finish.

By following these steps, you can achieve a rich, even color for your wood project. Just remember to take your time and apply each coat carefully and evenly.

Maintenance Tips for Stained Wood

After staining your wood, it is important to maintain it properly to ensure it lasts for a long time. Here are some tips to help you maintain your stained wood:

  • Clean Regularly: Dirt and dust can accumulate on your stained wood, making it look dull. To prevent this, clean your wood regularly with a soft cloth or a vacuum cleaner. Avoid using harsh chemicals that can damage the wood or the stain.
  • Avoid Water Damage: Stained wood can be damaged by water, so it is important to keep it dry. Wipe up any spills immediately and avoid placing wet items on the wood surface. If you need to clean the wood with water, use a damp cloth and dry it thoroughly afterward.
  • Protect from Sunlight: Sunlight can cause the stain to fade and the wood to dry out, so it is important to protect your stained wood from direct sunlight. Use curtains or blinds to block out the sun, or move the wood to a shaded area.
  • Reapply Stain: Over time, the stain on your wood may start to fade or wear off. To keep your wood looking its best, you can reapply the stain. Follow the manufacturer’s instructions for applying the stain and make sure to clean the wood thoroughly before applying the new coat.
  • Use Protective Coating: A protective coating can help to protect your stained wood from scratches, dings, and other damage. You can use a clear coat or a tinted coat to enhance the color of the stain. Follow the manufacturer’s instructions for applying the protective coating and allow it to dry completely before using the wood.

By following these maintenance tips, you can keep your stained wood looking beautiful for years to come.

Common Mistakes to Avoid

When it comes to staining wood, there are some common mistakes that many people make. Here are a few things to keep in mind to avoid these mistakes:

Applying Too Many Coats

One of the biggest mistakes people make when staining wood is applying too many coats. While it may seem like adding more coats will make the color richer and deeper, it can actually have the opposite effect. Too many coats can lead to a buildup of stain that can obscure the wood grain and create a splotchy, uneven finish.

Not Sanding Between Coats

Another mistake people make is not sanding between coats. Sanding between coats helps to smooth out any rough spots or raised grain, which can make the final finish look much better. If you skip this step, you may end up with a rough, uneven finish that is difficult to fix.

Using the Wrong Brush

Using the wrong brush can also be a mistake. For example, if you use a natural bristle brush with a water-based stain, the bristles can swell and become misshapen, making it difficult to apply the stain evenly. Make sure you use the right brush for the type of stain you are using.

Not Testing the Stain

Finally, not testing the stain can be a big mistake. Before you apply the stain to your entire project, it’s a good idea to test it on a small, inconspicuous area first. This will help you see how the stain will look on your particular type of wood and whether you like the color. If you don’t test the stain first, you may end up with a finish that you don’t like and have to redo the entire project.

Frequently Asked Questions

How many coats of stain should be applied to wood?

The number of coats of stain that should be applied to wood depends on the type of stain and the desired outcome. In general, one to two coats of stain are sufficient for most projects. However, some stains may require more coats to achieve the desired color or level of protection.

Is one coat of stain enough for wood?

One coat of stain may be enough for some projects, but it depends on the type of stain and the desired outcome. If you want a deeper color or more protection, you may need to apply more than one coat of stain.

Can you apply multiple coats of oil-based stain?

Yes, you can apply multiple coats of oil-based stain. However, you should wait for the first coat to dry completely before applying the second coat. This will ensure that the second coat adheres properly and doesn’t create a blotchy appearance.

How soon can a second coat of stain be applied to wood?

The drying time for stain varies depending on the type of stain and environmental conditions. In general, you should wait at least 24 hours before applying a second coat of stain. However, some stains may dry faster and allow for a second coat to be applied sooner.

Will applying two coats of stain make the color darker?

Applying two coats of stain may make the color darker, but it depends on the type of stain and the desired outcome. Some stains may not darken significantly with a second coat, while others may become much darker.

Can different types of stains be layered on wood?

Different types of stains can be layered on wood, but it may not always produce the desired outcome. For example, layering a water-based stain over an oil-based stain may not work well, as the water-based stain may not adhere properly. It’s best to stick with the same type of stain or consult with a professional if you want to layer different types of stains.