Tag Archives: high tooth count

How to Make Wooden Flowers: A Step-by-Step Guide

Are you looking for a unique way to add some natural beauty to your home decor? Wooden flowers are a charming and creative option that can brighten up any space. Not only are they a fun DIY project, but they also make great gifts for loved ones. In this article, we will guide you through the steps of how to make wooden flowers, so you can create your own beautiful and long-lasting blooms.

To make wooden flowers, you will need some basic materials such as wood, a saw, sandpaper, wood glue, and paint. The process involves cutting the wood into petal shapes, sanding the edges, and then gluing the petals together in the desired flower shape. You can customize your wooden flowers by adding other decorative items such as beads, ribbons, and wire. Whether you want to make a bouquet of daisies or a single rose, the possibilities are endless.

With a little bit of creativity and patience, you can make wooden flowers that look just as beautiful as the real thing. Not only do they add a touch of nature to your home, but they are also a sustainable and eco-friendly alternative to traditional flowers. So, grab your tools and let’s get started on this fun and rewarding project!

Understanding the Basics of Woodworking

Woodworking is a fun and rewarding hobby that allows you to create beautiful and functional objects out of wood. It’s important to understand the basics of woodworking before you start any project. In this section, we’ll cover some of the basics you need to know before you start making wooden flowers.

Choosing the Right Wood

Choosing the right wood is an important part of woodworking. Different types of wood have different properties and are suited for different purposes. When making wooden flowers, you want to choose a wood that is easy to work with and has a nice grain pattern.

Some good woods for making wooden flowers include:

  • Basswood: A soft wood that is easy to carve and has a fine grain pattern.
  • Pine: A soft wood that is easy to work with and has a distinctive grain pattern.
  • Cedar: A soft wood that is resistant to rot and has a pleasant aroma.

When choosing wood, make sure it is free from knots and other defects that can make it difficult to work with. You should also consider the color of the wood and how it will look when finished.

Safety Measures in Woodworking

Safety is an important consideration in woodworking. You will be using sharp tools and machines that can be dangerous if not used properly. Here are some safety measures you should take when working with wood:

  • Wear eye protection: When using power tools or hand tools, wear safety glasses or goggles to protect your eyes from flying debris.
  • Use sharp tools: Dull tools are more dangerous than sharp tools because they are more likely to slip and cause injury. Keep your tools sharp and in good condition.
  • Keep your work area clean: Cluttered workspaces can be dangerous. Keep your work area clean and free from tripping hazards.
  • Use machines safely: If you are using power tools, make sure you read the manual and follow all safety instructions. Never remove safety guards or operate a machine without proper training.

By following these safety measures, you can reduce the risk of injury and enjoy woodworking safely.

Gathering Necessary Tools

Before you start making wooden flowers, you need to gather all the necessary tools and materials. Here are the essential tools you will need:

Essential Woodworking Tools

  • Wooden dowels: These will serve as the stem of your wooden flowers. You can find these at your local craft store or online.
  • Floral wire: This will make the stems more flexible and sturdy.
  • Wooden petals: You can either purchase pre-cut wooden petals or cut them yourself using a saw and sandpaper.
  • Glue: You will need wood glue to attach the petals to the stem and to attach the petals to each other.
  • Saw: You will need a saw to cut the wooden petals into the desired shape.
  • Sandpaper: You will need sandpaper to smooth the edges of the petals.
  • Paint: You can use any type of paint, but acrylic paint is recommended for its durability and versatility.
  • Paintbrushes: You will need different sizes of paintbrushes to paint the petals and add details.

Choosing the Right Paint and Brushes

When choosing paint and brushes, consider the following:

  • Acrylic paint is the best choice for wooden flowers because it is water-resistant, dries quickly, and adheres well to wood.
  • Choose a paintbrush with soft bristles to prevent brush marks on the petals.
  • Use a smaller brush for details and a larger brush for painting the petals.
  • Consider using a sealer to protect the paint and add shine to the petals.

By gathering all the necessary tools and materials, you are ready to start making beautiful wooden flowers.

Creating the Flower Design

When it comes to making wooden flowers, the first step is to create a design for your flower. This design will serve as a guide for carving or cutting the wood into the shape of the flower. In this section, we’ll cover two important sub-sections to help you create your flower design: Sketching the Flower and Transferring the Design onto Wood.

Sketching the Flower

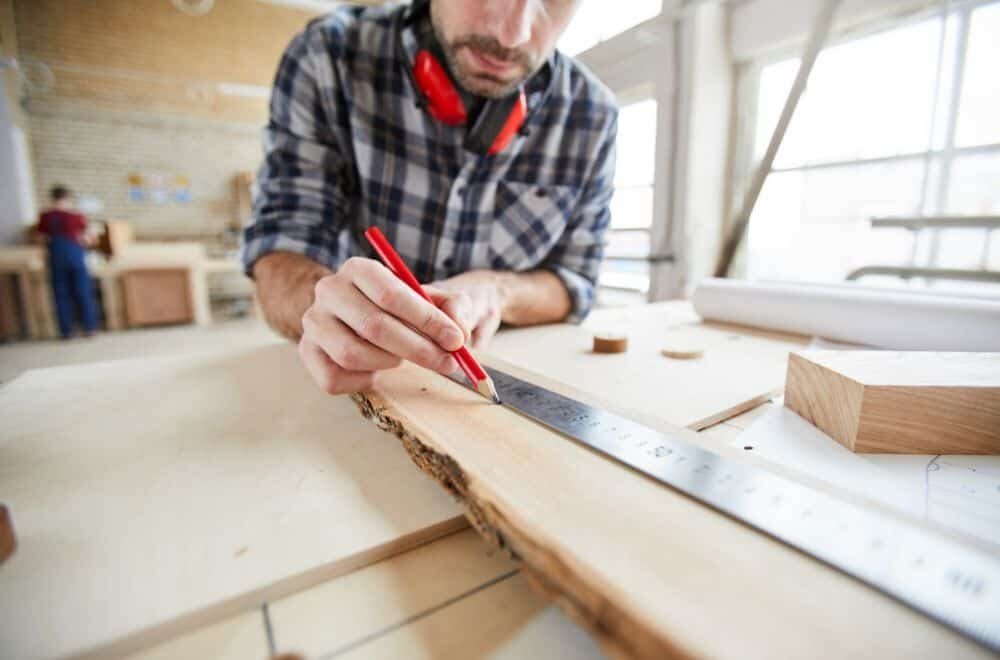
The first step in creating your wooden flower design is to sketch out the flower on paper. You can use a pencil and paper to create a rough sketch of the flower you want to make. Take your time and make sure to capture all the details of the flower, including the shape of the petals, the size of the flower, and any other features that make it unique.

Once you have a rough sketch of the flower, you can refine it by adding more details and making adjustments to the design. You can also use digital tools like Adobe Illustrator or Inkscape to create a more precise design for your flower.

Transferring the Design onto Wood

After creating your flower design, the next step is to transfer it onto the wood. You can do this by printing out your design on paper and then tracing it onto the wood using a pencil. Alternatively, you can use carbon paper to transfer the design onto the wood.

Once you have the design transferred onto the wood, you can begin cutting or carving the wood to create the shape of the flower. Make sure to take your time and work carefully to ensure that you create a precise and accurate representation of your flower design.

Overall, creating a flower design is an important step in the process of making wooden flowers. By following these tips and techniques, you can create a beautiful and unique wooden flower that will be a great addition to any home or garden.

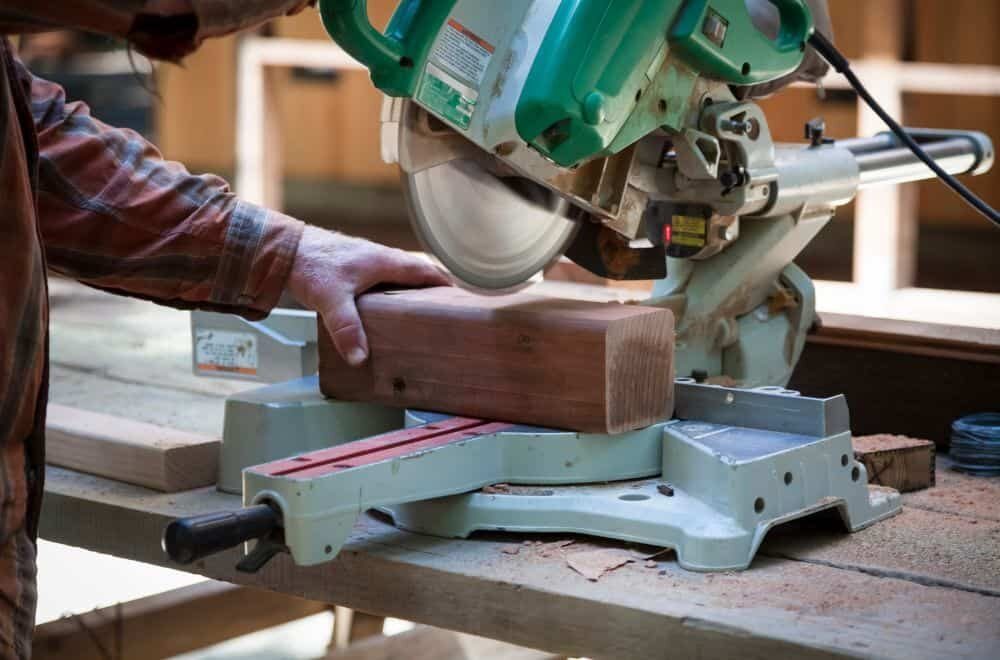
Cutting and Shaping the Flower

When it comes to making wooden flowers, cutting and shaping the petals is a crucial step. Here’s how to do it:

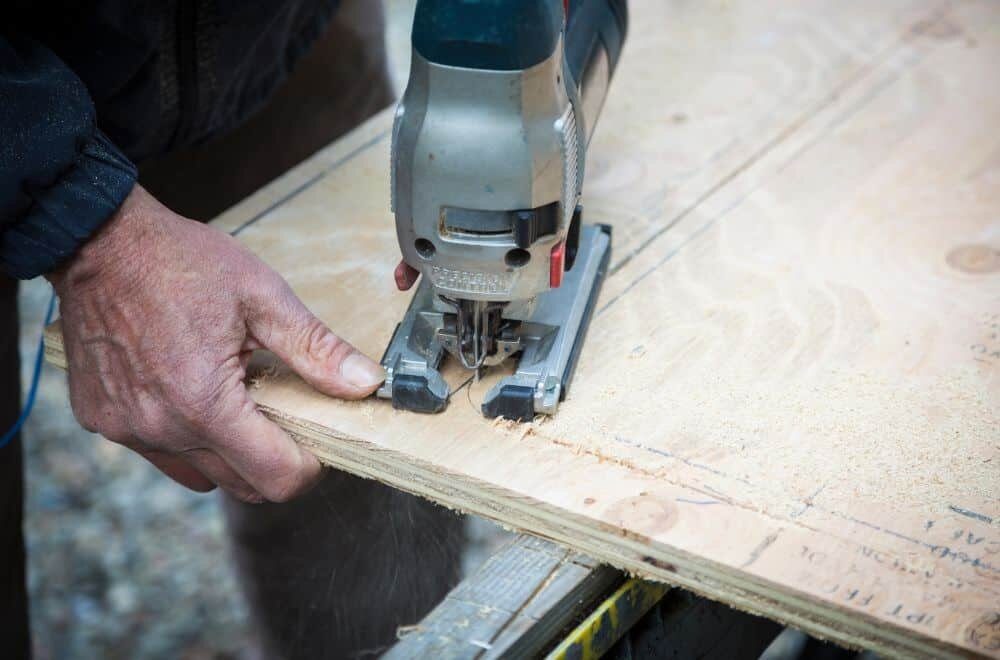
Using a Jigsaw for Cutting

A jigsaw is a versatile tool that can be used to cut intricate shapes and curves in wood. It’s the perfect tool for cutting out the petal shapes needed for your wooden flower. Follow these steps to use a jigsaw for cutting:

  1. Choose the right blade: For cutting wood, a blade with a high tooth count is best. Look for blades labeled “wood” or “fine.”

  2. Clamp the wood: Secure the piece of wood you’ll be cutting to a workbench or table with clamps. This will keep the wood from moving while you cut.

  3. Mark the petal shape: Use a pencil to draw the shape of the petal onto the wood. You can use a template or draw freehand.

  4. Cut the shape: Turn on the jigsaw and carefully guide the blade along the pencil line. Take your time and be patient. It’s better to go slow and get a clean cut than to rush and make mistakes.

Sanding the Edges

After cutting out the petal shapes, you’ll need to sand the edges to smooth them out and remove any rough spots. Here’s how to do it:

  1. Choose the right sandpaper: For sanding wood, a medium-grit sandpaper (around 120 grit) is a good choice.

  2. Sand the edges: Hold the sandpaper at a 45-degree angle to the edge of the petal and sand in a back-and-forth motion. Be sure to sand all the way around the edge of the petal to get a smooth, even finish.

  3. Check your work: After sanding, inspect the edges of the petal for any rough spots or jagged edges. If you find any, sand them down until the edge is smooth.

By following these steps, you’ll be able to cut and shape the petals for your wooden flower with ease.

Painting and Finishing

Once you have assembled your wooden flower, it’s time to add some color and finish it off. Here are some tips to help you paint and finish your wooden flowers:

Applying the Base Coat

The first step in painting your wooden flower is to apply a base coat. This will help the paint adhere to the wood and provide a smooth surface for the topcoat. You can use any type of paint for the base coat, but acrylic paint is a good choice because it dries quickly and is easy to work with.

To apply the base coat, use a small brush or foam brush and apply the paint in thin, even strokes. Be sure to cover the entire surface of the flower, including the petals and stem. Let the paint dry completely before moving on to the next step.

Adding Details with Paint

Once the base coat is dry, you can add details to your wooden flower with paint. Use a small brush to paint the details, such as the veins on the petals or the center of the flower. You can also use different colors to create a more realistic look.

If you’re not confident in your painting skills, you can use stencils or stamps to add details to your wooden flower. Simply place the stencil or stamp on the flower and apply paint with a brush or sponge.

Sealing the Wood

After you have finished painting your wooden flower, it’s important to seal the wood to protect it from moisture and dirt. You can use a clear coat of polyurethane or a wood sealer to seal the wood.

To apply the sealer, use a brush or spray bottle and apply a thin, even coat to the entire surface of the flower. Be sure to let the sealer dry completely before handling the flower.

By following these simple steps, you can add color and detail to your wooden flowers and protect them from damage.

Displaying Your Wooden Flowers

After creating your beautiful wooden flowers, it’s time to display them! Whether you want to create a flower arrangement or attach them to a wall or surface, there are different ways to showcase your wooden flowers. Here are some tips:

Creating a Flower Arrangement

One way to display your wooden flowers is by creating a flower arrangement. This can be done in a vase, a basket, or any other container of your choice. Here are some steps to follow:

  1. Choose your container: Select a container that matches the style and size of your wooden flowers. A clear vase can show off the stem of the flowers, while a basket can give a rustic feel.

  2. Add filler: Use some filler material, such as moss or small stones, to create a base for your wooden flowers.

  3. Arrange your flowers: Start arranging your wooden flowers in the container. Place the taller flowers in the back and the shorter ones in the front. You can also mix and match different colors and shapes.

  4. Adjust: Once you have arranged your flowers, step back and take a look. Make any necessary adjustments until you are happy with the final result.

Attaching to a Wall or Surface

Another way to display your wooden flowers is by attaching them to a wall or surface. This can be done using adhesive strips, hooks, or nails. Here are some steps to follow:

  1. Choose your location: Decide on the location where you want to hang your wooden flowers. Make sure it is a flat surface and that you have enough space.

  2. Prepare your flowers: If your wooden flowers have stems, you can trim them to the desired length. If they don’t have stems, you can attach a wire or string to the back.

  3. Attach your flowers: Use adhesive strips or hooks to attach your wooden flowers to the wall. If you prefer, you can also use nails. Make sure to space them evenly and at the same height.

  4. Adjust: Once you have attached your flowers, step back and take a look. Make any necessary adjustments until you are happy with the final result.

By following these tips, you can create a beautiful display of your wooden flowers that will add a unique touch to any room.

tools-needed-for-a-45-degree-angle-cut

How to Measure and Cut a 45-Degree Angle in Wood: Easy Steps

If you’re new to woodworking, measuring and cutting wood at precise angles can be a daunting task. A 45-degree angle cut is a common cut used in many woodworking projects, such as creating frames or molding. But how do you measure and cut a 45-degree angle cut in wood?

First, you’ll need the right tools. A miter saw is the most common tool used for cutting 45-degree angles in wood. It’s a power tool that allows you to make precise cuts at various angles. You’ll also need a measuring tape, a pencil, and safety gear such as safety glasses and ear protection.

Once you have your tools, it’s time to measure and mark your wood. Measure the length of the wood you want to cut and mark it with a pencil. Then, use your measuring tape to find the halfway point of the wood and mark it with another pencil line. This will be the point at which you’ll make your 45-degree angle cut. The next step is to adjust your miter saw to a 45-degree angle and carefully cut along the marked line. With practice, you’ll be able to make precise 45-degree angle cuts in no time.

Understanding 45-Degree Angle Cuts

If you’re new to woodworking, you may be wondering what a 45-degree angle cut is and why it’s important. Simply put, a 45-degree angle cut is a diagonal cut made on a piece of wood at a 45-degree angle. This type of cut is commonly used in woodworking to create beveled edges, miter joints, and other angled cuts.

To make a 45-degree angle cut, you will need a combination square, a pencil, and a saw. The easiest way to make this cut is by using an electric miter saw, as it allows you to adjust the angle of the blade to precisely 45 degrees. However, if you don’t have a miter saw, you can still make a 45-degree angle cut using a handsaw or circular saw.

When measuring for a 45-degree angle cut, it’s important to measure to the long end of the miter. This means that if you need a 10-inch piece of wood with a 45-degree angle cut, you should measure 10 inches from the long end of the miter and mark the cut line with your pencil.

It’s also important to remember that a 45-degree angle cut is an opposite cut, which means that the angle of the cut will be in the opposite direction of the angle of the saw blade. To ensure that you make a clean and accurate cut, use a saddle square or combination square to guide your saw along the cut line.

In summary, understanding how to measure and cut a 45-degree angle cut in wood is an essential skill for any woodworker. With the right tools and techniques, you can create beveled edges, miter joints, and other angled cuts with precision and ease.

Tools Needed for a 45-Degree Angle Cut

tools-needed-for-a-45-degree-angle-cut

If you’re planning to make a 45-degree angle cut in wood, you’ll need to have the right tools for the job. Here are the tools you’ll need:

Measuring Tools

To make a precise 45-degree angle cut, you’ll need to measure and mark the wood accurately. Here are the measuring tools you’ll need:

  • Combination square: This is a versatile tool that you can use to measure angles and mark straight lines. It’s essential for making accurate 45-degree angle cuts.
  • Tape measure: You’ll need a tape measure to measure the length of the wood and mark the point where you want to make the cut.
  • Pencil: You’ll need a pencil to mark the wood where you want to make the cut. Make sure the pencil is sharp so that the mark is clear and accurate.

Cutting Tools

Once you’ve measured and marked the wood, you’ll need to cut it at a 45-degree angle. Here are the cutting tools you’ll need:

  • Miter saw: A miter saw is the best tool for making a 45-degree angle cut. It’s designed to make angled cuts, and you can set it to cut at a precise angle. You can use a miter saw to make crosscuts, bevel cuts, and compound cuts.
  • Table saw: If you don’t have a miter saw, you can use a table saw to make a 45-degree angle cut. You’ll need to use a miter gauge to guide the wood through the saw blade at the correct angle. Make sure the saw blade is sharp and clean to ensure a smooth and accurate cut.
  • Circular saw: A circular saw can also be used to make a 45-degree angle cut. You’ll need to adjust the saw blade to the correct angle and use a straight edge to guide the saw through the wood. Make sure the saw blade is sharp and clean to ensure a smooth and accurate cut.

With these tools, you’ll be able to make a precise 45-degree angle cut in wood. Make sure you take the time to measure and mark the wood accurately, and use the right cutting tool for the job.

Measuring a 45-Degree Angle

measuring-a-45-degree-angle

Measuring a 45-degree angle is essential if you want to make precise cuts in wood. There are different tools and methods you can use to measure a 45-degree angle, and we will discuss some of them below.

Using a Combination Square

A combination square is a versatile tool that can help you measure angles, distances, and depths. To measure a 45-degree angle with a combination square, follow these steps:

  1. Place the combination square on the wood, aligning the long side with the edge you want to cut.
  2. Rotate the square until the 45-degree mark on the ruler aligns with the edge of the wood.
  3. Use a pencil to draw a line along the edge of the ruler.

Using a Protractor

A protractor is a tool that measures angles. To measure a 45-degree angle with a protractor, follow these steps:

  1. Place the protractor on the wood, aligning the base with the edge you want to cut.
  2. Rotate the protractor until the 45-degree mark aligns with the edge of the wood.
  3. Use a pencil to draw a line along the edge of the protractor.

Using a Bevel Gauge

A bevel gauge is a tool that measures and transfers angles. To measure a 45-degree angle with a bevel gauge, follow these steps:

  1. Place the bevel gauge on the wood, aligning the base with the edge you want to cut.
  2. Adjust the bevel gauge until the blade aligns with the edge of the wood.
  3. Tighten the bevel gauge.
  4. Use a pencil to draw a line along the blade of the bevel gauge.

Using a Speed Square

A speed square is a tool that helps you make square cuts and angles. To measure a 45-degree angle with a speed square, follow these steps:

  1. Place the speed square on the wood, aligning the base with the edge you want to cut.
  2. Rotate the square until the 45-degree mark aligns with the edge of the wood.
  3. Use a pencil to draw a line along the edge of the square.

In conclusion, measuring a 45-degree angle is not difficult if you have the right tools and know-how. You can use a combination square, protractor, bevel gauge, or speed square to measure a 45-degree angle. Choose the tool that works best for you and your project, and always double-check your measurements before making any cuts.

Marking the Wood for a 45-Degree Cut

marking-the-wood-for-a-45-degree-cut

When it comes to measuring and cutting a 45-degree angle cut in wood, marking the wood properly is crucial to ensuring a precise and accurate cut. Here are a few steps to follow when marking the wood for a 45-degree cut:

  1. Measure the Length: First, measure the length of the wood piece you want to cut. Use a measuring tape or ruler to get an accurate measurement.
  2. Mark the Wood: Once you have measured the length, mark the wood where you want to make the cut. Use a pencil to make a visible mark that you can easily see.
  3. Measure the Angle: Next, you need to measure the angle of the cut. To do this, use a protractor or combination square. Place the protractor or square on the wood at the mark you made and align it with the edge of the wood. Then, adjust it to a 45-degree angle.
  4. Mark the Angle: Once you have measured the angle, mark it on the wood using a pencil. Make sure the mark is visible and easy to see.
  5. Double Check: Before making the cut, double-check your measurements and marks to ensure they are accurate. This will help you avoid any mistakes and ensure a precise cut.

By following these steps, you can accurately mark the wood for a 45-degree cut and ensure that your cut is precise and accurate. Remember to always measure twice and cut once to avoid any mistakes.

Cutting the Wood at a 45-Degree Angle

cutting-the-wood-at-a-45-degree-angle

Now that you have your wood marked at a 45-degree angle, it’s time to cut it. The easiest way to do this is by using an electric miter saw. Here’s how you can do it:

  1. Set your combination square on the 45-degree mark and draw the cut line across the wood.
  2. Adjust the miter saw to 45 degrees.
  3. Align the saw blade with the cut line you drew.
  4. Gently guide the saw into and through the wood.

Make sure to take your time and be careful while cutting the wood. If you rush the process, you may end up with a crooked cut or even injure yourself.

If you don’t have a miter saw, you can use a circular saw or a handsaw to make the cut. However, these methods may not be as accurate as using a miter saw.

Another thing to keep in mind is that the thickness of the wood can affect how the cut turns out. Thicker wood may require multiple passes with the saw to get a clean cut.

Remember to always wear appropriate safety gear, such as safety glasses and ear protection, when using power tools.

Safety Precautions During Cutting

safety-precautions-during-cutting

When working with power tools, it is important to prioritize safety. Here are a few precautions you should take when cutting a 45-degree angle in wood:

Wear Protective Gear

Before you begin cutting, make sure you are wearing the appropriate protective gear. This includes safety glasses or goggles to protect your eyes from flying debris, earplugs to protect your hearing from loud noises, and a dust mask to prevent inhalation of sawdust.

Secure the Wood

Make sure the wood you are cutting is securely clamped or held in place to prevent it from moving or slipping during the cut. This will help you maintain control over the saw and prevent accidents.

Use the Right Blade

Make sure you are using the appropriate blade for the type of cut you are making. For a 45-degree angle cut, a crosscut blade or a combination blade with a high tooth count is recommended.

Mind the Blade Guard

Always make sure the blade guard is in place and functioning properly before you begin cutting. The blade guard helps protect your fingers from the blade and also helps prevent debris from flying out of the saw.

Keep Your Hands Clear

When making the cut, keep your hands well clear of the blade and the path of the saw. Use a push stick or other tool to guide the wood through the saw, if necessary.

By following these safety precautions, you can help ensure a safe and successful 45-degree angle cut in wood.

Troubleshooting Common Issues

Cutting a 45-degree angle in wood may seem simple, but it can be frustrating when things don’t go as planned. Here are some common issues you may encounter and how to troubleshoot them:

Uneven Cut

If your 45-degree angle cut is uneven, it could be due to a few reasons. First, make sure your saw blade is sharp and in good condition. Dull blades can cause jagged cuts. Next, check that your wood is clamped securely in place and not moving during the cut. Finally, ensure that your saw is properly aligned and calibrated for a 45-degree cut.

Inaccurate Angle

If your 45-degree angle is not accurate, it may be due to incorrect measurements or saw adjustments. Double-check your measurements and use a combination square to ensure accuracy. If your saw is not calibrated correctly, adjust it accordingly and recheck your cut.

Tear-Out

Tear-out occurs when the wood fibers splinter or tear during the cut, leaving an unsightly finish. To prevent this, use a sharp saw blade with a high tooth count. You can also use masking tape on the wood surface to prevent splintering. Another option is to make a scoring cut before the 45-degree cut to weaken the wood fibers and reduce tear-out.

Safety Concerns

Always prioritize safety when using power tools. Wear safety glasses and ear protection, and keep your hands and fingers away from the blade at all times. Use a push stick to guide the wood through the saw and never force the cut. If you are unsure or uncomfortable with the process, seek guidance from a professional or experienced woodworker.

Tips for a Perfect 45-Degree Angle Cut

tips-for-a-perfect-45-degree-angle-cut

Cutting a 45-degree angle in wood can be a challenging task, but with the right tools and techniques, you can achieve a perfect cut every time. Here are some tips that will help you get the job done:

Use a Combination Square

A combination square is an essential tool for measuring and marking angles. To cut a 45-degree angle, set your combination square on the 45-degree mark and draw the cut line on the wood. This will ensure that your cut is accurate and straight.

Use an Electric Miter Saw

An electric miter saw is the best tool for cutting a 45-degree angle in wood. Adjust the miter saw to 45 degrees, align it to the cut line, and gently guide the saw into and through the wood. Make sure to wear safety goggles and gloves while using the saw.

Check Your Measurements

Before making the cut, double-check your measurements to ensure that they are accurate. Use a tape measure or ruler to measure the length of the wood and mark the 45-degree angle with a pencil. This will help you avoid mistakes and ensure that your cut is precise.

Practice on Scrap Wood

If you are new to woodworking, it is a good idea to practice cutting 45-degree angles on scrap wood before working on your project. This will help you get a feel for the saw and ensure that you are comfortable with the process before making the cut on your final piece.

Take Your Time

Cutting a 45-degree angle in wood requires patience and precision. Take your time and make sure that you are comfortable with each step of the process before moving on to the next. Rushing can lead to mistakes and a less-than-perfect cut.

By following these tips, you can achieve a perfect 45-degree angle cut in wood every time. Remember to always prioritize safety and take your time to ensure a quality result.

Frequently Asked Questions

What are some tips for cutting a 45-degree angle with a circular saw?

When using a circular saw to cut a 45-degree angle, it’s important to make sure that the saw blade is set to the correct angle. You can use a protractor or angle finder to measure the angle of the blade. It’s also important to use a guide to ensure that your cut is straight and accurate. You can use a straight edge or a piece of scrap wood as a guide.

How can I measure and cut a 45-degree angle with a tape measure?

To measure and cut a 45-degree angle with a tape measure, you can use the Pythagorean theorem. Measure the length of the side you want to cut, then divide it by the square root of 2. This will give you the length of the other side of the triangle. Use this measurement to mark your cut line, then use a saw to make the cut.

Is there an angle cut calculator that can help me with cutting 45-degree angles?

Yes, there are several angle cut calculators available online that can help you calculate the correct angle for your cut. Simply enter the length of the side you want to cut, and the calculator will give you the correct angle to use.

What is the best way to measure a 45-degree angle on wood?

The easiest way to measure a 45-degree angle on wood is to use a combination square. Set the square to 45 degrees, then use it to mark your cut line. You can also use a protractor or angle finder to measure the angle.

How can I cut trim at a 45-degree angle?

To cut trim at a 45-degree angle, you can use a miter saw or a coping saw. If using a miter saw, set the saw to a 45-degree angle and make your cut. If using a coping saw, cut along the profile of the trim at a 45-degree angle.

Are there any techniques for cutting a 45-degree angle without a miter saw?

Yes, there are several techniques for cutting a 45-degree angle without a miter saw. You can use a circular saw with a guide, a handsaw with a miter box, or a jigsaw with a bevel cut. It’s important to take your time and make sure that your cut is accurate.