Tag Archives: fine-toothed blade

how-to-build-a-wooden-box-frame-a-beginners-guide-2

How to Build a Wooden Box Frame: A Beginner's Guide

Are you looking for a simple and practical way to build a wooden box frame? Whether you need a storage solution or a decorative item, building a wooden box frame is a great DIY project that can be completed with basic tools and materials. In this article, we will provide you with step-by-step instructions on how to build a wooden box frame using lumber, screws, and nails.

First, you will need to gather the necessary tools and materials, such as a saw, a drill, screws, nails, and lumber. Then, you will need to measure and cut the lumber to the correct size and shape, and assemble the pieces using screws and nails. We will guide you through each step of the process, including how to create a sturdy frame and how to finish the box with paint or stain.

Whether you are a beginner or an experienced DIY enthusiast, building a wooden box frame can be a fun and rewarding project that allows you to create a custom piece that fits your needs and style. So, let’s get started and learn how to build a wooden box frame that will last for years to come.

Understanding Wooden Box Frames

If you’re looking for a simple and elegant way to showcase your artwork, photographs, or other prized possessions, a wooden box frame might be just what you need. These frames are easy to make, customizable, and can be built to fit any size or shape of item you want to display.

A wooden box frame is essentially a wooden frame with a box-like shape that can hold items inside it. The frame is made up of multiple layers of lumber glued together using special types of adhesive, making it sturdy and easy to assemble.

When building a wooden box frame, you’ll need to choose the right type of wood. Hardwoods like oak, maple, and cherry are popular choices because they’re strong and durable, but softwoods like pine and spruce can also be used if you’re on a budget.

One of the advantages of building a wooden box frame is that you can customize it to your specific needs. You can choose the dimensions of the frame, the thickness of the wood, and the finish you want to apply. You can also add decorative elements like moldings or carvings to give your frame a unique look.

Overall, building a wooden box frame is a fun and rewarding project that can be completed in just a few hours. With a little bit of patience and the right tools and materials, you can create a beautiful frame that will showcase your favorite items for years to come.

Choosing the Right Materials

When it comes to building a wooden box frame, choosing the right materials is crucial. Here are some things to consider when selecting materials for your project.

Types of Wood

Pine, oak, or cedar are all good choices for a box frame. Pine is a popular choice because it is affordable and easy to work with. Oak is a bit more expensive but is known for its durability and strength. Cedar is a great choice if you want a wood that is resistant to rot and insects.

When selecting your wood, make sure it is straight and free of knots. It should also be dry and have a moisture content of around 12%.

Selecting Nails and Screws

Make sure your nails and screws are large enough that they won’t pull out of the wood too easily. For a box frame, nails are usually the best choice. They are easy to use and provide a strong hold.

If you choose to use screws, make sure they are long enough to go through both pieces of wood and have a wide enough diameter to provide a secure hold.

Choosing the Right Tools

A hammer and nails are the most basic tools you’ll need for building a box frame. Make sure you use a hammer with an anti-vibration handle to prevent fatigue while driving in the nails.

An electric saw is ideal for making precise cuts with minimal effort. If you don’t have an electric saw, a hand saw will work, but it will take more time and effort to make accurate cuts.

In addition to these tools, you may also need a drill, sandpaper, and wood glue depending on the design of your box frame.

Designing the Box Frame

how-to-build-a-wooden-box-frame-a-beginners-guide-2

Before you start building your wooden box frame, you need to design it. This will ensure that your box frame meets your requirements and looks the way you want it to. Here are two important steps to follow when designing your box frame:

Determining the Dimensions

The first step in designing your box frame is to determine its dimensions. You need to decide how big you want your box frame to be. Consider what you will be storing in it and how much space you have available.

To determine the dimensions of your box frame, measure the length, width, and height of the items you will be storing in it. Add a few inches to each measurement to ensure that your box frame will be big enough to hold everything.

Sketching the Design

Once you have determined the dimensions of your box frame, it’s time to sketch your design. This will help you visualize what your box frame will look like and make any necessary adjustments before you start building.

You don’t need to be an artist to sketch your design. Simply draw a rough outline of your box frame and label the dimensions. You can also add any additional features you want, such as handles or a lid.

Here are some things to keep in mind when sketching your design:

  • Make sure your box frame is symmetrical and balanced.
  • Consider the type of wood you will be using and how it will look with your design.
  • Think about any additional features you want to add, such as hinges or locks.

By following these steps, you can design a wooden box frame that meets your needs and looks great.

Preparing the Wood

Before you can begin constructing your wooden box frame, you need to prepare the wood. This involves cutting the wood to the desired size and sanding it to create a smooth surface. Here are the steps you should follow:

Cutting the Wood

The first step in preparing the wood is to cut it to the desired size. You can use a saw or a miter saw to cut the wood. Make sure to measure the wood carefully and mark the cut lines before you start cutting. Here are some tips to keep in mind:

  • Use a saw with a fine-toothed blade to ensure a clean cut.
  • Use a miter saw to make precise cuts at specific angles.
  • Wear safety goggles and gloves to protect yourself from flying wood chips.

Sanding the Wood

Once you have cut the wood to the desired size, the next step is to sand it. Sanding the wood will help create a smooth surface and remove any rough edges. Here are some tips to keep in mind:

  • Use a sandpaper with a low grit to remove any rough spots or imperfections.
  • Use a sandpaper with a high grit to create a smooth surface.
  • Sand in the direction of the grain to avoid creating scratches on the wood.
  • Use a sanding block to ensure an even sanding surface.

By following these steps, you can prepare the wood for your wooden box frame. With the wood cut to size and sanded, you are now ready to start constructing your box frame.

Assembling the Box Frame

assembling-the-box-frame

Once you have cut all the lumber pieces to the correct size and shape, it’s time to start assembling your wooden box frame. This section will guide you through the process of joining the pieces and securing the frame.

Joining the Pieces

To join the pieces of lumber together, you can use screws, nails, or wood glue. However, using all three will provide the most secure and stable frame. Here are the steps to follow:

  1. Apply a small amount of wood glue to the end of one of the side pieces.
  2. Place the glued end of the side piece flush against the end of one of the end pieces.
  3. Use a drill to make pilot holes through the side piece and into the end piece.
  4. Insert screws into the pilot holes to secure the pieces together.
  5. Repeat the process for the other side piece and the other end piece.

Securing the Frame

Once you have joined all the pieces together to form the frame, you need to secure it to ensure it remains stable. Here’s what you need to do:

  1. Place the frame on a flat surface.
  2. Use a square to ensure that the corners are 90 degrees.
  3. Drill pilot holes through the corners of the frame.
  4. Insert screws into the pilot holes to secure the corners.
  5. Check that the frame is level and adjust as necessary.

Congratulations! You have successfully assembled your wooden box frame. The next step is to finish it by sanding, staining, or painting it to your desired finish.

Finishing Touches

Once you have constructed your wooden box frame, it is time to add the finishing touches to make it look polished and professional. Here are a few things you can do to give your box frame a final touch of elegance.

Applying Paint or Stain

One of the easiest ways to give your wooden box frame a finished look is to apply paint or stain. You can choose a color that complements the decor of the room where the box frame will be displayed. Before applying paint or stain, make sure to sand the wood surface to ensure that it is smooth and free of any imperfections. Use a paintbrush or a cloth to apply the paint or stain evenly, and let it dry completely before handling the box frame.

Adding Protective Coating

If you want to protect your wooden box frame from scratches, dents, and other types of damage, you can add a protective coating. There are many types of protective coatings available, such as polyurethane, lacquer, and varnish. When applying a protective coating, make sure to read the instructions carefully to ensure that you are using it correctly. It is also important to apply the coating in a well-ventilated area and to wear protective gear, such as gloves and a mask.

By following these simple finishing touches, you can take your wooden box frame from a basic DIY project to a beautiful and functional piece of decor.

How to Make a Wooden Pallet Couch: A DIY Guide

Making a wooden pallet couch is a great way to add a unique and stylish piece of furniture to your home without breaking the bank. Pallets are readily available and can often be found for free, making them an affordable option for DIY projects. Plus, repurposing pallets is an eco-friendly way to reduce waste and create something new and useful.

To get started, you’ll need to gather your materials. You’ll need pallets, screws, a saw, sandpaper, and foam cushions. Once you have your materials, you can begin by disassembling the pallets and cutting the wood to size. Sand the wood to remove any rough edges or splinters, and then assemble the pieces into the frame of your couch. Finally, add the cushions and any finishing touches to complete your project.

Understanding the Basics of a Pallet Couch

If you’re looking for a unique and affordable way to furnish your living space, a wooden pallet couch might be the perfect solution. Building your own pallet couch can be a fun and rewarding DIY project, but it’s important to understand the basics before you get started.

Types of Wood

When it comes to building a pallet couch, the type of wood you choose is crucial. Pallets can be made from a variety of different woods, including pine, oak, and cedar. Pine is a popular choice because it’s inexpensive and readily available, but it’s also a softwood that can be prone to splitting and warping over time. Oak and cedar, on the other hand, are hardwoods that are more durable and resistant to weathering.

Before you start building your pallet couch, it’s important to inspect the pallets you’ll be using. Look for pallets that are in good condition, with no signs of rot or insect damage. You should also avoid pallets that have been treated with chemicals, as these can be harmful to your health.

Safety Measures

Building a pallet couch can be a fun and rewarding project, but it’s important to take safety precautions to avoid injury. Here are some tips to keep in mind:

  • Wear protective gear, such as gloves and safety glasses, when handling pallets.
  • Use a saw with a fine-toothed blade to avoid splintering the wood.
  • Sand the pallets thoroughly to remove any rough edges or splinters.
  • Use a drill to secure the pallets together, rather than nails, which can split the wood.
  • Make sure your finished pallet couch is stable and won’t tip over.

By following these basic guidelines, you can build a safe and sturdy wooden pallet couch that will add a unique touch to your living space.

Gathering Necessary Tools

Before you begin building your wooden pallet couch, it is important to gather all the necessary tools. Having the right tools will make the process smoother and more efficient. In this section, we will discuss the measuring tools, cutting tools, and fastening tools you will need for this project.

Measuring Tools

Accurate measurements are crucial when building a wooden pallet couch. The following measuring tools will come in handy:

  • Tape measure
  • Combination square
  • Carpenter’s square

Cutting Tools

Cutting the pallets to the right size is an important step in building a wooden pallet couch. The following cutting tools will be useful:

  • Circular saw
  • Hand saw
  • Jigsaw

Fastening Tools

To hold the pallets together, you will need the right fastening tools. The following tools will be useful:

  • Drill
  • Screws
  • Nails
  • Hammer

It is important to note that the type and size of screws or nails you use will depend on the type of wood used for the pallets. Make sure to choose the right fastening tools for your project.

With these measuring, cutting, and fastening tools, you will be well-equipped to build your own wooden pallet couch. Make sure to have all the necessary tools on hand before you begin the project to ensure a smooth and successful build.

Finding the Right Pallets

When making a wooden pallet couch, finding the right pallets is crucial. Here are some things to consider when selecting pallets for your project.

Pallet Size

The size of the pallets you choose will depend on the size of the couch you want to make. Standard pallets are usually around 48 inches by 40 inches. However, you can find pallets in a variety of sizes. Consider the dimensions of your space and the size of the cushions you plan to use when selecting pallets.

Pallet Condition

The condition of the pallets is also important. You want to make sure that the pallets you choose are sturdy and in good condition. Here are some things to look for when selecting pallets:

  • No broken or cracked boards
  • No signs of insect infestation
  • No signs of mold or mildew

It’s also a good idea to look for pallets that have been heat treated rather than chemically treated. Heat-treated pallets are safer for indoor use and do not contain harmful chemicals.

When selecting pallets, it’s important to keep in mind that you may need to do some sanding and cleaning before using them for your couch. However, with a little bit of effort, you can find the perfect pallets for your project.

Preparing the Pallets

Before you start building your wooden pallet couch, you need to prepare the pallets. This involves cleaning, sanding, and cutting the pallets to the desired size.

Cleaning

The first step in preparing the pallets is to clean them. Pallets are often used for shipping and can be dirty or covered in debris. To clean the pallets, use a stiff-bristled brush to remove any dirt or debris. You can also use a pressure washer if you have one available.

After cleaning, inspect the pallets for any nails or staples that may be sticking out. These can be dangerous and should be removed or hammered down.

Sanding

Once the pallets are clean, the next step is to sand them. Sanding will remove any rough spots or splinters on the pallets. Use a medium-grit sandpaper to sand the pallets, starting with the rougher areas and working your way to the smoother areas.

After sanding, wipe the pallets down with a damp cloth to remove any dust or debris.

Cutting

The final step in preparing the pallets is cutting them to the desired size. Use a circular saw to cut the pallets to the desired length and width. Be sure to measure carefully and wear safety goggles and gloves while cutting.

Once the pallets are cut, inspect them for any rough edges or splinters and sand them down if necessary.

By cleaning, sanding, and cutting the pallets, you will have a solid foundation for building your wooden pallet couch.

Assembling the Couch

Once you have all the materials and tools ready, it’s time to start assembling your wooden pallet couch. This section will guide you through the process step by step.

Building the Frame

The first step is to build the frame of the couch. Start by laying out the pallets on the ground, and arrange them in a rectangular shape to form the base of the couch. Make sure to align the pallets properly and use screws to secure them together.

Next, attach the legs to the corners of the frame. You can use either pre-made legs or make your own using scrap wood. To attach the legs, drill pilot holes and then screw them into the corners of the frame.

Adding the Seating Area

Once the frame is complete, it’s time to add the seating area. Start by measuring the dimensions of the frame, and then cut the plywood to fit the dimensions. Place the plywood on top of the frame, and then add foam padding on top of the plywood.

To cover the foam, you can use either fabric or leather. Cut the fabric/leather to fit the dimensions of the seating area, and then staple it to the plywood. Make sure to pull the fabric/leather tight to avoid any wrinkles or sagging.

Securing the Backrest

The final step is to secure the backrest to the frame. To do this, you can use either more pallets or scrap wood. Measure the height and width of the backrest, and then cut the wood/pallets to fit those dimensions.

Attach the backrest to the frame using screws, and then add foam padding and fabric/leather to cover it. Make sure to pull the fabric/leather tight to avoid any wrinkles or sagging.

Congratulations, you have now assembled your own wooden pallet couch!

Adding Finishing Touches

Once you’ve built your wooden pallet couch, it’s time to add some finishing touches to make it comfortable and stylish. Here are some ideas for painting, cushioning, and decorating your couch.

Painting

Painting your pallet couch is a great way to add a pop of color and protect the wood from wear and tear. Here are some tips for painting your couch:

  • Sand the surface of the pallets to make them smooth and remove any splinters.
  • Use a primer to create a smooth surface for the paint to adhere to.
  • Apply two or three coats of paint, allowing each coat to dry completely before adding the next.

You can choose any color you like, but consider using a durable outdoor paint if you plan to use your couch outside.

Cushioning

Cushions can make your pallet couch comfortable and cozy. Here are some tips for cushioning your couch:

  • Measure the dimensions of your couch and choose cushions that fit snugly.
  • Consider using outdoor cushions made from waterproof or water-resistant materials if you plan to use your couch outside.
  • Layer cushions of different sizes and shapes to create a comfortable and stylish look.

You can also make your own cushions by sewing covers from fabric and stuffing them with foam or batting.

Decorating

Finally, you can add some decorative touches to your pallet couch to make it unique and stylish. Here are some ideas:

  • Add throw pillows in different colors and patterns to create a cozy and inviting look.
  • Use a decorative throw blanket to add texture and warmth.
  • Hang string lights or lanterns above your couch for a cozy and romantic ambiance.

With these finishing touches, your wooden pallet couch will be a comfortable and stylish addition to your home or outdoor space.

diy-cornhole-boards-cutting-hole-jpg

How to Cut a Circle in Wood with Hand Tools: A Beginner's Guide

Cutting a circle in wood with hand tools can seem like a daunting task, but it’s actually quite simple once you know the right techniques. Whether you’re a beginner or an experienced woodworker, cutting circles by hand is a useful skill to have in your arsenal. With the right tools and a little bit of practice, you can create perfect circles every time.

One of the most common hand tools used for cutting circles in wood is a coping saw. This saw has a thin, flexible blade that allows you to make intricate cuts with ease. To use a coping saw, you’ll need to start by drilling a small hole in the center of your circle. Then, insert the blade of the saw into the hole and begin cutting along the line you’ve drawn. As you cut, be sure to keep the saw blade perpendicular to the wood to ensure a clean cut.

Another tool that can be used for cutting circles in wood is a hand-held jigsaw. This saw has a reciprocating blade that moves up and down, allowing you to make curved cuts with ease. To use a jigsaw, you’ll need to start by drilling a small hole in the center of your circle. Then, insert the blade of the saw into the hole and begin cutting along the line you’ve drawn. As you cut, be sure to keep the saw blade perpendicular to the wood to ensure a clean cut.

Understanding the Basics of Woodworking

understanding-the-basics-of-woodworking

Woodworking is a craft that involves creating objects from wood. It requires skill, patience, and the right tools. In this section, we will cover the basics of woodworking, including the types of wood and hand tools used in the craft.

Types of Wood

There are many types of wood used in woodworking, each with its own properties and characteristics. Some of the most common types of wood used in woodworking include:

  • Hardwoods: Hardwoods are dense and durable, making them ideal for furniture and flooring. Examples of hardwoods include oak, maple, and mahogany.
  • Softwoods: Softwoods are lightweight and easy to work with, making them ideal for construction and outdoor projects. Examples of softwoods include pine, spruce, and cedar.
  • Plywood: Plywood is made from thin layers of wood that are glued together. It is strong and durable, making it ideal for furniture and cabinetry.

When choosing wood for your woodworking project, consider the intended use of the object, as well as your budget and personal preferences.

Hand Tools for Woodworking

In woodworking, hand tools are used to shape and manipulate wood. Some of the most common hand tools used in woodworking include:

  • Chisels: Chisels are used to carve and shape wood. They come in a variety of sizes and shapes, and are used for different purposes.
  • Hand saws: Hand saws are used to cut wood into various shapes and sizes. They come in different types, including crosscut saws and rip saws.
  • Planes: Planes are used to smooth and shape wood. They come in different sizes and shapes, and are used for different purposes.
  • Clamps: Clamps are used to hold pieces of wood together while glue dries. They come in different sizes and styles, and are used for different purposes.

When choosing hand tools for your woodworking project, consider the type of wood you will be working with, as well as the intended use of the object. Invest in high-quality tools that will last for years to come.

Safety Measures When Cutting Wood

Cutting wood requires proper safety measures to prevent accidents and injuries. Here are some safety tips to keep in mind when cutting circles in wood with hand tools:

Wear Protective Gear

Before you start cutting wood, make sure you wear the appropriate protective gear. This includes safety glasses or goggles to protect your eyes from sawdust and wood chips, gloves to protect your hands from splinters, and a dust mask to prevent you from inhaling sawdust.

Use the Right Tool for the Job

Make sure you use the appropriate tool for the job. Using the wrong tool can be dangerous and can damage the wood. When cutting circles in wood, use a compass or a circle-cutting jig to ensure accurate cuts.

Secure the Wood

Secure the wood to a workbench or a sawhorse before you start cutting. This will prevent the wood from moving around while you cut and will ensure that your cuts are straight and accurate.

Keep Your Hands Away from the Blade

Make sure you keep your hands away from the blade when cutting wood. Use a push stick or a push block to guide the wood through the blade. This will prevent your hands from getting too close to the blade and will ensure that your cuts are straight and accurate.

Cut Away from Your Body

Always cut away from your body when cutting wood. This will prevent accidents and injuries in case the blade slips or the wood moves unexpectedly.

Take Breaks

Take frequent breaks when cutting wood to prevent fatigue and to ensure that you are always alert and focused. Cutting wood requires concentration and focus, and taking breaks can help you maintain your focus and prevent accidents and injuries.

By following these safety measures, you can ensure that you cut circles in wood safely and accurately.

Preparing the Wood

preparing-the-wood-1

Before you begin cutting a circle in wood with hand tools, you need to prepare the wood properly. Here are a few steps to follow:

Step 1: Choose the Right Wood

The type of wood you use will affect the ease of cutting and the finished product. Choose a wood that is easy to work with and has a smooth surface. Some popular choices include pine, poplar, and birch.

Step 2: Measure and Mark the Circle

Use a compass or a circle template to measure and mark the circle on the wood. Make sure the circle is centered and the size is correct.

Step 3: Secure the Wood

Secure the wood to a workbench or a clamp to prevent it from moving while you cut. This will ensure a straight and even cut.

Step 4: Choose the Right Tool

Choose the right tool for the job. For cutting circles in wood, you can use a coping saw, a jigsaw, or a hand-held rotary tool. Each tool has its advantages and disadvantages, so choose the one that you are most comfortable with.

Step 5: Choose the Right Blade

Choose the right blade for the tool you are using. A fine-toothed blade will give you a smoother cut, while a coarse-toothed blade will cut faster but leave a rougher edge.

By following these steps, you can prepare the wood properly for cutting a circle with hand tools.

Drawing the Circle

To cut a circle in wood with hand tools, you’ll need to start by drawing the circle onto the wood. Here are a few methods you can use to do this:

Method 1: Use a Compass

A compass is a tool used for drawing circles. To use a compass, follow these steps:

  1. Adjust the compass to the desired diameter of the circle.
  2. Place the point of the compass at the center of where you want the circle to be.
  3. Rotate the compass around the center point to draw the circle.

Method 2: Use a String and Pencil

If you don’t have a compass, you can use a string and pencil to draw a circle. Here’s how:

  1. Tie one end of the string to the pencil and the other end to a nail or other object.
  2. Place the nail at the center of where you want the circle to be.
  3. Pull the string taut and draw the circle by rotating the pencil around the center point.

Method 3: Use a Template

If you need to draw the same circle multiple times, you can create a template out of cardboard or another material. Here’s how:

  1. Cut out a circle of the desired size from cardboard or another material.
  2. Place the template on the wood where you want the circle to be.
  3. Trace around the template with a pencil.

Once you’ve drawn the circle onto the wood, you can move on to cutting it out using hand tools.

Cutting the Circle

cutting-the-circlediy-cornhole-boards-cutting-hole-jpg

Cutting a circle in wood can be done with a variety of hand tools. In this section, we will discuss two common methods: using a coping saw and using a jigsaw.

Using a Coping Saw

A coping saw is a small, handheld saw with a narrow blade that is used to make intricate cuts in wood. It is an excellent tool for cutting circles in wood, especially if you need to make small or irregular shapes.

To cut a circle with a coping saw, follow these steps:

  1. Draw the circle onto the wood using a compass or a circular template.
  2. Drill a hole in the center of the circle large enough to fit the coping saw blade.
  3. Insert the blade into the hole and tighten it.
  4. Begin cutting the circle by following the line you drew. Keep the saw blade perpendicular to the wood and use smooth, even strokes.
  5. When you have finished cutting the circle, sand the edges to smooth them out.

Using a Jigsaw

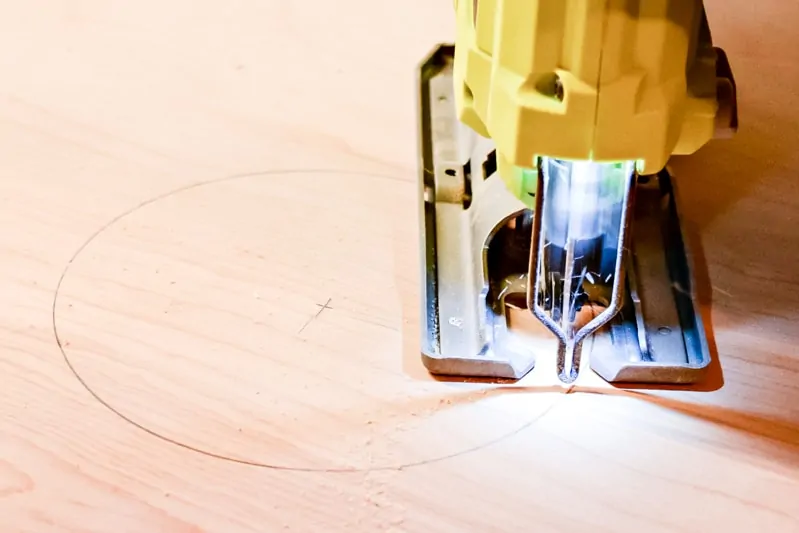
A jigsaw is a handheld power tool that uses a reciprocating blade to cut through wood. It is a versatile tool that can be used to make a variety of cuts, including circles.

To cut a circle with a jigsaw, follow these steps:

  1. Draw the circle onto the wood using a compass or a circular template.
  2. Clamp the wood to a workbench or sawhorse to keep it steady.
  3. Insert the jigsaw blade into the wood at the edge of the circle and turn on the saw.
  4. Follow the line you drew, keeping the jigsaw blade perpendicular to the wood and using smooth, even strokes.
  5. When you have finished cutting the circle, sand the edges to smooth them out.

Both of these methods are effective for cutting circles in wood. The choice of which method to use will depend on the size and shape of the circle you need to cut, as well as your personal preference and the tools you have available.

Refining the Circle

Once you have cut the circle in wood with hand tools, it’s time to refine it. This involves sanding the edges and polishing the circle to give it a smooth and finished look.

Sanding the Edges

To sand the edges of the circle, you will need sandpaper. Start with a coarse grit sandpaper and gradually work your way up to a finer grit. This will help smooth out any rough edges and make the circle more even.

To make the sandpaper easier to use, you can wrap it around a piece of dowel or a pencil. This will give you a firm grip and make it easier to sand the edges evenly.

When sanding, be sure to keep the sandpaper flat against the wood and move it in a circular motion. This will help prevent any flat spots or bumps from forming.

Polishing the Circle

Once you have sanded the edges, you can polish the circle to give it a smooth and shiny finish. To do this, you will need a polishing compound and a soft cloth.

Apply a small amount of the polishing compound to the cloth and rub it onto the surface of the circle in a circular motion. Be sure to cover the entire surface evenly.

After applying the polishing compound, use a clean part of the cloth to buff the surface of the circle. This will remove any excess compound and give the wood a smooth and shiny finish.

With these simple steps, you can refine the circle you cut with hand tools and give it a professional-looking finish.

Maintaining Your Tools

maintaining-your-tools

To ensure that your hand tools are in good condition and perform well, you need to take proper care of them. Here are some tips to help you maintain your tools:

  • Keep them clean: After every use, wipe your tools with a clean cloth to remove any dust or debris. If your tools are particularly dirty, you can use a mild detergent and water to clean them. Make sure to dry them thoroughly before storing them.
  • Sharpen them regularly: Sharpening your tools is essential to maintain their cutting edge. You can use a sharpening stone or a honing guide to sharpen your tools. Make sure to follow the manufacturer’s instructions when sharpening your tools.
  • Store them properly: Store your tools in a dry and cool place to prevent rust and corrosion. You can use a toolbox or a tool chest to store your tools. Make sure to organize your tools properly so that you can easily find them when you need them.
  • Oil them: To prevent rust and corrosion, you can oil your tools regularly. You can use a light machine oil or a rust inhibitor to oil your tools. Make sure to wipe off any excess oil before using your tools.
  • Check for damage: Regularly check your tools for any signs of damage, such as cracks or chips. If you find any damage, replace the tool or have it repaired by a professional.

By following these tips, you can ensure that your hand tools are in good condition and perform well. Proper maintenance of your tools can also help to extend their lifespan, saving you money in the long run.

Frequently Asked Questions

What is the best hand tool to cut circles in wood?

The best hand tool to cut circles in wood is a compass saw. It is a small, lightweight saw with a narrow blade that is perfect for cutting curves and circles. It has a pointed tip that allows you to start the cut in the center of the circle, and the narrow blade makes it easy to follow the curve of the circle.

How can I cut a circle in wood without a jigsaw?

If you don’t have a jigsaw, you can still cut a circle in wood using a compass saw or a coping saw. First, mark the center of the circle and draw the circle on the wood. Then, drill a hole in the center of the circle and insert the blade of the saw. Start cutting along the line of the circle, following the curve of the blade.

What is a circle cutting jig and how does it work?

A circle cutting jig is a tool that attaches to a jigsaw or a router and allows you to cut perfect circles in wood. It works by holding the wood in place and guiding the blade of the tool along the circumference of the circle. The jig can be adjusted to cut circles of different sizes.

How do I make a wooden circle frame using hand tools?

To make a wooden circle frame using hand tools, you will need a compass saw, a chisel, and a mallet. First, cut the circle out of the wood using the compass saw. Then, use the chisel and mallet to create a rabbet on the back of the circle. The rabbet should be the same depth as the thickness of the frame. Finally, cut the frame pieces to size and glue them to the circle.

What is the recommended drill bit for cutting circles in wood?

The recommended drill bit for cutting circles in wood is a hole saw. A hole saw is a circular saw blade with teeth that is used to cut holes in wood. It attaches to a drill and is available in different sizes. It is important to choose a hole saw that is the same size as the circle you want to cut.

What is the proper technique for cutting large circles in plywood with hand tools?

To cut large circles in plywood with hand tools, you will need a compass saw and a jigsaw. First, use the compass saw to cut a rough circle in the plywood. Then, use the jigsaw to cut along the line of the circle, following the curve of the blade. It is important to use a sharp blade and to take your time to ensure a clean cut.