
Wooden door hangers are a great way to add a touch of personality to your home decor. They can be customized to fit any style or theme, and can be made using a variety of materials. In this article, we will show you how to make a wooden door hanger using simple materials and techniques.
To start, you will need a wooden base for your door hanger. You can purchase pre-cut wooden rounds or squares from a craft store, or cut your own using a saw. Next, you will need to choose a design for your door hanger. This can be a simple shape or a more intricate design, depending on your skill level and preferences.
Once you have your design, you can begin painting or staining your wooden base. You can use acrylic paint or wood stain to achieve the desired look. After your base is dry, you can add any additional details such as lettering or embellishments. Finally, attach a hanger to the back of your door hanger and it’s ready to be displayed on your front door or in your home.
Understanding the Basics of Door Hangers
If you’re looking for a fun and easy way to add some personality to your front door, a wooden door hanger is a great option. But before you start crafting, it’s important to understand the basics of door hangers.
Materials
The first thing you’ll need is a wooden round or plaque. You can find these at most craft stores or online. You’ll also need some paint, brushes, and any other decorations you want to add, such as ribbon, flowers, or vinyl lettering.
Design
When it comes to designing your door hanger, the possibilities are endless. You can choose a theme, such as seasonal or holiday, or simply create a design that matches your home’s decor. Don’t be afraid to get creative and add your own personal touch.
Construction
To construct your door hanger, start by painting your wooden round or plaque. Once it’s dry, you can add any decorations or vinyl lettering. If you’re adding a bow or ribbon, attach it with hot glue or wire. Finally, attach a hanger to the back of your door hanger so you can hang it on your front door.
Maintenance
To keep your door hanger looking its best, be sure to protect it from the elements. If you’re using it outside, consider adding a coat of sealant to protect it from rain and sun damage. And if it does get dirty, simply wipe it down with a damp cloth.
Now that you understand the basics of door hangers, it’s time to get crafting! With a little creativity and some basic supplies, you can create a beautiful and unique wooden door hanger that will add some personality to your front door.
Materials Needed
Making a wooden door hanger is a fun and easy project that requires only a few materials. Here are the things you’ll need to get started:
Wood
The first thing you’ll need is a piece of wood to use as the base for your door hanger. You can use any type of wood you like, but MDF (medium-density fiberboard) is a popular choice because it’s easy to work with and doesn’t splinter. You can purchase pre-cut wooden bases from craft stores or cut your own from a larger piece of wood.
Paint and Brushes
Once you have your wooden base, you’ll need to choose a paint color and gather some brushes. Acrylic paint is a good choice because it dries quickly and is easy to clean up. You’ll also want to have a few different sizes of brushes on hand so you can paint both large and small areas.
Decorative Elements
To make your door hanger stand out, you’ll want to add some decorative elements. This can include things like ribbon, greenery, or pre-made bows. You can also use stencils or stickers to add designs or words to your door hanger.
Tools
Finally, you’ll need a few tools to help you put everything together. A staple gun can be useful for attaching ribbon or other decorative elements, while a drill can be used to make holes for hanging your door hanger. You’ll also want to have some sandpaper on hand to smooth out any rough edges on your wooden base.
With these materials in hand, you’re ready to start creating your own beautiful wooden door hanger.
Choosing the Right Wood
When making a wooden door hanger, selecting the right type of wood is crucial. You want to choose a wood that is both lightweight and smooth, so it won’t be too heavy on the door and will be easy to paint or decorate.
Here are some popular types of wood to consider:
Medium-Density Fiberboard (MDF)
MDF is a popular choice for wooden door hangers because it is easy to work with and has a smooth surface. It’s made by breaking down hardwood and softwood and contains tiny wood fibers, so it won’t have any wood grain. MDF is also affordable and readily available at most hardware stores.
Birch Plywood
Birch plywood is a strong and durable option for door hangers. It has a beautiful wood grain that can add a rustic touch to your project. However, it can be more expensive than other types of wood.
Pine
Pine is another affordable option for door hangers. It’s lightweight and easy to work with, but it may have knots or other imperfections that can affect the final look of your project.
Cedar
Cedar is a great choice if you want a natural wood look for your door hanger. It’s lightweight, durable, and has a pleasant aroma. However, it can be more expensive than other types of wood.
When choosing the right wood for your door hanger, consider the look you want to achieve, your budget, and the tools you have available to work with. With the right wood and a little creativity, you can create a unique and beautiful door hanger that will add charm to any door.
Designing Your Door Hanger
When it comes to designing your wooden door hanger, there are a few things to consider. From sketching your design to choosing the right size, each step is important to ensure that you end up with a door hanger that you love.
Sketching Your Design
Before you start cutting your wood, it’s important to sketch out your design. This will give you a better idea of what your door hanger will look like and help you make any necessary adjustments before you start cutting.
When sketching your design, consider the following:
- What shape do you want your door hanger to be?
- What design elements do you want to include (e.g. text, images, patterns)?
- What colors do you want to use?
Once you have a rough sketch of your design, you can start refining it and making any necessary changes.
Choosing the Right Size
The size of your door hanger will depend on a few factors, including the size of your door and the design you have in mind. Here are a few things to keep in mind when choosing the right size:
- Make sure your door hanger is proportional to the size of your door. A door hanger that is too small or too large can look awkward.
- Consider the placement of your door hanger. If you plan to hang it on the front door, you may want to choose a larger size to make it more visible from the street.
- Think about the design elements you want to include. If you have a lot of text or images, you may need a larger size to fit everything.
Once you have a general idea of the size you want, you can start cutting your wood and bringing your design to life.
Cutting the Wood
Cutting the wood is one of the most important steps in making a wooden door hanger. It requires precision and attention to detail. In this section, we will discuss the safety precautions you should take before cutting the wood and the cutting techniques you can use.
Safety Precautions
Before cutting the wood, it is important to take some safety precautions to avoid accidents. Here are some tips to keep in mind:
- Wear safety goggles to protect your eyes from flying wood chips.
- Wear earplugs to protect your ears from the noise of the saw.
- Wear a dust mask to avoid inhaling sawdust.
- Keep your fingers away from the saw blade.
- Keep the saw blade guard in place.
- Make sure the wood is properly secured before cutting it.
- Always use a sharp blade.
Cutting Techniques
There are several cutting techniques you can use to cut the wood for your door hanger. Here are some of the most common techniques:
- Jigsaw: A jigsaw is a versatile tool that can be used to make curved cuts in the wood. It is perfect for cutting out the shape of your door hanger. To use a jigsaw, clamp the wood to a workbench and follow the outline of your design with the blade.
- Circular Saw: A circular saw is a powerful tool that can be used to make straight cuts in the wood. It is perfect for cutting the wood to the desired size. To use a circular saw, clamp the wood to a workbench and use a straight edge as a guide for the saw blade.
- Scroll Saw: A scroll saw is a specialized tool that can be used to make intricate cuts in the wood. It is perfect for cutting out small details in your design. To use a scroll saw, clamp the wood to a workbench and follow the outline of your design with the blade.
Remember to take your time and be patient when cutting the wood. It is better to make slow, steady cuts than to rush and make mistakes.
Finishing Your Door Hanger
Once you have painted your wooden door hanger, it’s time to finish it off with a protective coat. This will not only make your door hanger look more professional, but it will also help to protect it from the elements.
Sanding the Wood
Before applying any finish, it’s essential to sand your wooden door hanger. Sanding will remove any rough spots or imperfections, leaving you with a smooth surface to work with.
Start by using a coarse-grit sandpaper to remove any large bumps or ridges. Then, switch to a fine-grit sandpaper to smooth out the surface. Be sure to sand all sides of the door hanger, including the edges.
Once you have finished sanding, wipe the door hanger down with a damp cloth to remove any dust or debris.
Applying Finish
There are many different finishes you can use on your wooden door hanger, including varnish, polyurethane, and wax. Each has its own advantages and disadvantages, so it’s essential to choose the right one for your project.
Varnish is a popular choice for wooden door hangers as it provides a durable and long-lasting finish. It’s also available in a range of sheens, from matte to high gloss.
Polyurethane is another popular choice, as it’s easy to apply and dries quickly. It’s also very durable and resistant to scratches and stains.
Wax is a more traditional finish that provides a soft, natural look. It’s easy to apply and can be buffed to a high shine.
When applying your chosen finish, be sure to follow the manufacturer’s instructions carefully. Apply the finish in thin, even coats, and allow each coat to dry completely before applying the next.
With a little bit of sanding and the right finish, your wooden door hanger will look beautiful for years to come.
Adding Details
Now that you have your wooden door hanger base, it’s time to add some personality to it! Here are some tips on how to add details to your door hanger:
Painting Your Door Hanger
Painting is a great way to add color and design to your door hanger. Here are some steps to follow when painting your door hanger:
- Sand the surface of your wooden door hanger with fine-grit sandpaper to create a smooth surface for painting.
- Choose your paint colors and apply a base coat to your door hanger. You can use acrylic or spray paint depending on your preference.
- Once the base coat is dry, use stencils, paint pens, or brushes to add designs, patterns, or lettering to your door hanger.
- Allow the paint to dry completely before adding any accessories or hanging your door hanger.
Adding Accessories
Accessories can add a unique touch to your door hanger and make it stand out. Here are some ideas for accessories to add to your door hanger:
- Ribbon or Twine: Attach a ribbon or twine to your door hanger to create a hanger. You can also use ribbon or twine to create bows or knots for added decoration.
- Flowers or Greenery: Add silk or dried flowers or greenery to your door hanger to create a natural touch. You can use hot glue or wire to attach them securely.
- Embellishments: Buttons, beads, and other small embellishments can add a fun touch to your door hanger. Use hot glue to attach them securely.
- Vinyl Decals: Use vinyl decals to add lettering or designs to your door hanger. You can find pre-made decals or create your own using a vinyl cutter.
Remember, the key to adding details to your door hanger is to be creative and have fun! Experiment with different colors, designs, and accessories until you find the perfect combination that reflects your style.
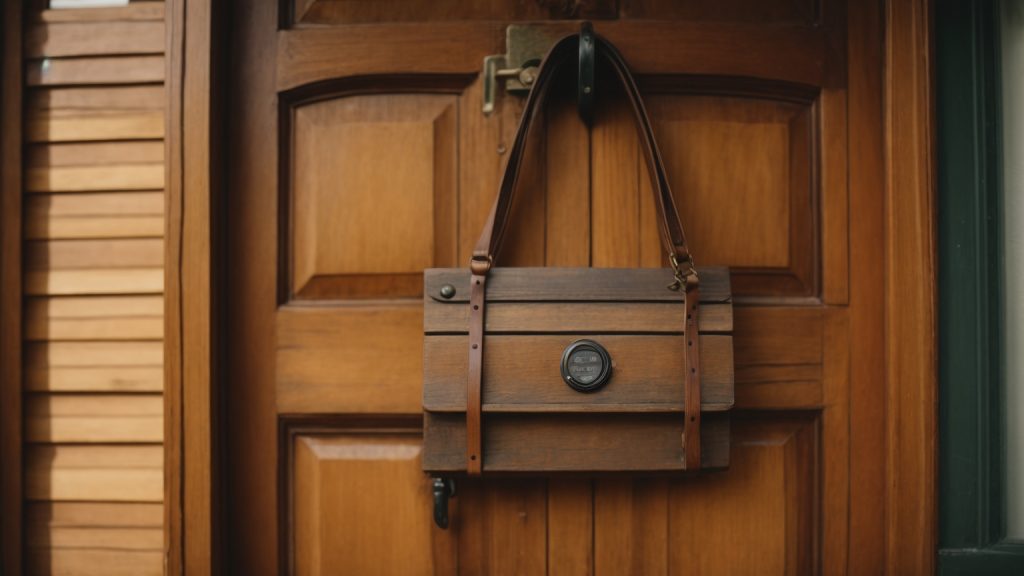
Hanging Your Door Hanger
Once you’ve finished creating your wooden door hanger, it’s time to hang it up! Here are a few tips to ensure your door hanger looks great and stays securely in place.
Choosing the Right Spot
Before you hang your door hanger, take a moment to consider where it will look best. You’ll want to choose a spot that is visible from the street and complements your home’s overall aesthetic. Consider hanging your door hanger on the front door, a side door, or even a fence or gate.
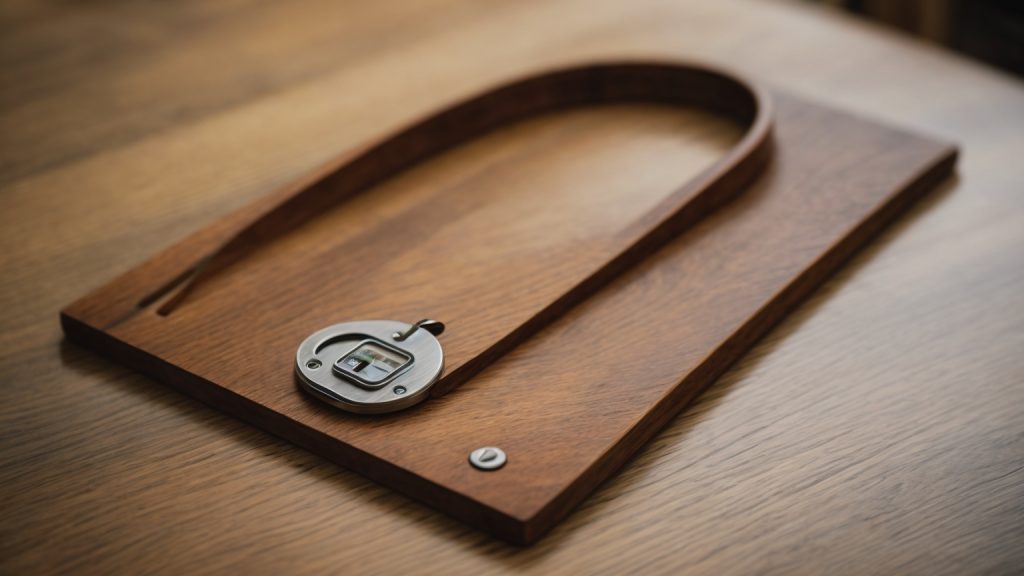
Hanging Hardware
To hang your door hanger, you’ll need to attach some hanging hardware to the back. You can use a simple picture hanger or a sawtooth hanger, depending on the weight of your door hanger. Make sure the hardware is securely attached to the back of the hanger and centered so that it hangs straight.
Hanging Your Door Hanger
Once your hardware is attached, it’s time to hang your door hanger. Hold the hanger up to the desired spot and mark where the hardware will go. Then, use a drill or screwdriver to attach the hardware to the surface. Make sure the hardware is securely attached and can support the weight of the door hanger.
Maintenance
To keep your wooden door hanger looking great, you may need to perform some maintenance from time to time. If the hanger becomes dirty or dusty, simply wipe it down with a damp cloth. If the finish begins to fade or wear away, you can apply a fresh coat of paint or stain to restore its appearance.
By following these simple tips, you can ensure that your wooden door hanger looks great and stays securely in place for years to come.