If you’re interested in making your own musical instrument, why not try making a wooden flute? Wooden flutes are a beautiful and unique addition to any musician’s collection. Plus, making your own flute can be a rewarding experience that allows you to customize the instrument to your liking.
There are several methods for making a wooden flute, but most involve selecting a piece of wood, cutting and drilling it to the appropriate size and shape, and then sanding and finishing the flute. Some common types of wood used for making flutes include elder wood, bamboo, and hardwoods like maple or walnut. Each type of wood has its own unique properties that can affect the sound and playability of the finished instrument.
Understanding the Basics of a Wooden Flute
Making a wooden flute can be a fun and rewarding experience, but before you dive into the process, it’s important to understand the basics of the instrument. Here are some key things to keep in mind:
Materials
The first step in making a wooden flute is choosing the right materials. Traditionally, flutes are made from wood such as elder, bamboo, or cedar. When selecting wood, it’s important to choose a piece that is straight, dry, and free of knots or cracks. You may also want to consider the density and grain of the wood, as this can impact the sound quality of the finished flute.
Design
Once you have your materials, it’s time to design your flute. There are many different styles and designs of flutes, each with its own unique sound and character. Some common designs include the Native American flute, the South American quena, and the Irish tin whistle. When designing your flute, consider factors such as the number of holes, the placement of the holes, and the length and diameter of the instrument.
Construction
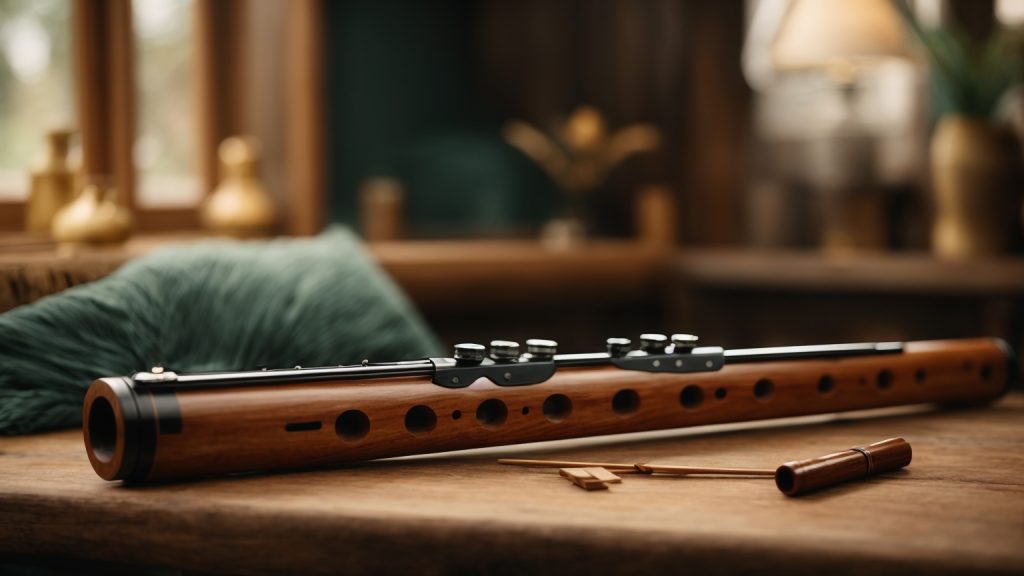
The construction of a wooden flute can be broken down into several steps. First, you will need to cut your wood to the appropriate length and shape it into a rough cylinder. From there, you will need to drill the finger holes and the mouthpiece, and then fine-tune the instrument to ensure that each note is in tune. Finally, you will need to sand and finish the flute to give it a smooth and polished appearance.
Playing
Once your flute is complete, it’s time to start playing! To play a wooden flute, hold the instrument horizontally and blow across the mouthpiece while covering and uncovering the finger holes to create different notes. With practice, you can learn to play a variety of songs and melodies on your handmade wooden flute.
Overall, making a wooden flute is a fun and rewarding experience that can result in a beautiful and unique instrument. By understanding the basics of the instrument and following the proper construction techniques, you can create a flute that sounds as good as it looks.
Materials Needed
If you’re interested in making a wooden flute, you’ll need to gather some materials before you get started. Here are the materials you’ll need:
Choosing the Wood
The type of wood you choose for your flute will have a significant impact on the sound quality and durability of the instrument. Some popular options include maple, walnut, cedar, and bamboo. When choosing your wood, you should consider the following factors:
- Density: The denser the wood, the better the sound quality. Look for wood that is heavy and hard.
- Straightness: The wood should be straight and free of knots or cracks that could weaken the structure of the flute.
- Moisture content: The wood should be dry and stable to prevent warping or cracking over time.
Other Essential Materials
In addition to the wood, there are a few other materials you’ll need to make your wooden flute:
- Saw: You’ll need a saw to cut the basic shape of the flute from your block of wood.
- Drill: A drill will be used to create the holes for the flute.
- File: You’ll need a file to smooth out the edges of the flute after cutting and drilling.
- Sandpaper: Sandpaper will be used to further smooth the flute and prepare it for finishing.
- Headjoint cork or cork sheet: This material is used to create a secure seal between the headjoint and the flute body.
- Flute keys: Depending on the design and complexity of the flute, various keys, springs, and rods may be needed.
Safety Precautions
When making a wooden flute, safety should be your top priority. You will be working with sharp tools and potentially hazardous materials, so it’s important to take the necessary precautions to avoid injury. Here are some safety tips to keep in mind:
Wear Protective Gear
Before you start working, make sure you’re wearing the appropriate protective gear. This includes safety glasses to protect your eyes from flying debris, a dust mask to prevent inhalation of sawdust, and gloves to protect your hands from sharp tools.
Use Sharp Tools
Using dull tools can be more dangerous than using sharp ones, as they require more force to use and can slip more easily. Make sure your tools are sharp and in good condition before you start working.
Work in a Safe Area
Make sure your work area is well-lit and free of clutter. Keep your tools organized and within easy reach, and make sure you have enough space to move around comfortably.
Use Tools Correctly
Make sure you know how to use your tools correctly before you start working. Follow the manufacturer’s instructions and use the appropriate tool for the job.
Take Breaks
Working for extended periods of time can lead to fatigue, which can increase the risk of injury. Take regular breaks to rest and stretch your muscles.
By following these safety precautions, you can minimize the risk of injury and create a wooden flute safely and efficiently.
Designing Your Flute

When it comes to making a wooden flute, designing it is one of the most important steps. It will determine the sound quality, the comfort of holding it, and the overall look of the instrument. Here are some tips to help you design your own wooden flute.
Determining the Size
The size of your flute will depend on your personal preference and the type of music you want to play. A good rule of thumb is to make it as long as your forearm from elbow to fingertips. This will ensure that the flute is comfortable to hold and play.
You will also need to decide on the diameter of the flute. A larger diameter will produce a deeper and fuller sound, while a smaller diameter will produce a higher and brighter sound. Experiment with different diameters to find the one that produces the sound you like.
Deciding the Number of Holes
The number of holes on your flute will depend on the type of music you want to play. A standard wooden flute has six holes, but you can add more or fewer holes depending on your preference.
If you are a beginner, it is recommended that you start with six holes. This will allow you to play a wide range of notes and melodies. As you become more experienced, you can experiment with adding more holes to your flute.
When deciding on the placement of the holes, it is important to consider the spacing between them. The spacing will affect the sound quality and playability of the flute. You can use a flute hole placement chart to help you determine the optimal spacing for your flute.
By following these tips, you can design your own wooden flute that is comfortable to hold, produces the sound you like, and looks great. Once you have designed your flute, you can move on to the next step of actually making it.
Carving the Flute
Carving a wooden flute can be a fun and rewarding experience. With the right tools and techniques, you can create a beautiful instrument that produces rich and melodious sounds. In this section, we will go over the two main steps involved in carving a wooden flute: carving the body and drilling the holes.
Carving the Body
The first step in carving a wooden flute is to create the body of the instrument. To do this, you will need a block of hardwood, such as maple or walnut, and a saw to cut the basic shape of the flute. Once you have the basic shape, you can use a carving knife or chisel to shape the body of the flute.
When carving the body, it is important to pay attention to the shape and size of the flute. The body should be tapered towards one end, and the diameter of the flute should be consistent throughout its length. You can use a caliper to ensure that the diameter is consistent.
It is also important to carve the body in a way that allows for proper air flow. The air should flow smoothly through the flute without any obstructions or turbulence. To achieve this, you can create a slight curve in the body of the flute.
Drilling the Holes
Once you have carved the body of the flute, the next step is to drill the holes for the notes. You will need a drill to create the holes, and a file to smooth out the edges of the holes.
When drilling the holes, it is important to pay attention to the size and placement of the holes. The size of the holes will determine the pitch of the notes, and the placement of the holes will determine the fingering positions. You can use a tuning app or a chromatic tuner to ensure that the holes are drilled to the correct size and placement.
After drilling the holes, you can use a file to smooth out the edges of the holes. This will ensure that the air flows smoothly through the holes, and that the notes are clear and crisp.
In conclusion, carving a wooden flute requires patience, skill, and attention to detail. By following these steps, you can create a beautiful instrument that produces rich and melodious sounds.
Finishing Touches
After you have completed the main construction of your wooden flute, it is time to add the finishing touches to make it look and sound great.
Sanding
The first step in finishing your wooden flute is sanding. Sanding helps to smooth out any rough edges and surfaces, making the flute more comfortable to play. You can use sandpaper of different grits to achieve different levels of smoothness. Start with a coarse grit, such as 120, and work your way up to a finer grit, such as 400 or 600. Be sure to sand in the direction of the wood grain to avoid damaging the wood.
Applying Finish
After sanding, it’s time to apply a finish to your wooden flute. A finish not only makes the flute look nice, but it also protects the wood from moisture and wear. There are several types of finishes you can use, including oil-based finishes, water-based finishes, and wax finishes.
Oil-based finishes, such as tung oil or linseed oil, penetrate the wood and provide a natural, matte finish. Water-based finishes, such as polyurethane or acrylic, dry quickly and provide a hard, durable finish. Wax finishes, such as beeswax or carnauba wax, provide a soft, protective layer that can be buffed to a shine.
To apply the finish, use a clean cloth or brush and apply a thin, even coat to the entire flute. Let the finish dry completely before sanding lightly with a fine grit sandpaper. Repeat this process until you have achieved the desired level of finish.
With these finishing touches, your wooden flute will be ready to play and admire.
Tuning Your Flute
Once you have finished making your wooden flute, it’s important to tune it properly. Here are some tips to help you get the perfect sound from your flute:
1. Use a Tuner
Using a tuner is the easiest way to tune your flute. Simply play each note and adjust the tuning until it matches the desired note on the tuner. Make sure to check each note, starting from the lowest note to the highest note.
2. Adjust the Embouchure Hole
If your flute is still out of tune after using a tuner, you can try adjusting the size of the embouchure hole. A smaller hole will make the note sharper, while a larger hole will make the note flatter. Use a file to adjust the size of the hole until the note is in tune.
3. Adjust the Finger Holes
If your flute is still out of tune after adjusting the embouchure hole, you can try adjusting the size and position of the finger holes. A smaller hole will make the note sharper, while a larger hole will make the note flatter. You can also try moving the holes slightly to adjust the pitch.
4. Use a Drone
Using a drone is another way to tune your flute. Simply play the drone note and adjust your flute until it matches the pitch of the drone. This method is especially useful for tuning the lower notes of the flute.
5. Practice
Tuning your flute takes practice. Keep practicing until you can easily tune each note without the help of a tuner. With practice, you’ll be able to hear when your flute is out of tune and make the necessary adjustments.
By following these tips, you’ll be able to tune your wooden flute and get the perfect sound. Keep in mind that tuning can be a time-consuming process, but it’s worth it to get the best possible sound from your flute.
Maintaining Your Wooden Flute
Congratulations on making your own wooden flute! Now that you have a beautiful instrument, it’s important to take care of it to ensure it lasts for years to come. Here are some tips for maintaining your wooden flute:
Cleaning Your Flute
After each use, it’s important to clean your flute to remove any moisture or debris that may have accumulated. Here’s how:
- Take apart your flute and remove any excess moisture with a dry cloth.
- Use a cleaning rod with a cloth or feather to clean the inside of the flute.
- Use a soft cloth to wipe down the outside of the flute.
Avoid using any harsh chemicals or water on your wooden flute, as this can damage the wood.
Oiling Your Flute
To keep your wooden flute from drying out, it’s important to oil it regularly. Here’s how:
- Use a soft cloth to apply a thin layer of oil to the outside of the flute.
- Let the oil sit for a few minutes, then wipe off any excess with a clean cloth.
Be sure to use a high-quality oil specifically designed for wooden instruments. Avoid using vegetable or cooking oils, as these can go rancid and damage the wood.
Storing Your Flute
When you’re not playing your flute, it’s important to store it properly to prevent damage. Here’s how:
- Always store your flute in its case to protect it from dust, moisture, and other environmental factors.
- Avoid storing your flute in extreme temperatures or humidity, as this can cause the wood to warp or crack.
- If you’re traveling with your flute, make sure to pack it securely to prevent any damage during transport.
By following these simple maintenance tips, you can ensure that your wooden flute stays in great condition for years to come.